

Comment ajouter des incrustations ou des motifs personnalisés dans la résine (découpe au laser ou avec une Cricut)
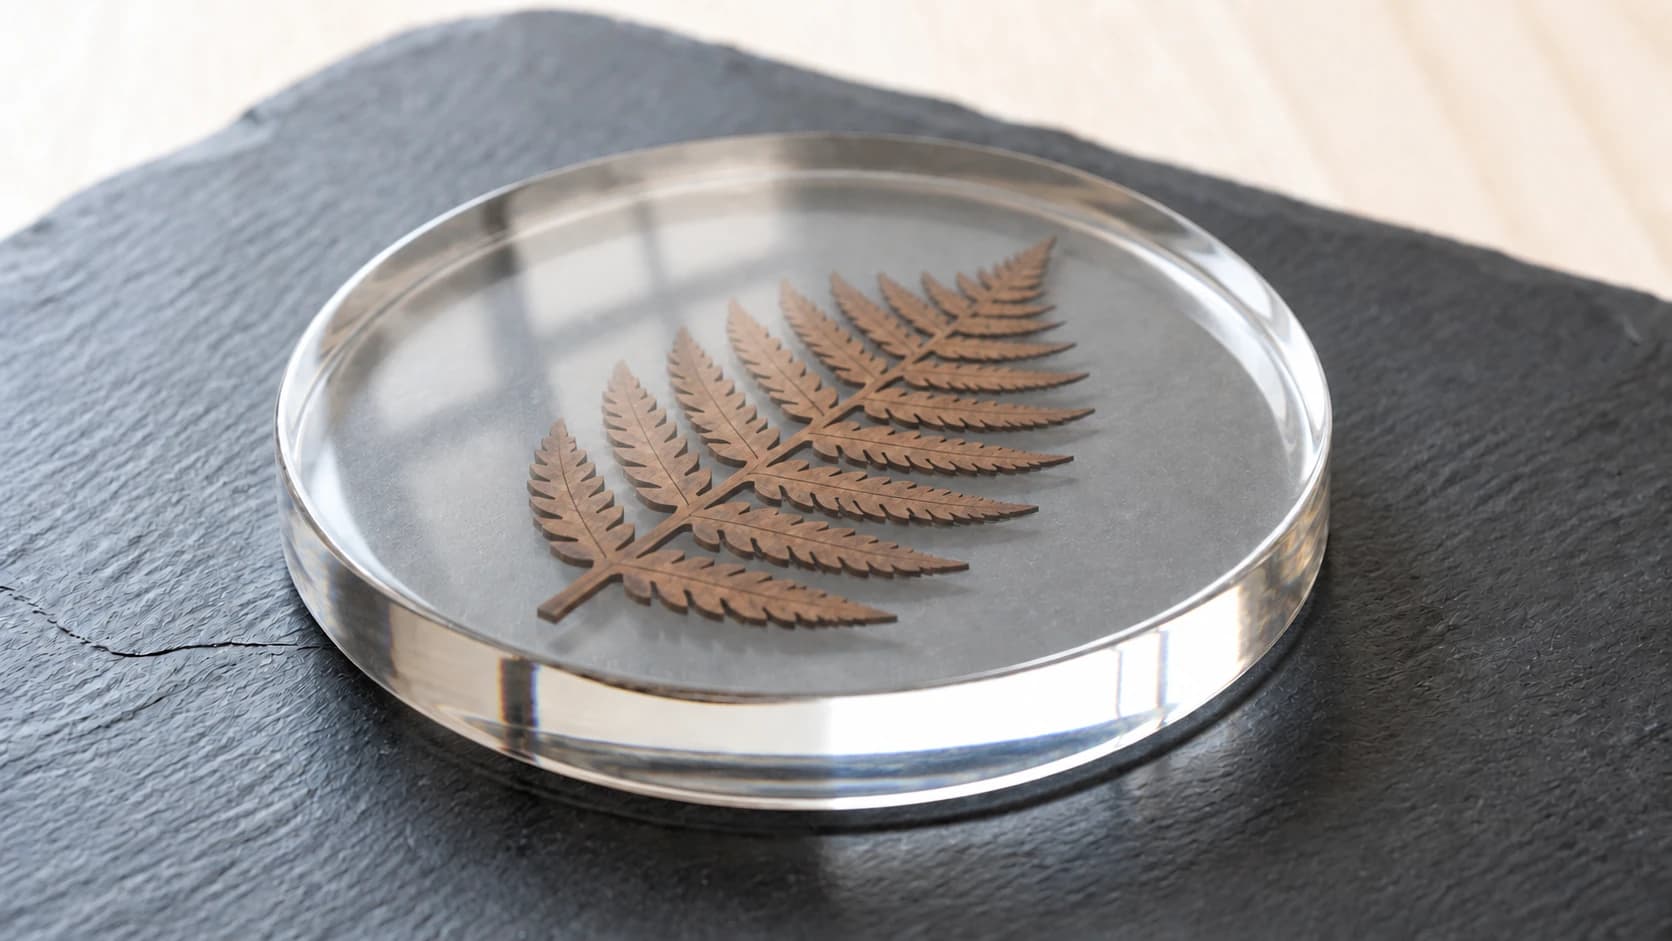
Vous avez déjà vu ces dessous de verre. Une fougère en bois aux contours nets, une silhouette en papier, un mandala en vinyle métallique, parfaitement à niveau dans une résine parfaitement transparente, comme s'il y avait poussé. Puis vous essayez à votre tour, et le motif dérive vers un coin, se recroqueville sur les bords et se couvre d'une barbe de bulles pendant la nuit.
Le plus frustrant, c'est que rien de tout cela ne vient du fait que la résine serait difficile à utiliser. Cela vient de trois erreurs précises : couler une couche trop profonde, sauter la couche de scellement sur un motif poreux et déposer la pièce à sec. Corrigez ces trois points et les motifs incrustés deviennent l'une des techniques les plus fiables du travail de la résine.
Ce guide couvre tout le parcours : concevoir le motif, le transformer en vecteur prêt à découper, le découper au laser ou avec une Cricut, puis l'incruster avec des coulées en plusieurs couches pour qu'il reste en place sans flotter ni emprisonner de bulles.
Ce que c'est (et ce que ce n'est pas)
Faisons rapidement le point, car « incrustation » désigne deux choses différentes dans le monde des makers.
L'incrustation traditionnelle consiste à insérer un matériau plein dans un creux pratiqué dans un autre matériau plein, par exemple des formes en noyer collées dans des logements découpés dans une planche d'érable. Si c'est ce que vous cherchez, notre guide des incrustations multicolores en bois couvre tout le processus, notamment la génération des pièces et des logements correspondants.
Cet article traite de l'autre procédé : une illustration plate découpée, suspendue à l'intérieur d'une résine transparente. La résine constitue le corps de la pièce, et votre motif découpé y flotte comme un fossile dans l'ambre. Cette technique convient aux dessous de verre, plateaux, bijoux, porte-clés, marque-pages, fenêtres de tables-rivières et pratiquement à tout moule que vous possédez.
Le motif lui-même peut être presque tout ce que vous pouvez découper en faible épaisseur et à plat :
| Matériau | Découpe avec | Épaisseur typique | Sceller avant l'incrustation ? |
|---|---|---|---|
| Placage de bois | Laser (certaines machines Cricut avec une lame Deep-Point) | ~0.5 à 0.6 mm | Oui, toujours |
| Papier cartonné / papier | Laser ou Cricut | ~0.2 à 0.4 mm | Oui, toujours |
| Vinyle adhésif | Cricut ou Silhouette | ~0.1 mm | Généralement non |
| Acrylique | Laser | 1 à 3 mm | Non |
| Feuille artisanale / métallique | Cricut | ~0.1 à 0.4 mm | Tester d'abord |
Ces épaisseurs sont indicatives ; les produits varient, vérifiez donc l'emballage ou le profil de matériau de votre machine pour la feuille que vous avez effectivement achetée. Plus fin est généralement préférable. Une silhouette en placage de 0.5 mm donne l'impression d'un motif flottant dans du verre. Une pièce en acrylique de 3 mm ressemble à un objet enfermé dans la résine, ce qui peut aussi être très esthétique, mais elle nécessite un moule plus profond et davantage de couches pour être recouverte.
IMPRIMEZ. DÉCOUPEZ. GRAVEZ.



- Plusieurs formats (SVG, DXF, PNG)
- Créations testées sur machine
- Licences commerciales
Sponsorisé par PrintCutCarve.com
Étape 1 : passez votre motif au format vectoriel
Votre machine découpe le long de tracés, et les contours vectoriels offrent les tracés les plus nets et les plus réutilisables. Cricut Design Space peut convertir automatiquement certaines images matricielles importées en formes de découpe, mais un véritable vecteur offre une découpe plus prévisible et fonctionne avec la plupart des flux de travail au laser et à la machine de découpe. Si vous concevez déjà dans un logiciel vectoriel, passez à la suite. Si votre motif est un croquis, une photo de dessin ou un PNG que vous avez créé ou acheté, convertissez-le d'abord.
- Commencez par une image nette et très contrastée. Les silhouettes, les dessins au trait et les logos simples s'incrustent très bien. Les détails très fins deviennent fragiles une fois découpés dans du placage ou du papier, et presque invisibles quand la résine les entoure. S'il se casserait sous forme de flocon en papier, simplifiez-le.
- Importez-le dans MonoTrace. MonoTrace convertit gratuitement les images en contours SVG nets, sans crédits. Connectez-vous, importez l'image, ajustez le seuil jusqu'à ce que l'aperçu affiche exactement les formes à découper, puis téléchargez le SVG.
- Vérifiez les îlots détachés. Tout élément qui tomberait lors de la découpe (le centre d'un « O », les espaces à l'intérieur d'une feuille) doit soit devenir une petite pièce séparée à placer à la main, soit être relié au reste dans le design. Les petites pièces intérieures détachées sont difficiles à aligner sous la résine ; reliez-les lorsque c'est possible.
- Convertissez le format si votre machine est exigeante. Cricut Design Space accepte directement les SVG. Certains logiciels laser préfèrent le DXF. File Converter convertit les SVG en DXF sans consommer de crédits d'outil, ainsi que les images, afin que le format ne soit jamais ce qui vous arrête. Le téléchargement du fichier converti nécessite un abonnement payant actif.
- Dimensionnez-le par rapport au moule, pas à votre écran. Mesurez la cavité du moule et laissez une bordure visible de résine transparente de chaque côté. Environ 5 mm est une bonne règle générale pour des pièces de la taille d'un dessous de verre. Un motif qui touche la paroi du moule peut laisser la résine s'infiltrer dessous et finir par avoir l'air comprimé.
Conseil
Réponse courte pour tout le projet : vectorisez gratuitement votre motif avec MonoTrace, découpez-le dans un placage fin ou du papier cartonné, scellez complètement tout matériau poreux, coulez une couche de base et laissez-la atteindre le stade de gel collant, déposez le motif sur cette couche avec une goutte de résine dessous, puis coulez la couche supérieure. C'est la base collante qui empêche le motif de flotter et de dériver.
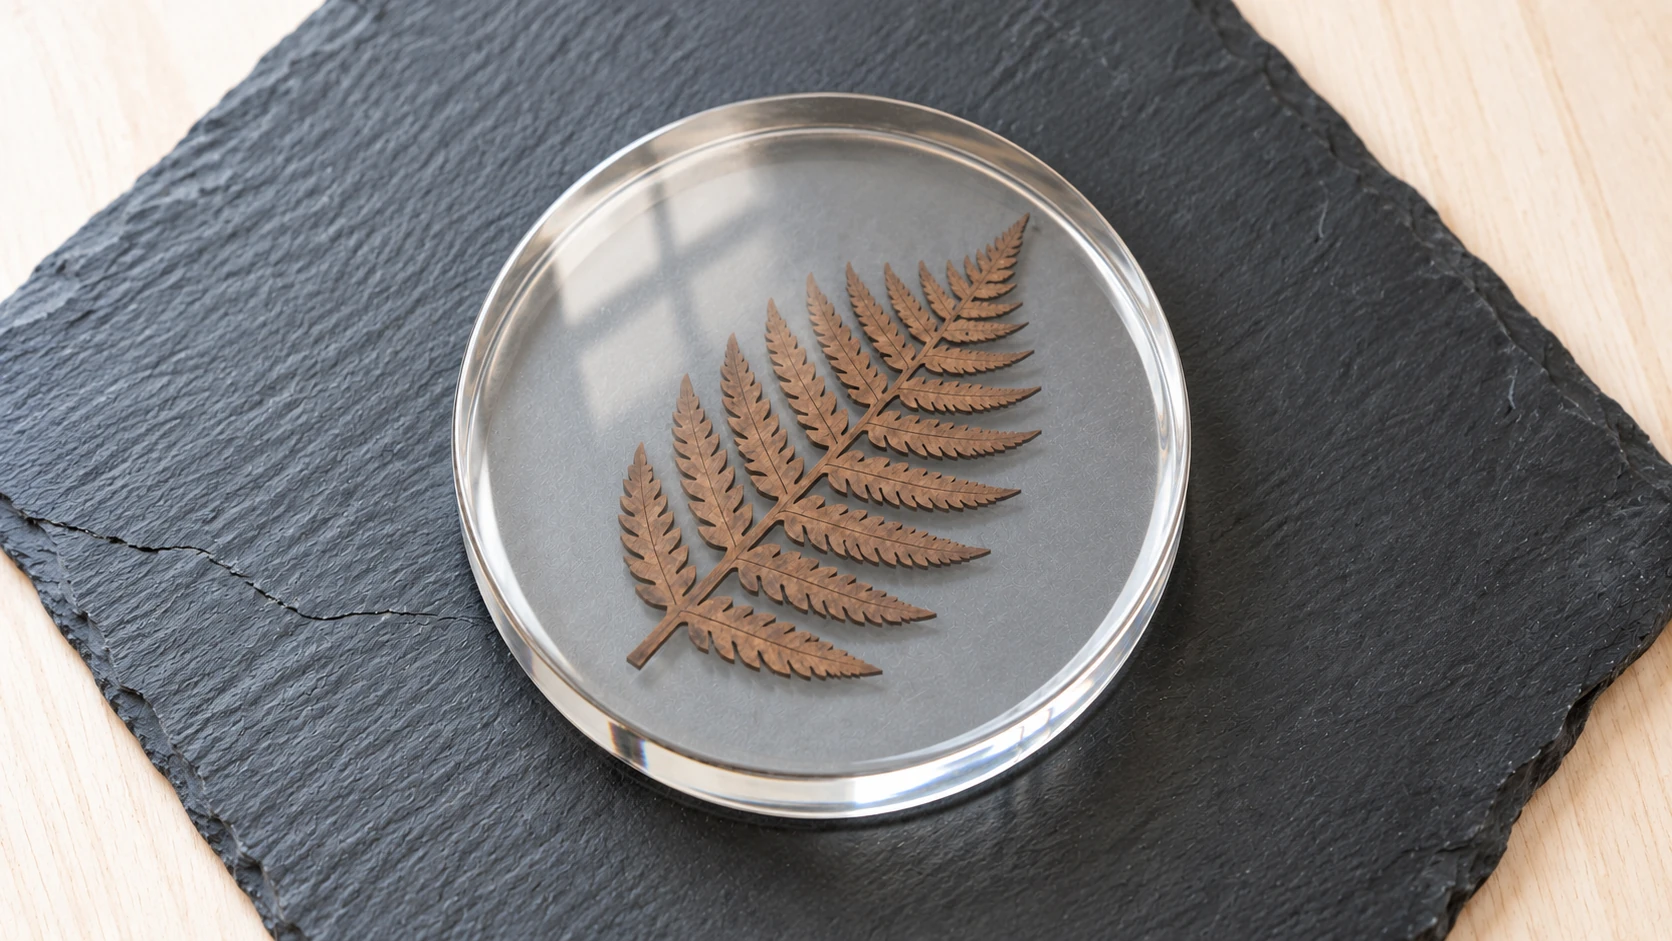
Laissez de la résine transparente autour de l’ensemble du motif, tige comprise. Cette vue de l’exemple terminé permet de mieux voir la bordure.
Étape 2 : découpez le motif
Au laser : le placage et le papier cartonné se découpent rapidement à faible puissance. Utilisez les réglages recommandés par votre machine pour les matériaux fins et découpez une petite forme d'essai avant de vous attaquer à votre beau placage. Deux passages légers donnent souvent de meilleurs résultats qu'un seul passage très chaud sur le placage, car les bords brûlés diffusent un voile brun dans la résine. Si les bords découpés sont couverts de suie, essuyez-les délicatement avec un chiffon à peine humide et laissez complètement sécher la pièce.
Avec une Cricut ou une Silhouette : le papier cartonné, le vinyle et la feuille artisanale sont des matériaux courants ; vérifiez que votre feuille exacte figure dans la liste des matériaux de la machine avant de vous lancer. Pour un motif en vinyle, désherbez-le comme d'habitude, puis utilisez du ruban de transfert pour garder les designs composés de plusieurs parties alignés. Vous pouvez ainsi placer le vinyle d'un seul bloc, ce qui constitue un véritable avantage par rapport aux pièces détachées découpées au laser pour les designs complexes.
Quel que soit le matériau découpé, faites-en deux exemplaires. Le premier vous servira de pièce d'essai pour la couche de scellement et le placement. Découper une pièce de rechange ne coûte que quelques centimes. Refaire une coulée, en revanche, non.
Étape 3 : scellez tout ce qui est poreux (ne sautez pas cette étape)
C'est l'étape qui distingue les incrustations nettes de celles qui sont gâchées. Le bois et le papier contiennent beaucoup d'air. Si vous les plongez dans la résine sans les sceller, cet air s'échappe pendant des heures sous forme de microbulles, tandis que la résine pénètre et rend le papier translucide et taché. Le bois peut également libérer des tanins qui jaunissent la résine environnante.
- Enduisez toute la pièce. Les deux faces et, surtout, chaque bord découpé. Les bords sont du bois de bout sur le placage et des fibres brutes sur le papier, et ils absorbent la résine le plus rapidement. Une fine couche du même époxy que celui que vous allez couler fonctionne bien, appliquée au moyen d'un petit pinceau. Les produits de scellement transparents à séchage clair conçus pour les loisirs créatifs sur papier conviennent également au papier cartonné ; suivez les instructions du fabricant concernant les couches et le temps de séchage.
- Laissez la couche de scellement durcir complètement avant l'incrustation, conformément au calendrier de durcissement du fabricant. Une couche encore collante s'étalera et deviendra trouble au contact de la coulée.
- Vérifiez le dos. Tenez la pièce scellée devant une source lumineuse et recherchez les zones ternes, qui correspondent à des parties non scellées susceptibles de faire des bulles plus tard.
Le vinyle et l'acrylique sont déjà non poreux et peuvent donc généralement être utilisés tels quels. La seule réserve concernant le vinyle adhésif est l'adhésif lui-même : certains réagissent avec la résine et créent un léger voile sur le bord. C'est précisément le rôle de la pièce d'essai de l'Étape 2.
Avertissement
Les échecs de scellement ne se voient pas immédiatement. La pièce paraît parfaite au moment de la coulée, puis le matin venu, un halo de microbulles suit les contours de votre motif. Si vous voyez des zones ternes et mates sur le placage ou le papier après le scellement, scellez à nouveau. L'objectif est une couverture complète : suivez donc les instructions du fabricant du produit de scellement concernant les couches et le durcissement, et testez d'abord sur une chute.
Étape 4 : incrustez avec des coulées en plusieurs couches
Les coulées profondes en une seule fois sont à l'origine des éléments flottants. La plupart des inclusions légères flottent dans la résine liquide de coulée ; le bois et le papier commencent donc à remonter dès que vous vous éloignez, assez lentement pour que tout semble parfait lorsque vous quittez la pièce. Les couches éliminent ce problème physique.
- Coulez la couche de base. Environ un tiers à la moitié de la profondeur du moule, en mélangeant exactement selon le ratio et les instructions du fabricant. Si les instructions de votre résine l'autorisent, passez une torche ou un pistolet thermique au-dessus des bulles de surface en le gardant en mouvement et à la distance indiquée par le fabricant, puis couvrez la coulée pour la protéger de la poussière.
- Attendez le stade de gel collant. La résine doit être assez ferme pour que le motif ne s'enfonce pas, mais suffisamment collante pour le retenir. Le temps dépend entièrement de votre résine et de la température ambiante ; fiez-vous donc à la fenêtre de gel ou de recouvrement indiquée par le fabricant plutôt qu'à l'horloge. Touchez le bord de la coulée avec une phalange gantée : vous recherchez des fils et de la viscosité, sans transfert de liquide.
- Placez le motif avec de la résine dessous. Appliquez au pinceau ou déposez une petite quantité de résine fraîchement mélangée à l'endroit où la pièce reposera, puis posez le motif en commençant par un bord et en le déroulant à plat comme pour appliquer un protecteur d'écran. Cette couche humide sous le motif comble l'interstice microscopique qui retiendrait sinon une nappe d'air prisonnière sous votre motif, principale source de bulles autour des inclusions.
- Appuyez doucement et vérifiez la position immédiatement. Une fois qu'il adhère à la couche collante, il reste en place. Utilisez une pince à épiler ou un cure-dent, regardez directement par-dessus pour vérifier le centrage et corrigez toute inclinaison avant de continuer. Le sens de la face compte aussi : rappelez-vous qu'un moule de dessous de verre produit généralement une pièce avec la face visible orientée vers le bas.
- Coulez la couche supérieure. Coulez lentement, près de la surface, en commençant à côté du motif plutôt que dessus afin de ne pas le déplacer. Éliminez les bulles à la torche, couvrez la pièce et laissez-la tranquille pendant toute la durée de durcissement indiquée par le fabricant.
Pour les motifs épais comme l'acrylique de 3 mm, divisez également la coulée de recouvrement en deux couches, en respectant la profondeur de coulée maximale de votre résine. Les coulées qui dépassent cette profondeur peuvent chauffer suffisamment pour déformer certaines inclusions en acrylique fin ; restez donc dans la limite du fabricant et vérifiez les recommandations de température du fournisseur de l'acrylique si vous coulez en profondeur.
Information
Chaque coulée de ce processus suit les mêmes règles que tout autre travail de résine : ratio précis, mélange soigneux, pièce chaude, surface à niveau et protection contre la poussière. Si vos coulées échouent pour des raisons qui n'ont rien à voir avec le motif incrusté, consultez d'abord notre liste de contrôle des erreurs courantes avec la résine, car l'incrustation amplifie tous les problèmes déjà présents.
Problèmes courants et leurs causes
| Symptôme | Cause | Correctif pour la prochaine fois |
|---|---|---|
| Le motif a flotté jusqu'à la surface | Placé dans la résine liquide, sans couche de base collante | Attendre le stade de gel avant de le placer |
| Halo de bulles autour du motif | Bords non scellés ou absence de résine sous la pièce | Sceller chaque bord ; poser le motif humide sur une goutte de résine |
| Le papier est devenu transparent et taché | La résine a pénétré dans le papier non scellé | Sceller les deux faces et les bords, puis laisser durcir complètement avant l'incrustation |
| Voile brun qui se diffuse depuis le placage | Bords brûlés ou libération de tanins | Passages laser plus légers, essuyer la suie et sceller soigneusement |
| Le motif est de travers ou décentré | Ajusté trop tard, après la prise de la couche | Vérifier immédiatement par-dessus après la pose |
| Ligne de séparation trouble entre les coulées | Fenêtre de recouvrement dépassée ou surface poussiéreuse | Respecter le délai de recouvrement du fabricant et garder la pièce couverte |
Foire aux questions
Puis-je incruster du papier imprimé ordinaire, comme une photo à jet d'encre ?
Oui, mais le scellement est encore plus important, car certaines encres peuvent baver ou bouger au contact de la résine. La composition des encres et les traitements du papier varient beaucoup d'un produit à l'autre : scellez donc complètement les deux faces et tous les bords, puis faites d'abord un essai avec une impression de rechange, quelle que soit l'imprimante utilisée.
Le vinyle adhère-t-il au moule ou flotte-t-il au milieu ?
Les deux techniques sont valables. Coller le vinyle adhésif au fond du moule place le design au ras de la surface finie. Le suspendre entre les couches, comme décrit ci-dessus, le place visiblement à l'intérieur de la résine. C'est la méthode en couches qui donne l'impression d'un « motif flottant dans du verre ».
Quelle épaisseur de résine doit-il y avoir au-dessus du motif ?
Il faut suffisamment de résine pour que le motif ne perce jamais la surface, avec une marge pour un ponçage ou un dôme ultérieur. Quelques millimètres de résine transparente au-dessus donnent un bon résultat sur les dessous de verre. Pour les bijoux, même 1 à 2 mm peuvent suffire, car les pièces sont observées de près.
Mon design comporte beaucoup de petites pièces séparées. Comment les maintenir alignées ?
Découpez-les dans du vinyle et placez-les en une seule unité avec du ruban de transfert, ou reliez le design lors de l'édition vectorielle afin que les pièces restent physiquement connectées. Placer dix fines lamelles de placage détachées sur de la résine collante avec une pince à épiler est une épreuve de caractère dont vous pouvez simplement vous épargner la difficulté en adaptant votre design.
Commencez par le motif
La technique de coulée présentée ici s'apprend en un ou deux essais. Ce qui donne envie de conserver une pièce, c'est son motif, et cette partie est gratuite : tracez votre dessin, votre logo ou le gribouillage de votre enfant en un SVG propre avec MonoTrace ; si votre laser demande un DXF plutôt qu'un SVG, File Converter s'occupe de la conversion en quelques secondes. Les deux outils ne consomment aucun crédit. Le téléchargement du fichier converti nécessite un abonnement payant actif.
Si vous hésitez encore sur ce que vous allez incruster, notre article sur les idées de projets en résine pour débutants propose une liste complète de formes et de pièces qui fonctionnent bien avant de passer aux motifs personnalisés. Découpez deux exemplaires, scellez-les soigneusement et laissez la couche de base gélifier. C'est tout le secret.
Outils associés
Prêt à essayer ces outils ?
Inscrivez-vous gratuitement, sans carte bancaire. Les outils gratuits sont disponibles immédiatement.
Commencer gratuitement