

Primeiros passos com Beam Bench: da instalação à sua primeira gravação
O laser chega, você parafusa a estrutura e então vem a parte sobre a qual nenhum vídeo de unboxing avisa: a máquina não faz nada sozinha. Todo corte e toda gravação começam como um arquivo em um software, e encarar um software para laser pela primeira vez pode parecer como se sentar em uma cabine de comando.
Beam Bench é nosso aplicativo gratuito para laser, criado para tornar essa primeira hora menos intimidadora. Este guia leva você do download à sua primeira gravação e parte do princípio de que você nunca usou um laser. Ao final, você terá instalado o aplicativo, conectado sua máquina, configurado um design simples e gravado esse design em um pedaço de material de teste.
Dica
Resposta curta: baixe o Beam Bench gratuitamente em beambench.com, instale-o, adicione sua máquina em Configurações do dispositivo, desenhe ou importe um design, defina a velocidade e a potência da camada, confira em Visualização, faça o enquadramento na máquina e pressione Iniciar.
Antes de baixar qualquer coisa
Tenha isto por perto:
- Um laser compatível com GRBL. A maioria dos lasers de diodo para hobby é. Se sua máquina veio com uma pequena placa controladora e se conecta por USB, é muito provável que use GRBL. GRBL simples por conexão serial é o caminho totalmente compatível do Beam Bench. Uma lista maior de controladores (FluidNC, grblHAL, Marlin, Snapmaker 2.0, Smoothieware, vários modelos LaserPecker, Ruida RDC6442S pela rede, além de placas genéricas compatíveis com GRBL e Lihuiyu M2/M3 Nano) está disponível, mas atualmente aparece como experimental no aplicativo.
- Um cabo USB de dados. O que veio com sua máquina. Se você substituí-lo, confirme que é um cabo de dados, não um cabo exclusivo para carregamento.
- Material de teste. Um pedaço de compensado de 3mm é perfeito para a primeira gravação.
- Óculos de proteção para laser adequados ao comprimento de onda do seu laser, além de um local ventilado para trabalhar.
Uma observação honesta antes de começar: o Beam Bench está em beta pública. Ele é gratuito, está evoluindo rapidamente e, ocasionalmente, você encontrará alguma imperfeição. Quando algo for importante para a segurança ou para evitar problemas, este guia avisará.
IMPRIMA. CORTE. ENTALHE.



- Vários formatos (SVG, DXF, PNG)
- Designs testados em máquinas
- Licenças comerciais
Patrocinado por PrintCutCarve.com
Etapa 1: instale o aplicativo
Baixe o instalador da sua plataforma em beambench.com. O Beam Bench funciona no macOS 10.15 ou posterior (Intel ou Apple Silicon), no Windows 10 de 64 bits ou posterior e no Linux de 64 bits.
macOS
Abra o .dmg baixado e arraste o Beam Bench para Aplicativos; depois, abra-o a partir dali. As versões são assinadas e notarizadas, então devem abrir sem problemas. Se o Gatekeeper ainda impedir a abertura, clique com o botão direito no aplicativo e escolha Abrir, ou use Ajustes do Sistema, depois Privacidade e Segurança, depois Abrir Mesmo Assim.
Windows
Execute o instalador .exe e siga as instruções. Se o SmartScreen mostrar "O Windows protegeu o computador", clique em Mais informações e depois em Executar assim mesmo. Talvez você também precise de um driver serial para o laser, como veremos na etapa de conexão.
Linux
Torne o AppImage executável e execute-o:
chmod +x Beam.Bench_*.AppImage
./Beam.Bench_*.AppImage
Para se comunicar com um laser por USB, normalmente seu usuário precisa entrar no grupo dialout (sudo usermod -aG dialout $USER; depois, saia da sessão e entre novamente). Algumas distribuições usam uucp ou tty.
Etapa 2: conheça o aplicativo
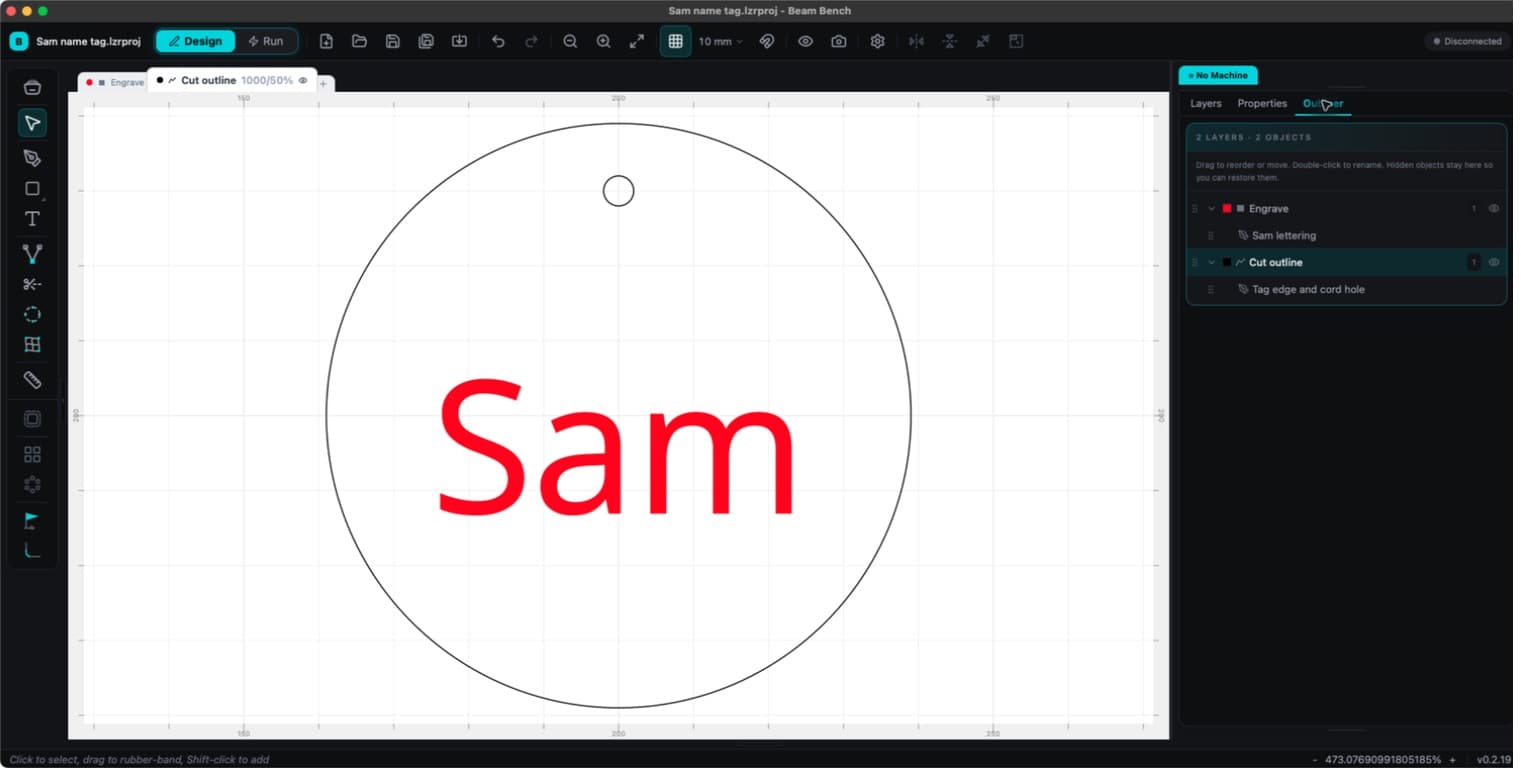
Na primeira inicialização, você vê um Untitled Project novo. As capturas de tela abaixo acompanham uma simples etiqueta com nome, para que você reconheça o mesmo design durante todo o fluxo de trabalho.
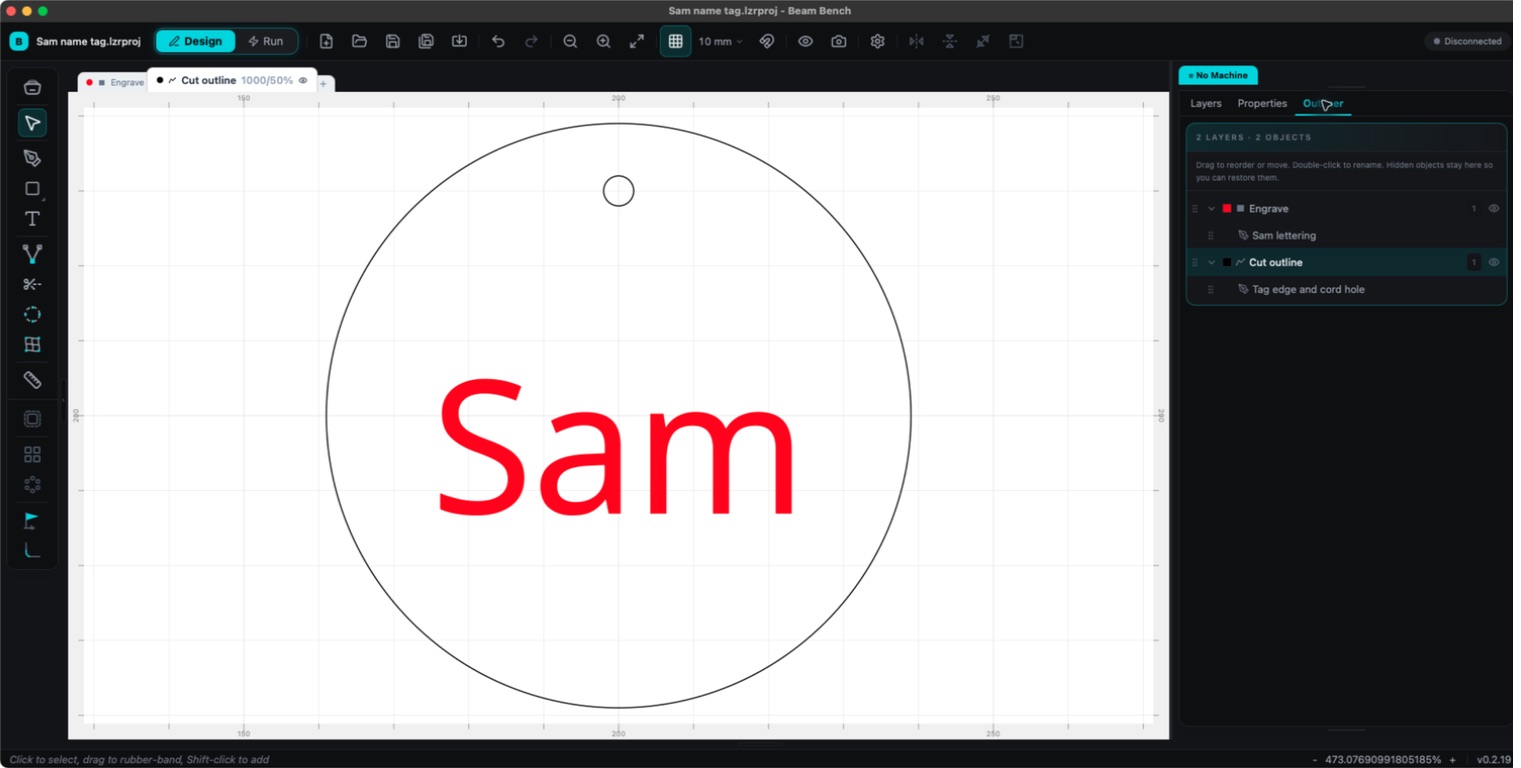
O conceito que faz o Beam Bench ficar fácil de entender é o seletor Design / Run no topo da janela. Design é onde você desenha e organiza os elementos. Run é onde você se comunica com a máquina. Você passará a maior parte do tempo em Design e mudará para Run quando chegar a hora de gravar.
Um tour rápido pelo modo Design:
- Barra de ferramentas superior: nome do projeto, seletor Design/Run, Novo, Abrir, Salvar, Importar, desfazer e refazer, zoom, alternâncias de grade e encaixe, Visualização e Configurações do dispositivo.
- Lado esquerdo: ferramentas de desenho (Selecionar, Desenhar, Formas, Texto e outras), além de ferramentas de modificação como Deslocamento e matrizes.
- Lado direito: painéis acoplados de Camadas, Propriedades e Estrutura.
- Acima da tela: as abas de camada coloridas aparecem assim que você desenha ou importa algo (um projeto novo começa sem nenhuma). As camadas permitem dizer ao laser "corte esta parte, grave aquela", e cada aba tem suas próprias configurações. Falaremos mais sobre isso na etapa 5.
Uma coisa importante: até você configurar um perfil de máquina, a tela mostra uma área de trabalho genérica de 400 x 400 mm. Isso é apenas um espaço reservado, não o tamanho real da mesa da sua máquina. A próxima etapa corrige isso.
Etapa 3: informe ao Beam Bench qual é o seu laser
Clique em Configurações do dispositivo na barra de ferramentas superior. A janela Dispositivos será aberta.
- Abra a aba Perfis. Clique em Novo, dê um nome ao perfil e Salve-o. Os botões de predefinição permanecem desativados até que o perfil seja salvo.
- Agora procure sua máquina, ou algo parecido, em Predefinição da máquina. Generic GRBL Diode é um bom ponto de partida para a maioria dos lasers de diodo. Escolha-o, clique em Visualizar para ver o que será preenchido e depois em Aplicar. Confira se o tamanho da mesa corresponde à sua máquina e clique em Definir como ativo. A tela agora corresponde à sua área de trabalho real.
- Abra a aba Conexão. Escolha Serial como tipo de conexão e selecione o Controlador e o Perfil.
- Conecte o laser, ligue-o e selecione sua Porta. Se nada aparecer, tente Mostrar todas as portas ou o botão de atualização.
- Escolha a Taxa de transmissão. 115200 é o padrão para máquinas GRBL e é o valor predefinido de Generic GRBL Diode. Depois, clique em Conectar e aguarde o status mostrar Pronto.
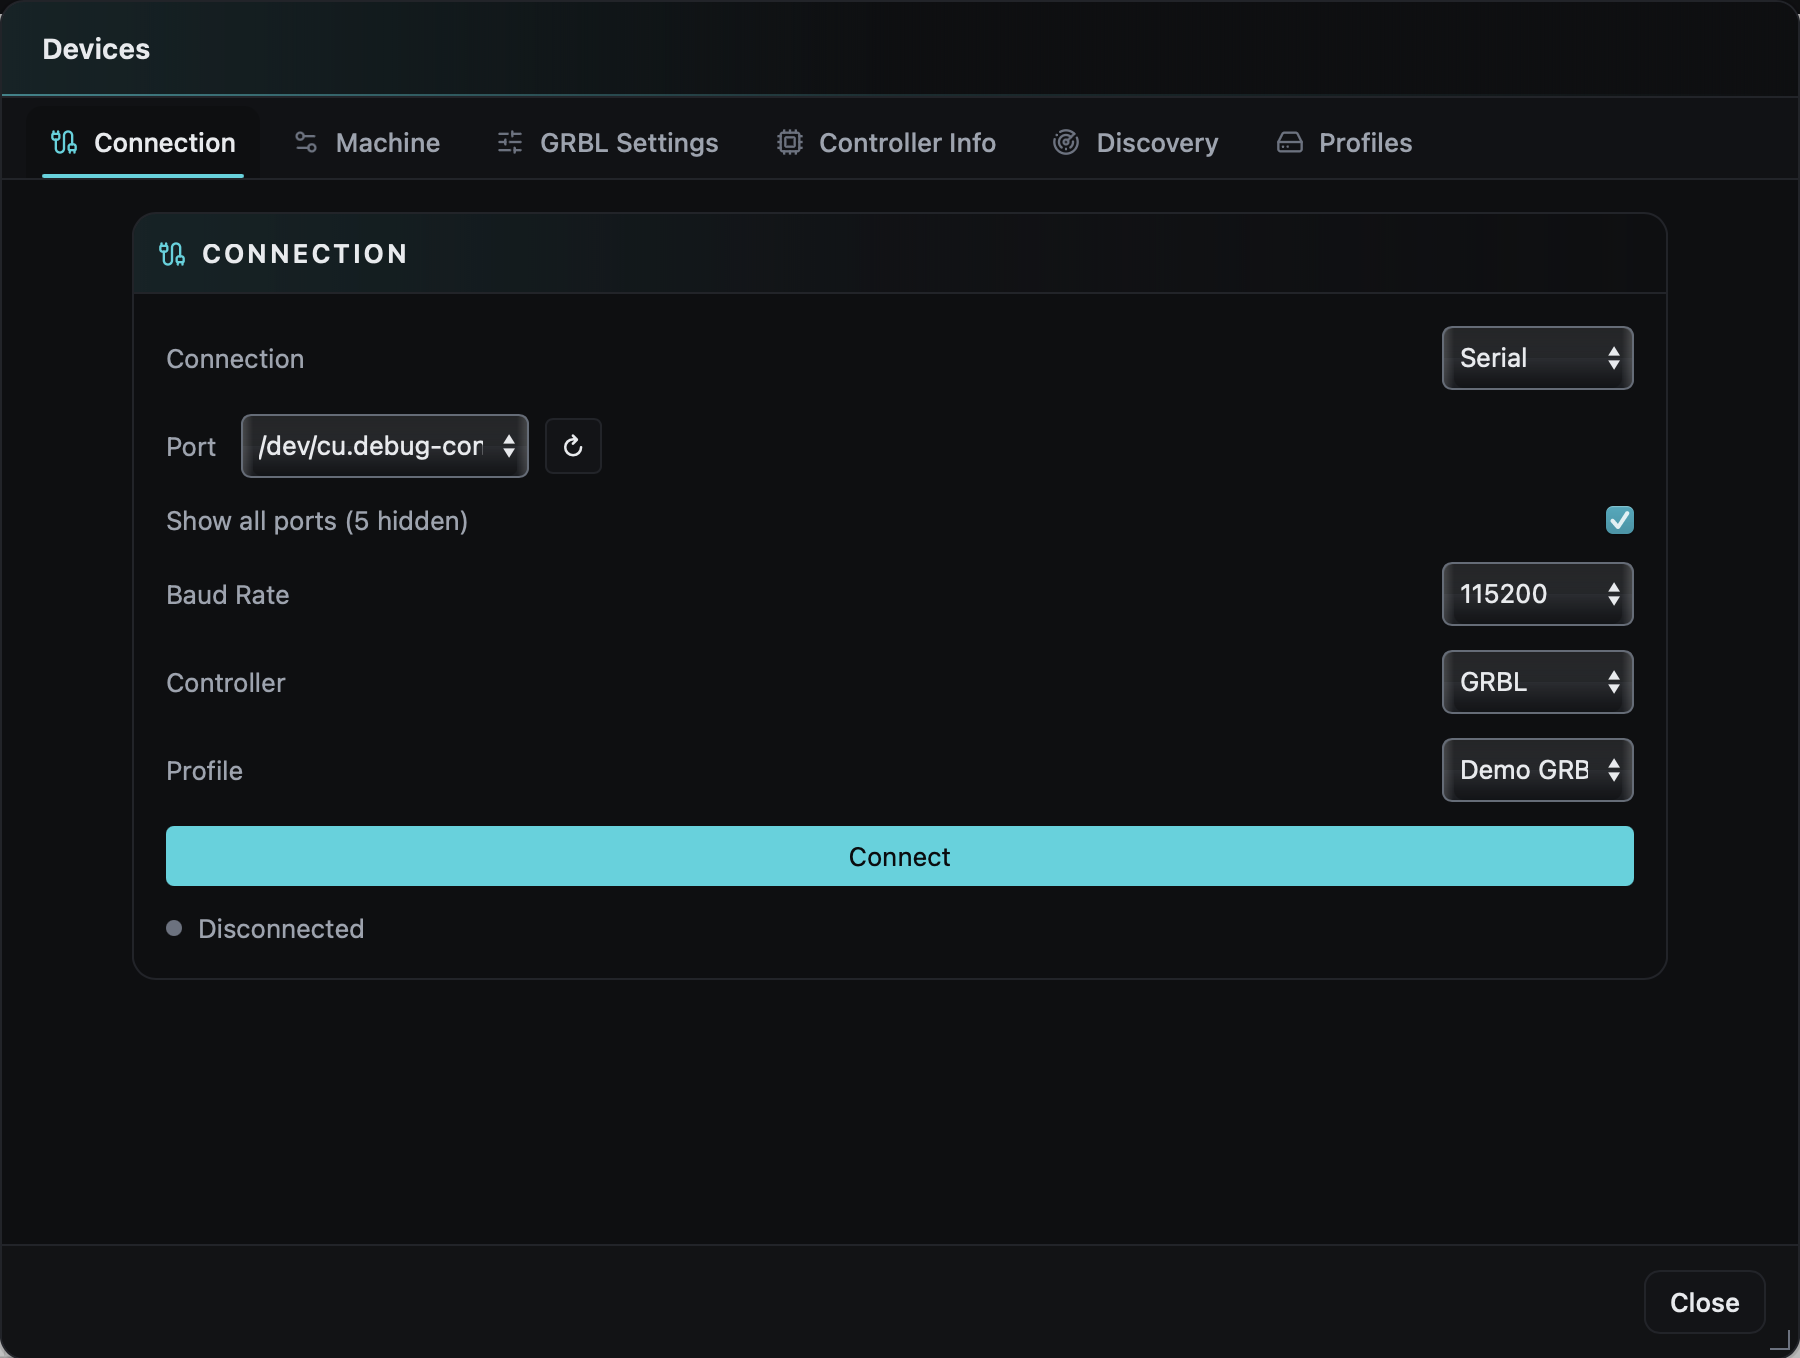
Há duas armadilhas comuns para iniciantes aqui:
Informação
Embora seu laser seja conectado por um cabo USB, escolha Serial, não USB, como tipo de conexão. Máquinas GRBL aparecem como portas seriais. A opção USB literal é destinada a uma família específica de placas de gravadores mais antigas.
No Windows, se nenhuma porta aparecer, provavelmente o chip serial da sua máquina precisa de um driver. Os mais comuns são CH340 e CP210x, disponíveis nos sites dos fabricantes dos chips; o manual do seu laser informará qual você precisa.
Etapa 4: coloque algo na tela
Para a primeira gravação, mantenha tudo simples. Duas boas opções:
Desenhe. Selecione a ferramenta Formas e arraste para criar um retângulo (mantenha Shift pressionado para fazer um quadrado). Adicione seu nome com a ferramenta Texto. Clique no menu de formas e você também encontrará elipses, estrelas e polígonos. Isso já é suficiente para um primeiro projeto.
Importe. Clique em Importar na barra de ferramentas (ou pressione Ctrl+I, Command+I no Mac, ou simplesmente arraste um arquivo para a tela). O Beam Bench lê arquivos vetoriais SVG, imagens comuns (PNG, JPG, BMP, GIF, TIFF, WebP, TGA), DXF, AI, PDF, EPS e até arquivos de projeto .lbrn / .lbrn2 de outros programas para laser, para que você possa aproveitar designs que já possui.
Dica
Tem uma imagem ou um logotipo que deseja cortar em vez de gravar? Primeiro, passe-o pelo MonoTrace. Ele é gratuito e transforma imagens em contornos SVG limpos, exatamente o que um laser precisa.
Etapa 5: velocidade, potência e passadas
Esta é a etapa que determina se o laser vai atravessar o material, gravar bem ou quase não deixar marca.
Cada objeto na tela pertence a uma camada, e cada camada contém suas próprias instruções para a máquina. Selecione uma aba de camada acima da tela para ver suas configurações no painel Layers. Os três números importantes:
| Configuração | O que ela faz |
|---|---|
| Velocidade | A rapidez com que o cabeçote se move. Mais devagar significa mais queima. |
| Potência (%) | A intensidade com que o laser dispara. Mais alta significa mais queima. |
| Passadas | Quantas vezes o trabalho é repetido. Mais passadas cortam mais profundamente. |
Cada camada também tem um Modo: Linha segue o contorno (esse é o corte), Preenchimento sombreia toda a forma (essa é a gravação) e Preenchimento com deslocamento é uma variante que trabalha das bordas para dentro. Se sua camada contiver uma foto ou outra imagem, o modo Imagem também aparecerá.
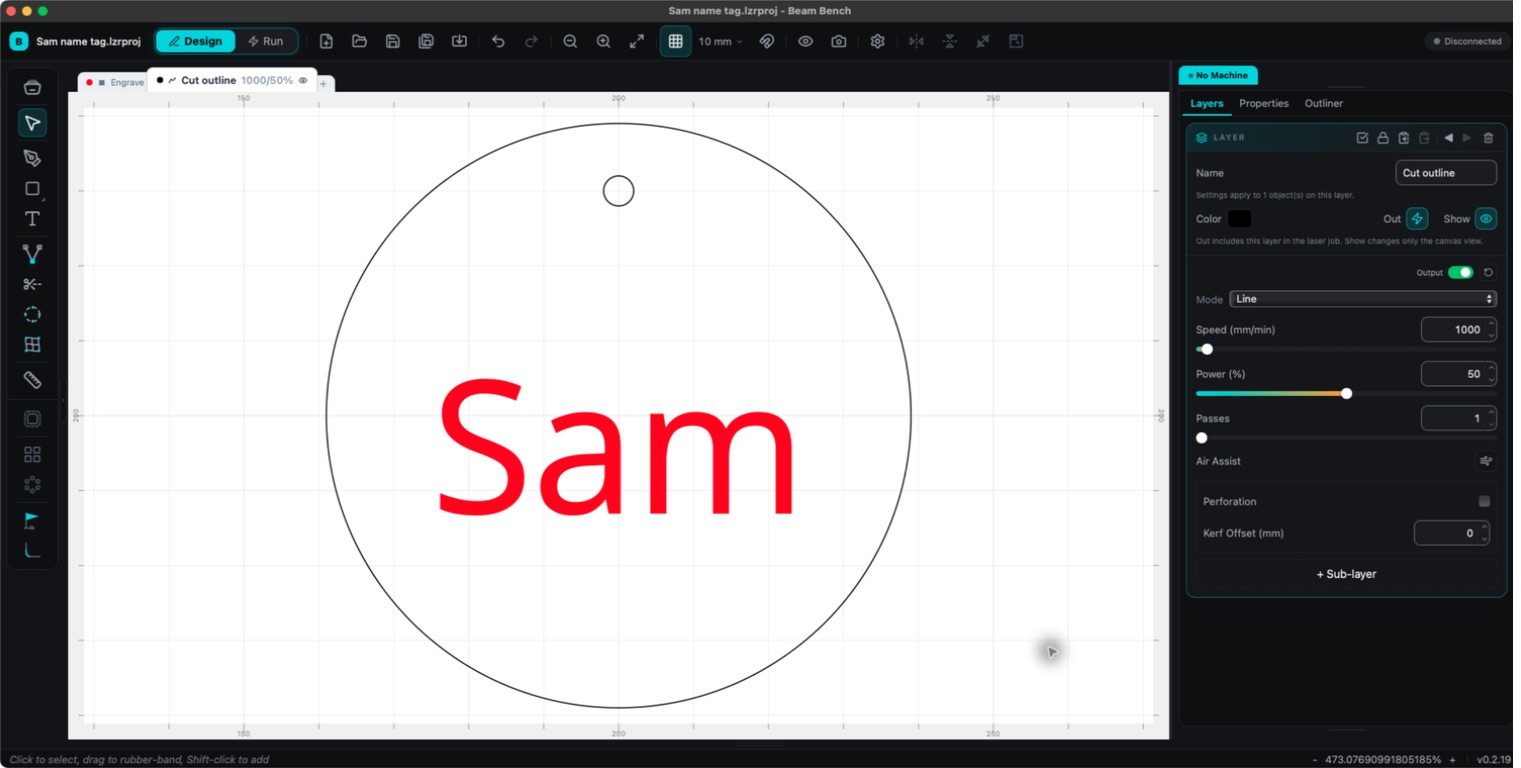
O contorno de corte tem suas próprias configurações de camada. Os valores exibidos são exemplos padrão, não configurações testadas para o seu laser ou material.
Que números você deve inserir? Sinceramente: teste em material de sobra. Cada máquina, lente e chapa de compensado é um pouco diferente, e as configurações que cortam bem em um diodo de 10W mal deixam marca em outro. Comece com cautela, faça um pequeno teste e ajuste. Quando encontrar configurações de que goste, salve-as na Biblioteca de materiais (no botão Biblioteca) para nunca precisar redescobri-las.
Etapa 6: visualize antes de gravar
Pressione Alt+P (ou clique em Visualização na barra de ferramentas). A janela de Visualização reproduz seu trabalho como um filme: você pode percorrer a linha do tempo, acelerá-lo em até 40x e ativar sobreposições como Mostrar deslocamento para ver como o cabeçote se moverá entre as formas.
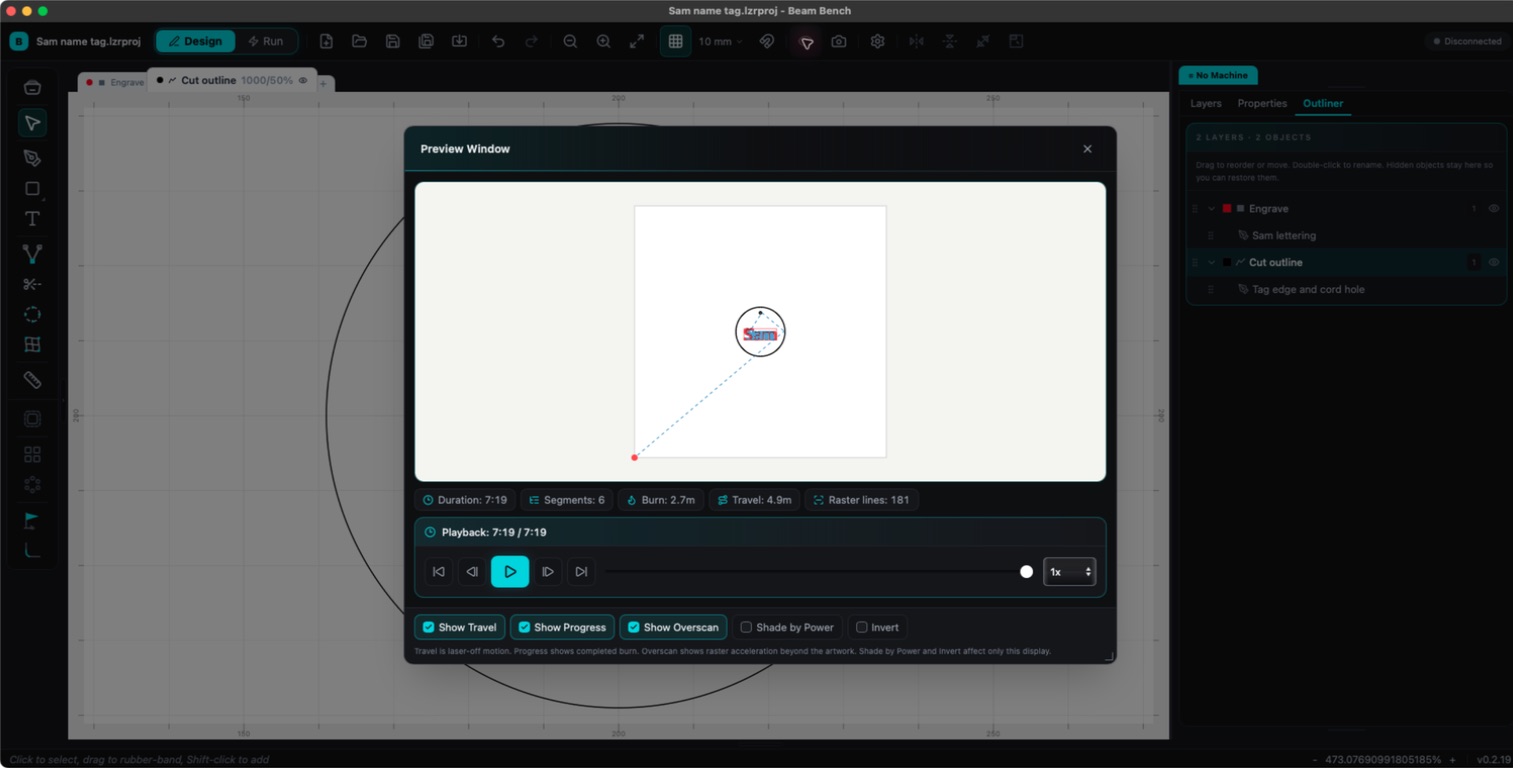
A visualização segue o mesmo design. Verifique a gravação, o furo para pendurar e o contorno externo antes de passar à máquina.
Trinta segundos aqui economizam material de verdade. Você está conferindo três coisas: tudo o que pretendia incluir está presente, nada está fora da área de trabalho e o corte acontece depois da gravação, não antes (a ordem das camadas é a ordem de execução; arraste as abas de camada para reordená-las).
Etapa 7: faça o enquadramento e grave
É hora de mudar o seletor de Design para Run. O espaço de trabalho muda: você terá controles de Movimento para deslocar o cabeçote do laser e um painel de Controle do laser com os botões importantes.
- Prenda ou coloque um peso sobre o material de teste e ajuste o foco do laser de acordo com as instruções da sua máquina.
- Clique em Enquadrar. Por padrão, o cabeçote percorre os limites do trabalho com o laser desligado, para que você veja exatamente onde ele ficará no material. O botão pede confirmação antes de mover o cabeçote. Ajuste o material e faça o enquadramento novamente. Vale conferir uma coisa: o painel também tem um modo Enquadrar: laser ligado, e um perfil de máquina pode mudar o enquadramento para esse modo; portanto, confirme que o botão mostra apenas Enquadrar antes de confiar que a passagem será sem emissão.
- Coloque os equipamentos de segurança. Depois, clique em Iniciar.
Aviso
Use seus óculos de proteção adequados, mantenha a ventilação funcionando e nunca deixe um laser ligado sem supervisão. Nem por um minuto. O material pode começar a queimar rapidamente, e um cortador a laser é a única ferramenta da oficina capaz de iniciar um incêndio enquanto você está na cozinha. Saiba onde ficam o interruptor físico de energia e a parada de emergência da máquina antes de pressionar Iniciar: o botão de Parar do software aciona uma parada de emergência pelo controlador (uma reinicialização suave no GRBL), mas um comando físico ao alcance da mão é a verdadeira rede de segurança.
Antes de qualquer movimento, o Beam Bench protege a execução em várias camadas. Iniciar e Enquadrar nem aparecem no Controle do laser até que a máquina esteja conectada e ociosa. Ao pressionar o botão, uma nova visualização é criada, e qualquer arte fora da área de trabalho interrompe tudo imediatamente com um erro de limites. Por fim, ocorre uma verificação preliminar (o controlador está no modo laser, a mesa corresponde ao perfil ativo, o homing está correto); se algo exigir atenção, uma janela de Verificação preliminar será aberta e informará o problema. Para quem está começando, essa é exatamente a proteção desejada. Uma verificação aprovada inicia o trabalho.
Durante a execução, você terá Pausar, Parar e Retomar, além de uma barra de progresso com o tempo decorrido e o tempo restante estimado. Quando terminar, deixe a fumaça se dissipar antes de levantar o material. Essa primeira peça merece ser guardada, esteja torta ou não.
Quando algo não funciona como deveria
- Nenhuma porta aparece. Cabo USB errado ou exclusivo para carregamento, ou, no Windows, driver CH340/CP210x ausente. No Linux, confira a participação no grupo
dialoutindicada na etapa de instalação. A opção Mostrar todas as portas na aba Conexão também vale um clique. - O instalador está bloqueado. O Gatekeeper no macOS e o SmartScreen no Windows têm opções para permitir a abertura, descritas na etapa 1.
- Não há botão Iniciar ou o trabalho não é executado. Iniciar e Enquadrar só aparecem no Controle do laser quando a máquina está conectada e ociosa; um estado de alarme conta como não ocioso, então faça o homing da máquina primeiro. Um erro de limites significa que parte do design está fora da área de trabalho. E, se a janela de Verificação preliminar abrir, leia-a; ela informa o problema.
- Algo mais está estranho. O aplicativo está em beta, e o painel Console no modo Run mostra a conversa bruta com o controlador, o que é muito útil ao pedir ajuda. Ajuda, depois Relatar um bug envia um relatório diretamente para nós.
Perguntas frequentes
O Beam Bench funcionará com meu laser?
Se for uma máquina GRBL com conexão serial, o que abrange a maioria dos lasers de diodo para hobby, sim: esse é o caminho totalmente compatível. Conexões FluidNC, grblHAL, Marlin, Snapmaker 2.0, Smoothieware, vários modelos LaserPecker, Ruida RDC6442S, compatíveis com GRBL genérico e Lihuiyu M2/M3 Nano existem no aplicativo, mas atualmente estão marcadas como experimentais.
Ele é realmente gratuito?
Sim. O Beam Bench é gratuito para baixar e usar. Ele é feito por nós, a equipe por trás da Craftgineer.
Posso continuar usando arquivos de design que já tenho?
Quase certamente. SVG, DXF, AI, PDF, EPS, formatos comuns de imagem e arquivos de projeto .lbrn/.lbrn2 são importados diretamente.
A primeira gravação é a mais difícil
Depois disso, tudo fica mais fácil: a segunda gravação leva metade do tempo e, na quinta, você estará ajustando velocidade e potência como se fizesse isso há anos. Quando quiser avançar, a visão geral do Beam Bench mostra o que mais o aplicativo pode fazer, e nosso guia completo de gravação a laser para iniciantes aborda o lado artesanal: materiais, foco e como pensar nas configurações.
E, quando quiser designs que valham a pena gravar, é para isso que a Craftgineer existe. O MonoTrace transforma qualquer imagem em vetores limpos e prontos para corte gratuitamente, e o Photo Converter transforma fotos em arte de linha pronta para gravação. Baixe o Beam Bench em beambench.com, crie algo e aproveite o cheiro de um primeiro projeto concluído.
Ferramentas relacionadas
Pronto para experimentar estas ferramentas?
Cadastre-se grátis, sem precisar de cartão de crédito. Ferramentas gratuitas disponíveis imediatamente.
Começar grátis