

Cómo cortar madera gruesa con un láser de diodo
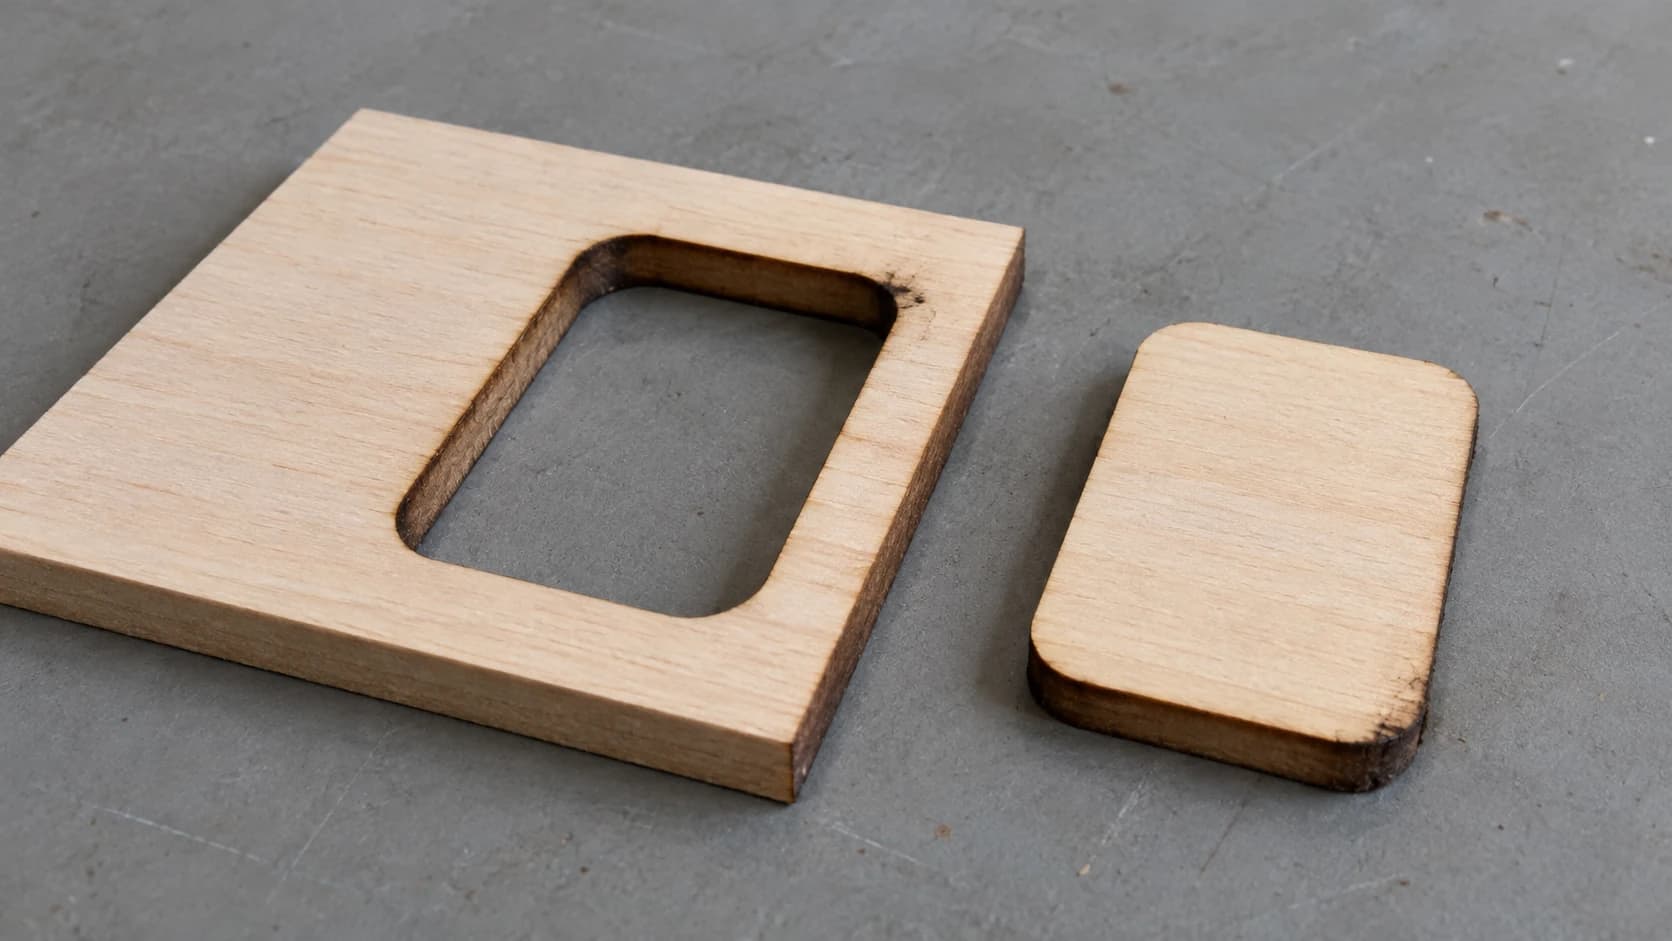
Pones la potencia al 100%, bajas la velocidad, ajustas las pasadas a seis y pulsas iniciar. Veintiséis minutos después, el taller huele a hoguera y la pieza ha quedado cortada por completo salvo por dos puntos cerca del centro, donde todavía está soldada a la plancha. La sacas de un tirón, arrancas la cara y el borde que sí se ha cortado parece un trozo de carbón.
Después descubres que las pestañas son demasiado gruesas para las ranuras de todos modos, porque el corte ha quedado con forma de cuña.
Los láseres de diodo pueden atravesar madera gruesa perfectamente. Pero no lo consiguen simplemente subiendo la potencia, que es lo primero que prueba todo el mundo.
Consejo
Respuesta corta: las claves para que un diodo atraviese madera gruesa son la asistencia de aire, una profundidad de enfoque correcta, varias pasadas medias en lugar de una sola lenta, elevar la pieza sobre la base y elegir tilo o álamo en vez de contrachapado. Poner la potencia al máximo y la velocidad al mínimo normalmente solo produce carbón.
Qué significa realmente «gruesa»
Nuestra guía rápida de ajustes del láser sitúa en unos 3mm el límite cómodo para un diodo de 10W, y esa es la cifra adecuada para un corte que termina en un número razonable de pasadas y queda bien. Esta publicación trata de ir más allá de lo cómodo.
Las cifras siguientes suponen una madera blanda fácil de trabajar, como el tilo.
| Potencia óptica | Cortes cómodos y limpios | Alcanzable con técnica |
|---|---|---|
| 5W | Madera blanda de 3mm | Unos 6mm, lentamente |
| 10W | 3mm | De 6mm a 10mm |
| 20W | De 5mm a 6mm | De 10mm a 15mm |
| 40W o más | De 9mm a 10mm | De 15mm a 20mm |
Considera esa tabla como una orientación editorial aproximada, no como especificaciones comprobadas. Es un resumen de lo que suelen contar los makers, no de cifras que hayamos medido en un banco de pruebas. Las cifras de los fabricantes suelen situarse cerca de la columna derecha, porque un «grosor máximo de corte» anunciado normalmente significa una pasada muy lenta a través de tilo blando en condiciones ideales, y no dice nada sobre si el borde queda presentable o la pieza queda a escuadra. Tu máquina, lente y material pueden desplazar todos estos valores en ambas direcciones.
Ten en cuenta también la unidad importante: los vatios ópticos, la luz que realmente sale del láser, no la potencia del enchufe que anuncian algunas listas de productos.
IMPRIME. CORTA. TALLA.



- Varios formatos (SVG, DXF, PNG)
- Diseños probados en máquinas
- Licencias comerciales
Patrocinado por PrintCutCarve.com
Elegir el material importa más que la potencia
La forma más rápida de cortar madera más gruesa es elegir una madera que se deje cortar.
El tilo y el álamo son los más fáciles. Densidad uniforme, poca resina y ninguna sorpresa escondida en el interior.
El contrachapado de abedul báltico es popular y es la razón por la que fallan muchos cortes gruesos. Cada línea de cola es una capa que el láser tiene que atravesar, y la cola no se distribuye de manera uniforme. Cuando un corte atraviesa todo salvo una zona especialmente resistente, una bolsa de cola es una causa probable, una vez descartadas las causas aburridas: el enfoque, una lente sucia, una tabla combada y los propios ajustes. Compra material de calidad con menos huecos y espera que el contrachapado necesite más pasadas que la madera maciza del mismo grosor.
El MDF corta de forma predecible porque no tiene veta, pero produce mucho humo y un olor fuerte. La extracción no es opcional con MDF.
El pino y otras maderas blandas resinosas se pueden cortar, pero los nudos y las bolsas de resina se inflaman, se carbonizan mucho y dejan halos oscuros en la cara.
Qué no debes probar: nada que contenga vinilo o PVC, nada con un recubrimiento desconocido y ningún material tratado si no puedes obtener confirmación por escrito de que es seguro para láser. Son problemas químicos, no problemas de potencia, y ningún número de vatios los hace seguros.
Las cinco cosas que realmente te permiten atravesarlo
1. Asistencia de aire, siempre
La asistencia de aire no es un extra agradable para cortar material grueso: es la diferencia entre cortar y quemar. El flujo de aire elimina el humo y los residuos de la ranura para que el haz alcance material nuevo, y evita que un frente de llama permanezca dentro del corte.
Sin ella, cada pasada deposita hollín en el corte y la siguiente tiene que quemar ese hollín antes de llegar a la madera. Esa es la verdadera razón por la que la pasada número cuatro parece hacer menos que la número uno.
Una bomba barata de acuario merece la pena como primer experimento, y un compresor adecuado ofrece mucho más margen de trabajo. Mantente dentro de la presión y la boquilla que especifique el fabricante de tu láser, ya que demasiado aire con la boquilla incorrecta solo aviva la llama.
2. Enfoca dentro del material, no sobre él
Para grabar, enfocas en la superficie. Para cortar material grueso, prueba a colocar la parte más estrecha del haz en algún punto dentro del material en lugar de encima, para que el haz se mantenga concentrado durante más parte de su recorrido por la madera. Un tercio de la profundidad es un punto razonable para empezar a probar, no una regla. Hasta dónde puedes llegar depende de tu lente y de tu máquina, y con un eje Z móvil debes vigilar que el cabezal no choque con la pieza.
Enfoca en la superficie de una tabla de 10mm y la mitad inferior del corte la realiza un haz que ya se ha dispersado. Eso es lo que crea la ranura en forma de cuña que arruina el ajuste entre pestañas y ranuras.
3. Varias pasadas medias, no una sola lenta
Una pasada muy lenta concentra el calor en un punto y, en lugar de cortar, obtienes un cañón ancho y carbonizado que todavía no atraviesa el material.
Varias pasadas más rápidas permiten que el material pierda calor entre recorridos, mantienen la ranura más estrecha y dan a la asistencia de aire la oportunidad de retirar los residuos. Empieza con tres o cuatro pasadas a una velocidad que corte visiblemente en lugar de quemar lentamente, y añade pasadas en vez de reducir aún más la velocidad.
Advertencia
No muevas la pieza entre pasadas ni vuelvas a posicionar la máquina. Todo esto depende de que cada pasada caiga exactamente en la misma ranura. Si tu software ofrece un paso de Z entre pasadas y tu máquina tiene un eje Z móvil, bajar el enfoque a medida que el corte se profundiza puede ayudar. Comprueba qué dirección considera «abajo» tu controlador antes de ejecutarlo y vigila la holgura del cabezal, porque un movimiento de Z en la dirección equivocada hará que el cabezal choque con la pieza.
4. Eleva la pieza sobre la base
Una pieza apoyada completamente sobre una base sólida no tiene dónde expulsar el humo y el calor, y el contacto con la superficie inferior aparece como quemaduras en la parte posterior. Colocar el material sobre una base de panal, o sobre unas tiras de sobrante apoyadas de canto, ofrece al humo y a la luz un lugar por el que escapar.
Este único cambio resuelve más quejas de «¿por qué está tan sucia la parte posterior de mi pieza?» que cualquier otra cosa.
5. Dale la vuelta y corta por ambas caras
Cuando de verdad estés en el límite, corta hasta la mitad de la profundidad desde arriba, da la vuelta a la pieza y corta la otra mitad desde abajo. Reduces a la mitad la profundidad que debe alcanzar cada corte, y la conicidad de cada lado se compensa parcialmente en lugar de sumarse.
El inconveniente es el registro. Necesitas una plantilla, un tope o marcas de alineación que te permitan volver a colocar la pieza exactamente en la posición reflejada. Si la alineación se desvía medio milímetro, aparecerá un escalón visible en el centro del borde.
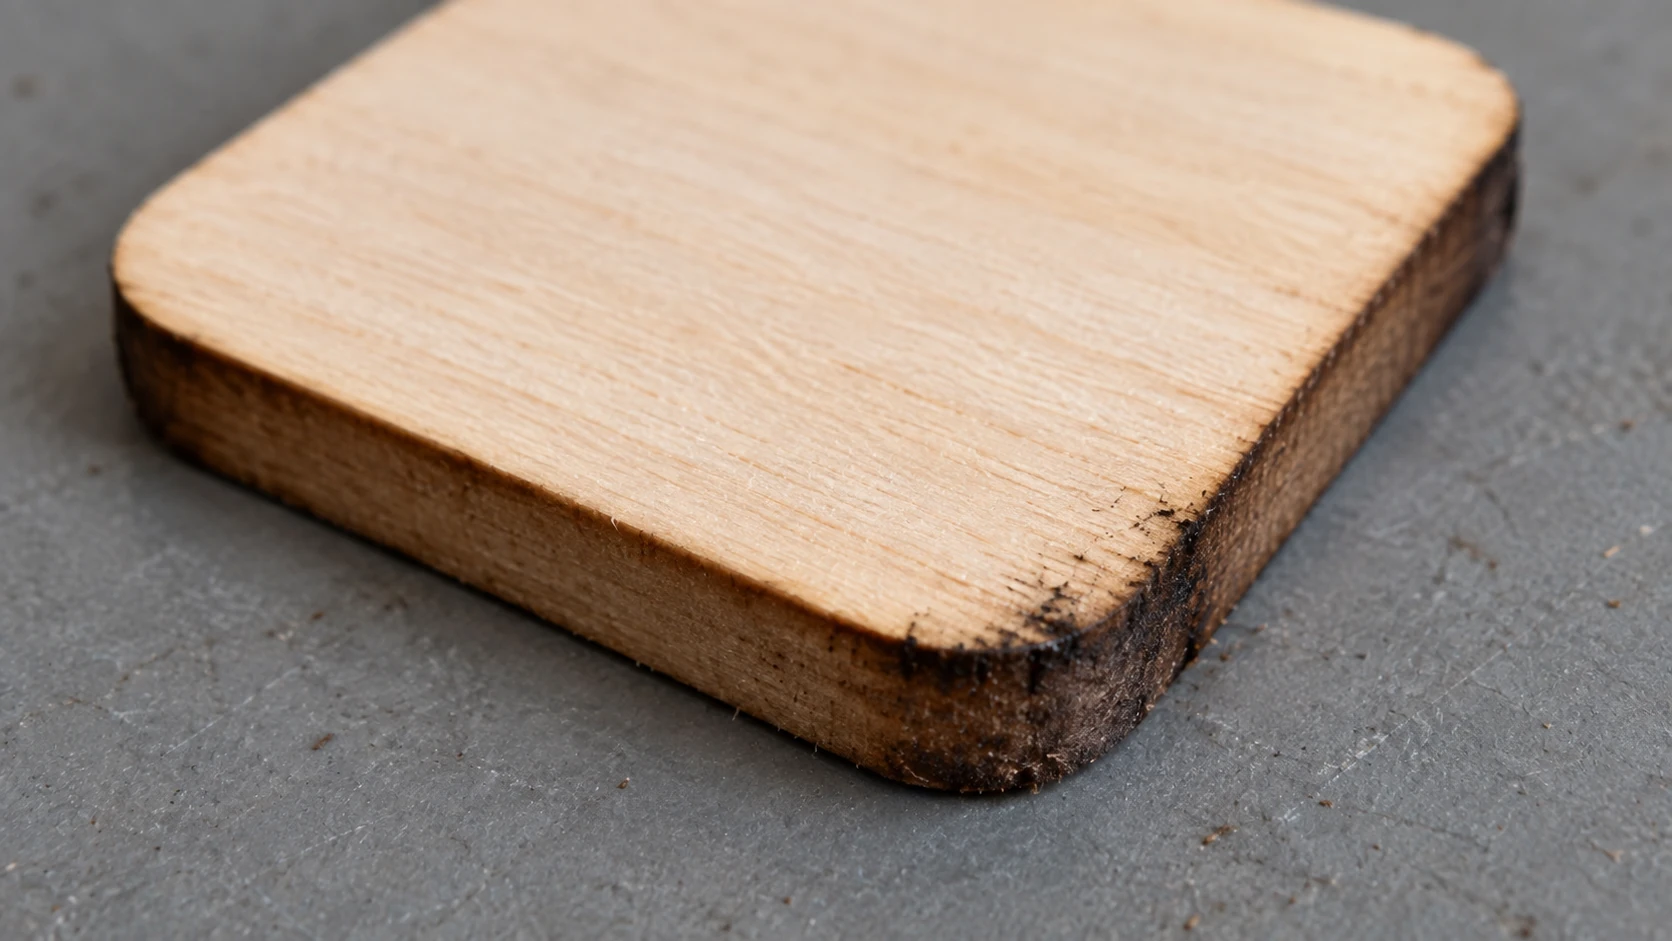
La misma pieza recortada, vista más de cerca, muestra por qué también conviene inspeccionar el borde, además de la cara. Esta es una muestra ilustrativa, no una prueba verificada de grosor o potencia en vatios.
Orden de operaciones
- Elige un material fácil de trabajar y asegúrate de que esté plano. Una tabla combada cambia su distancia respecto a la lente a lo largo del corte, y el resultado será irregular justo de la forma que no podrás corregir después.
- Enmascara la cara superior con cinta de pintor si te importa que quede limpia. La cinta recibe la quemadura de retorno de la llama en lugar de la madera.
- Eleva la pieza sobre la base.
- Ajusta el enfoque dentro del material en lugar de sobre la superficie, empezando aproximadamente a un tercio de la profundidad.
- Activa la asistencia de aire antes de empezar, no después de que la primera pasada salga mal.
- Corta un cuadrado de prueba de 20mm en el mismo material y con los mismos ajustes, y cuenta cuántas pasadas necesita realmente.
- Mide el cuadrado de prueba y anota la ranura, arriba y abajo. Esa cifra es la que necesitas para cualquier ensamblaje.
- Ejecuta el corte real sin tocar la pieza entre pasadas.
Ese cuadrado de prueba no es opcional si las piezas tienen que encajar. Los cortes con diodo en material grueso tienen una conicidad real, y una pieza de 10mm medida solo por arriba no te dirá qué ocurre abajo. Nuestra explicación de la ranura de corte muestra cómo convertir esa medición en una cifra de compensación.
Advertencia
Cortar madera gruesa conlleva un riesgo serio de incendio. El corte vectorial puede producir llamas abiertas, y un incendio repentino requiere tu atención en el mismo instante en que ocurre, no al final de la pasada. Nunca dejes desatendido un corte grueso, mantén la extracción en funcionamiento y ten al alcance de la mano algo con lo que apagar un incendio. Nuestra guía de seguridad láser explica el resto.
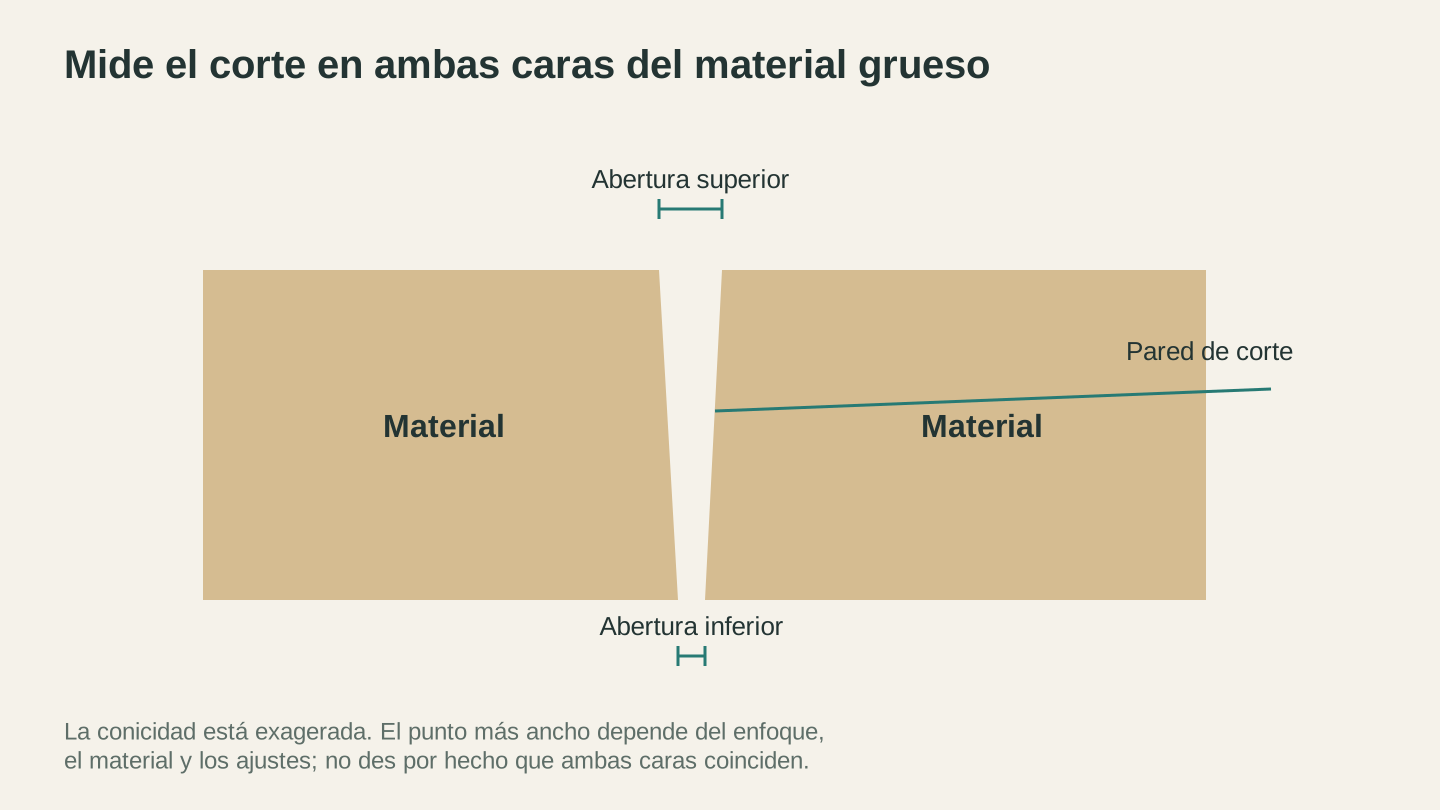
Comprueba ambas caras al medir un corte en material grueso. El estrechamiento está exagerado aquí, y la forma real depende del material, el enfoque y el proceso de corte.
Cuándo parar y utilizar otra herramienta
A partir de unos 12mm en un diodo de potencia media, la respuesta honesta es que el láser es la herramienta equivocada. Cuando un corte dura media hora, requiere vigilancia constante, produce un borde carbonizado y cónico y aun así puede no atravesar el material, no compite con un par de minutos en una sierra de cinta o una fresadora CNC.
El láser demuestra su utilidad en formas que no podrías cortar de otra manera: vaciados interiores, curvas cerradas, trabajos de calado intrincados y decenas de piezas idénticas. Las líneas rectas en material grueso no son una de ellas. Nuestra comparativa entre cortadora láser y fresadora CNC explica en qué casos gana cada una.
Un buen hábito híbrido: desbasta las piezas gruesas con una sierra y deja que el láser haga el trabajo de detalle en las caras.
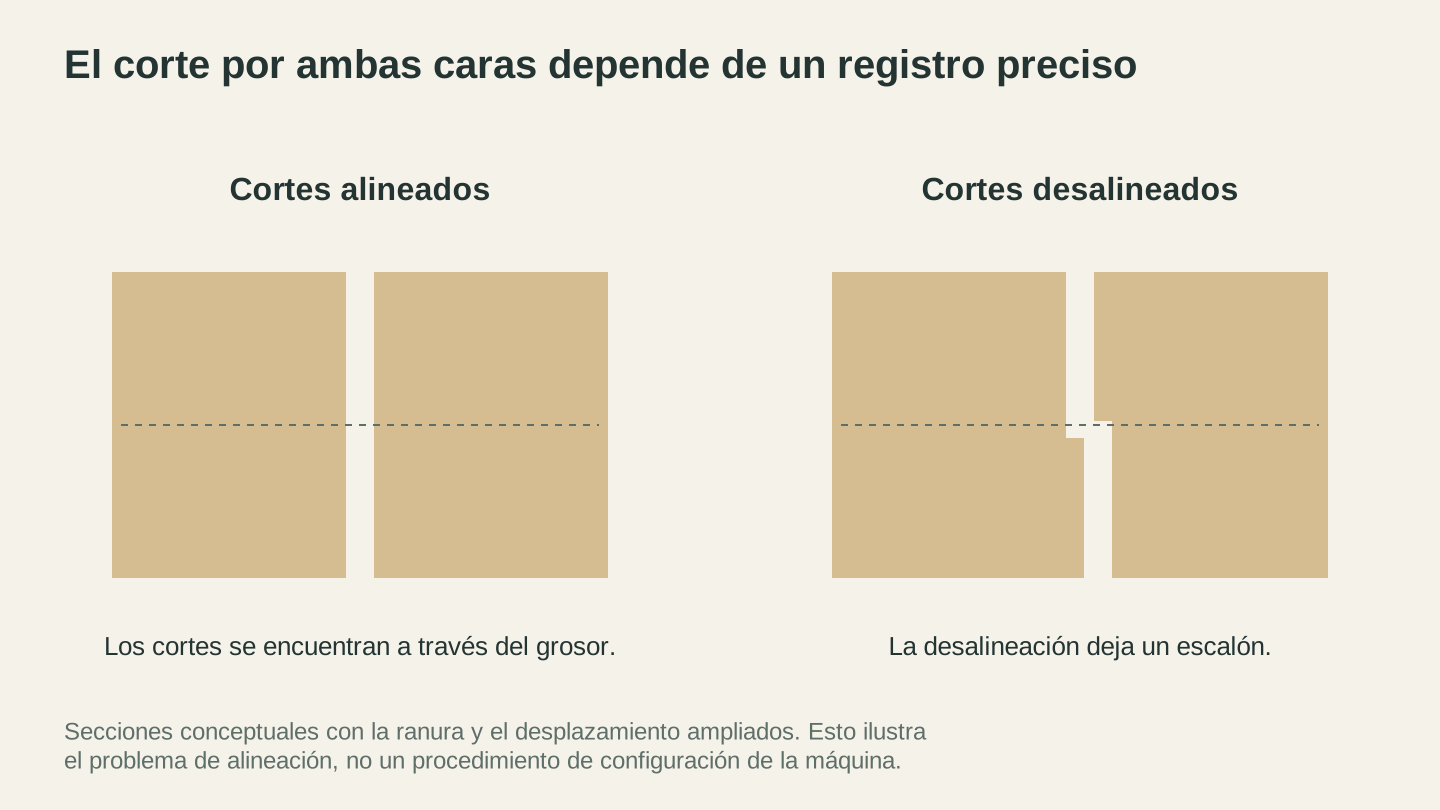
Los cortes desde lados opuestos necesitan un registro preciso. Aunque ambos cortes se encuentren, un desplazamiento puede dejar un escalón a lo largo del borde terminado.
Cómo obtener más piezas de la tabla
El material grueso es caro y cortarlo lleva tiempo, así que una mala distribución te cuesta el doble. Antes de cortar, coloca las piezas sobre el tamaño real de la tabla en CutPlan usando el modo CNC, que anida las piezas para fresado y corte láser. La planificación y el anidado no cuestan créditos a ningún miembro que haya iniciado sesión, y te indicará claramente cuándo las piezas dibujadas no caben en el material que tienes. Descargar el paquete de exportación, con un SVG por plancha y, en modo CNC, un DXF por plancha, requiere un plan de pago.
Si tu diseño comenzó como una imagen, MonoTrace lo convierte primero en vectores cerrados y limpios sin coste de créditos, y File Converter gestiona conversiones de SVG y DXF en ambas direcciones, también sin coste de créditos, aunque descargar el archivo convertido requiere un plan de pago. Como todo en Craftgineer, ambos necesitan una cuenta con la sesión iniciada.
Preguntas frecuentes
¿Qué grosor puede cortar un láser de diodo?
Cómodamente, unos 3mm para uno de 10W y de 5mm a 6mm para uno de 20W. Con asistencia de aire, un enfoque correcto, varias pasadas y un material fácil como el tilo, las máquinas de 10W alcanzan de 6mm a 10mm y las de 20W alcanzan de 10mm a 15mm. El contrachapado suele cortarse de forma menos uniforme que la madera maciza adecuada con los mismos ajustes, por las líneas de cola y los huecos que pueda contener.
¿Es mejor hacer varias pasadas o una sola pasada lenta?
Varias pasadas, en casi todos los casos. Una pasada muy lenta concentra el calor en un punto y crea una ranura ancha y carbonizada que a menudo sigue sin atravesar el material. Varias pasadas más rápidas cortan de forma más estrecha y limpia.
¿De verdad necesito asistencia de aire para cortar madera gruesa?
En la práctica, sí. Sin un flujo de aire que despeje la ranura, las pasadas posteriores gastan su energía quemando hollín en lugar de madera, y la carbonización empeora mucho. Incluso una bomba de acuario marca una diferencia visible.
¿Por qué mi corte es más ancho arriba que abajo?
Por debajo del punto focal, el haz se dispersa y pierde intensidad, así que elimina menos material cuanto más profundiza, dejando el corte más ancho donde entró. Mover el enfoque hacia el interior del material lo compensa, y cortar hasta la mitad de la profundidad desde cada lado lo compensa aún más. El punto exacto donde la ranura es más ancha depende de dónde hayas colocado el enfoque, así que mide un corte de prueba en lugar de darlo por hecho.
¿Por qué mi corte atraviesa todo salvo un punto?
Revisa primero las causas habituales: el enfoque, una lente sucia o dañada, unos ajustes que ya eran insuficientes y una tabla combada que cambia su distancia respecto a la lente mientras se desplaza el cabezal. Después, los sospechosos habituales son una bolsa de cola o un hueco en el contrachapado, y que la pieza se haya movido entre pasadas.
¿Puede un láser de diodo cortar madera dura como roble o nogal?
Puede, pero lentamente y con una carbonización mayor que en la madera blanda, y hasta dónde llegue depende mucho de la potencia óptica y de la especie. Los módulos de mayor potencia suelen atravesar madera dura más gruesa con menos pasadas que los de 10W y 20W. Si tu máquina está en torno a 10W y quieres un borde presentable, la madera dura de más de unos 6mm suele ser trabajo para un láser de CO2 o una fresadora.
Corta un cuadrado de prueba
Antes de hacer la pieza real, corta un cuadrado de 20mm en el material que vayas a utilizar. Cuenta las pasadas que necesita y mide después la ranura arriba y abajo con un calibre.
Esas dos cifras valen más que cualquier tabla de ajustes de Internet, porque proceden de tu máquina, tu lente y la tabla exacta que tienes ahora mismo sobre la base.
Después coloca las piezas reales sobre tu material en CutPlan, gratis para planificar, para que el material grueso que tardas media hora en cortar esté al menos bien distribuido sobre la tabla. Si el diseño todavía necesita limpieza, MonoTrace lo convertirá primero en vectores listos para cortar.
Herramientas relacionadas
CutPlan
Planifica cortes en tableros con piezas, distribuciones y secuencias de corte. Exporta informes y planos de los tableros.
Se necesita un plan para descargar
MonoTrace
Convierte fotos e ilustraciones en contornos SVG gratis, con un modo boceto opcional.
File Converter
Convierte entre las combinaciones compatibles de formatos vectoriales, documentos, imágenes de mapa de bits y mallas 3D.
Se necesita un plan para descargar
¿Quieres probar estas herramientas?
Regístrate gratis, sin necesidad de tarjeta. Las herramientas gratuitas están disponibles de inmediato.
Empezar gratis