

Beginner Laser Projects to Try in Beam Bench
The fastest way to learn laser design software is not a manual. It's a project small enough to finish tonight that happens to force one new tool on you. Six projects in, you know the software; twenty in, you've stopped thinking about it.
These six are sequenced to do exactly that in Beam Bench, our free laser app. Each one is designed entirely inside Beam Bench, no other design program needed, and each teaches you one or two tools you'll use forever. If the app isn't set up yet, the getting started guide handles install through first burn.
One honest note before the list: Beam Bench doesn't ship with a clip art library. Its Art Library exists for building your own collections. Aside from the photo plaque's imported image, every project below starts from shapes and text the app draws itself, which is the point: you're learning to make things, not arrange downloads.
1. A round name tag (text, offset, and your first cut+engrave combo)
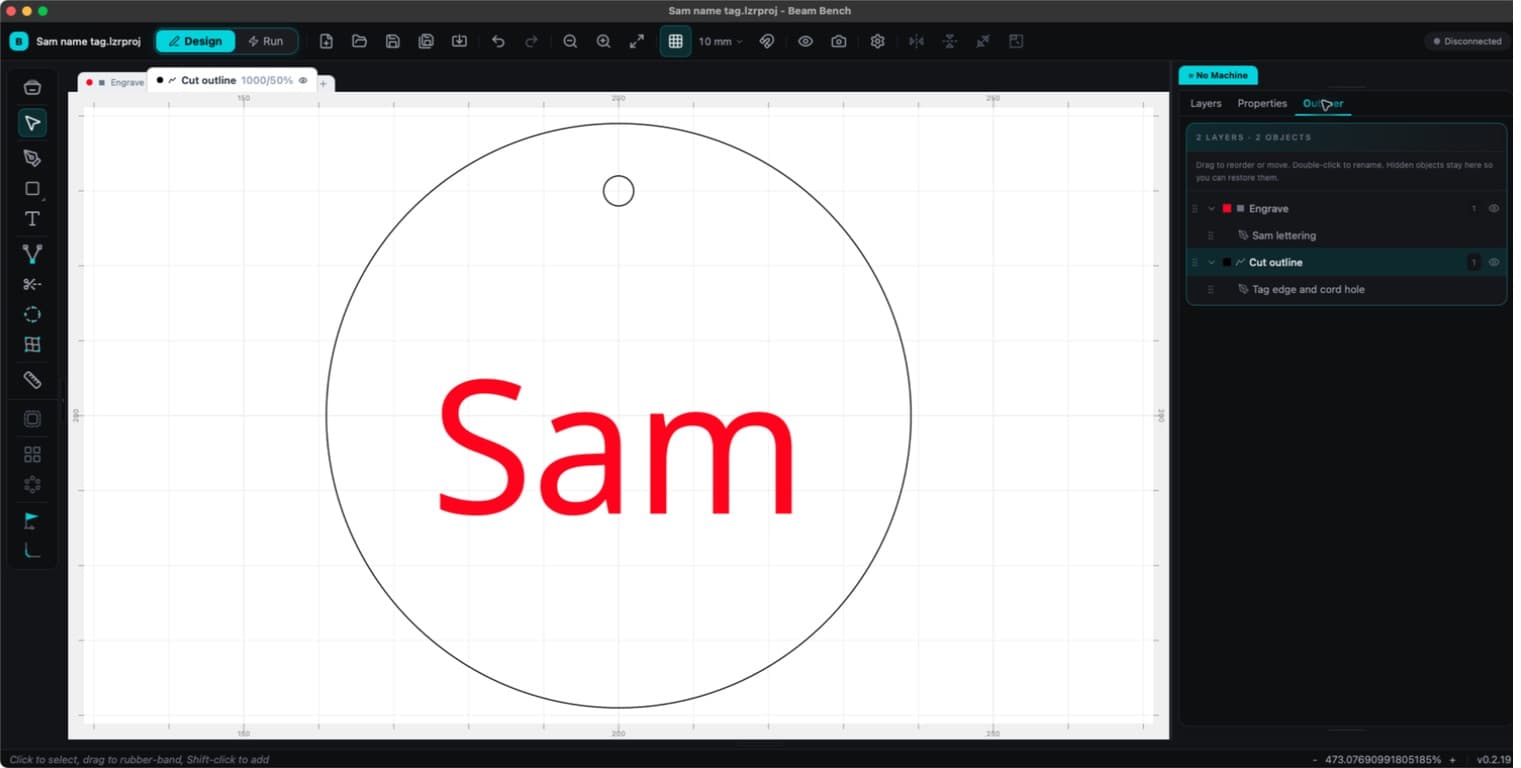
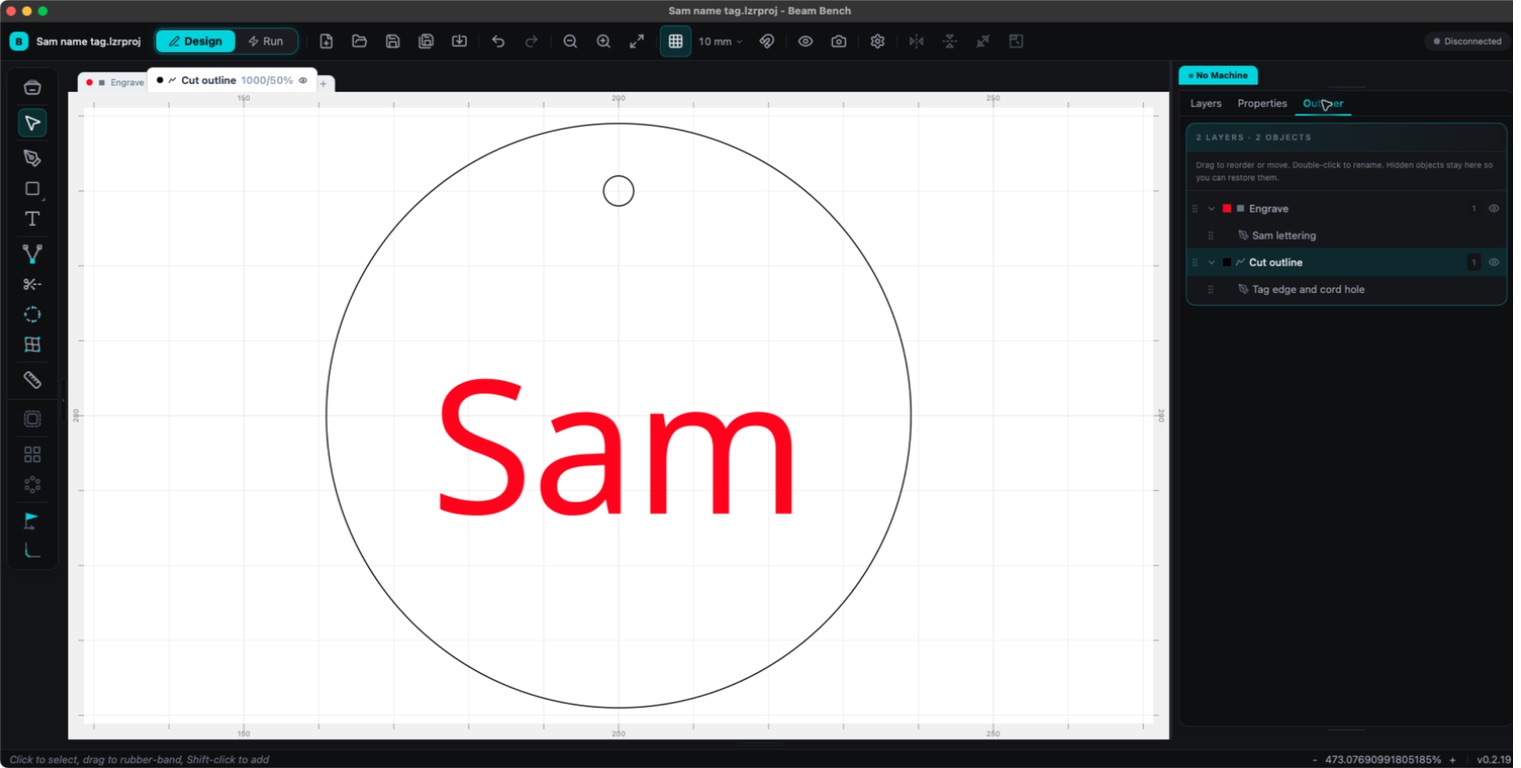
The classic first project, and the one the getting started guide burns: a circle with a name in it, cut out with a hanging hole.
The Beam Bench route: draw an Ellipse (hold Shift while dragging for a true circle), add your text with the Text tool, and center them (select both, then the center-alignment buttons in the Properties panel; Alt plus the arrow keys aligns edges instead). Add a small circle near the top edge for the hole.
The layer move is the real lesson: the text goes on a Fill layer (engraved), and the outer circle plus hole go on a Line layer (cut). Layer order is run order, so put the Fill layer first and the Line layer last: the cut that frees the piece happens at the very end.
Two upgrades when the plain version feels easy: the Text tool's Shape options bend text along curves (a name arched over a circle is the Arch or Circle shape), and the Offset Shapes tool (Alt+O) generates a border ring around any shape at a set distance, which is how tags get that professional double-outline look.
PRINT. CUT. CARVE.



- Multiple formats (SVG, DXF, PNG)
- Machine-tested designs
- Commercial licenses
Sponsored by PrintCutCarve.com
2. A coaster set (corner radius and the array that batches them)
Draw a Rectangle at coaster size. The Corner Radius property rounds all four corners at once; the separate Radius Tool rounds corners individually if you want just the top two softened. Add a decorative engraving in the middle, your initials, a motif, anything on a Fill layer.
Now the tool that turns one coaster into a set: Grid Array. Set columns and rows, choose Edge to Edge spacing with a couple of millimeters of gap, and Beam Bench lays out the whole batch. The dialog's extras (brickwork half-shift, mirrored alternates) matter more for decorative patterns, but even the plain grid changes how you think: you design one, you cut many.
For the engraving itself, this is where our Monogram Generator earns a mention: it builds classic split and framed monograms free, and the SVG it exports drops straight onto the Beam Bench canvas.
3. An engraved wreath (circular array, the pattern machine)
Draw one small leaf: an ellipse, stretched, maybe nudged with the Node Edit tool if you're feeling brave. Select it and open Circular Array. Set the count somewhere around twelve, turn on Rotate Copies so each leaf turns as it goes around, and set the radius. Beam Bench arranges the ring.
You just made a wreath, a motif you'll recognize from countless personalized signs. Put a name in the middle with curved text and you've independently invented a piece straight out of our 30 beginner laser projects roundup. Engrave the whole thing as a Fill layer on a board, or add an outer circle on a Line layer to cut it into an ornament.
The design lesson: complex-looking symmetry is nearly always one element plus an array. Once you see it, you see it everywhere.
4. A sheet of gift tags (arrays again, plus Tabs)
Design one gift tag: rounded rectangle, hole, small engraved motif. Grid Array it into a full sheet of material. Then the new tool: Tabs.
Select a tag's cut outline, pick the Tabs tool, and click on the outline where you want a tab. Each tab is a small deliberate gap in the cut, a bridge of uncut material that keeps the piece attached to the sheet instead of dropping loose (and possibly shifting) mid-job. When the job's done, the whole sheet can lift out together and tags snap free with a twist; a touch of sanding hides the stub. Holding strength depends on your material and tab width, so test one before trusting a full sheet.
Tabs only work on closed outlines, and the tab width setting applies to the selected object's layer entry rather than to an individual marker, which for a uniform tag sheet is exactly what you want. This is the project that makes batch cutting feel safe.
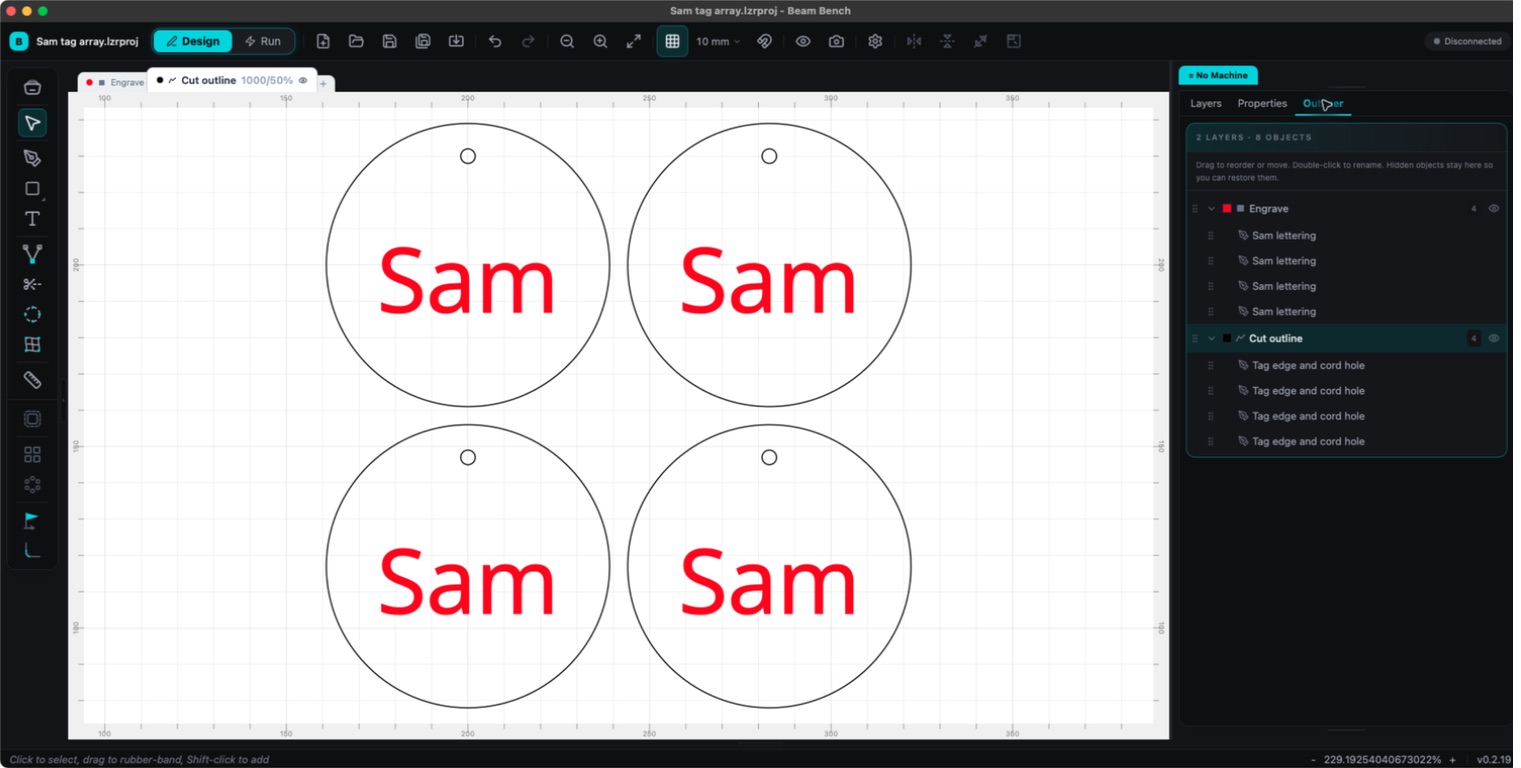
The same name-tag design, repeated with Grid Array. These 78 mm tags use a 5 mm edge-to-edge gap; choose spacing for your own material and project.
5. A photo plaque (raster meets vector)
Take everything from the photo engraving guide, the imported photo, the dither mode, the Adjust Image pass, and put a frame around it: a rectangle border and a caption in curved or straight text, both on vector layers, with the photo on its Image layer.
This is the first project where three layer modes run in one job: the photo on its Image layer, the caption as Fill, and the outer frame as Line. Watching Preview play the whole sequence, the photo's scanlines, then the caption's fill scanlines, then the final vector cut, is the moment the layer system permanently clicks. And if you'd rather the photo read as clean line art than a dithered photograph, Photo Converter turns it into pen-and-ink style linework first (1 credit), which tends to hold up well on blotchy woods that fight dithers.
6. A warped-text sign (the fun one)
Type a word. Open the Text tool's Shape options and try Wave, Flag, or Rise. Or grab the Warp tool and pull the corners of a 4-point cage around any design until it leans, bulges, or perspectives its way into looking hand-drawn.
There's no new production concept here. This project exists because twenty minutes of playing with warp and text shapes teaches you more canvas fluency than an hour of tutorials, and because a wavy "welcome" board is a genuinely good gift. Design play is a skill; schedule some.
The habits that carry over
Across all six projects, three habits are doing the heavy lifting:
| Habit | Where you learned it |
|---|---|
| Put the Fill layer before the Line layer; layer order is run order | Name tag |
| Design one, array many | Coasters, wreath, tag sheet |
| Preview before every burn | All of them |
A few practical notes as you go: text uses the fonts installed on your computer, so a project opened on a different machine may substitute fonts (finish text-heavy designs on one computer, or convert text to paths when done). Entering Node Edit on text or parametric shapes converts them to plain paths, so do your editing after the wording and shape settings are final. And none of these posts quote power and speed numbers on purpose: your machine and material set those, and a small test on scrap answers in two minutes what no article can.
Beam Bench is free at beambench.com. Pick whichever project matches tonight's scrap supply, and let the second one be the wreath; everyone's second project should have an array in it.
Related Tools
Ready to try these tools?
Sign up free, no credit card required. Free tools available immediately.
Start Free