

How to Engrave a Photo With Beam Bench
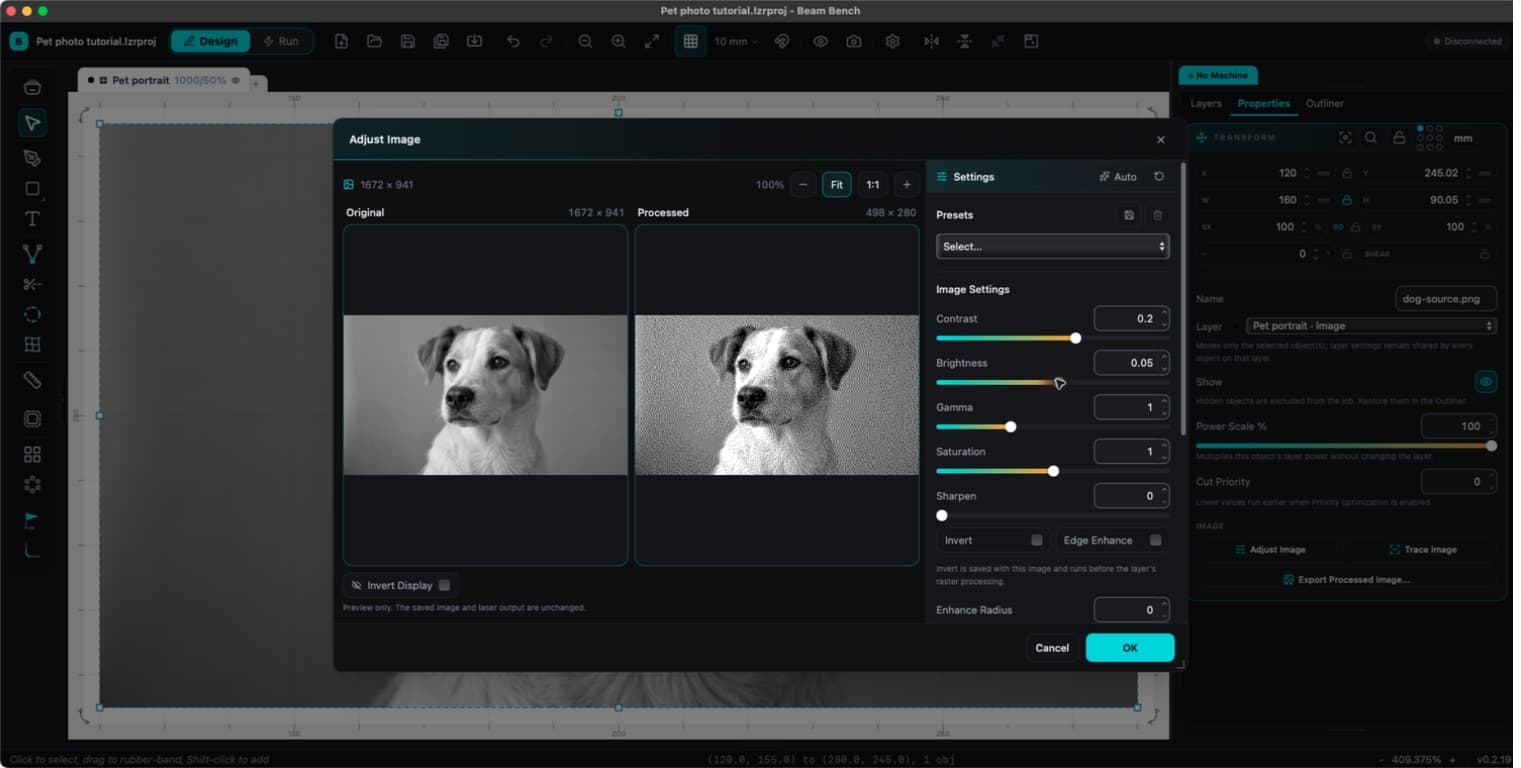
Photo engraving is the project that sells people on owning a laser. A face, a pet, a wedding shot, burned into wood or slate in thousands of tiny dots: it looks like magic, and the machine does all the hard work.
Except the machine doesn't, quite. The difference between a muddy gray smudge and a portrait people gasp at is almost entirely decided in software, before the laser ever fires. This guide walks through that software side in Beam Bench, our free laser app, from picking a photo that will actually work to your first test burn. If you haven't set up Beam Bench yet, start with the install-to-first-burn walkthrough and come back.
Tip
Short answer: import the photo (Beam Bench converts it to grayscale and puts it on an Image layer automatically), size it with aspect lock ON, pick a raster mode (Floyd-Steinberg is the default for good reason), tune brightness and contrast in Tools, then Adjust Image, and always burn a small test on the exact material first.
Two ways to laser a photo (pick your style first)
Before touching settings, decide what look you want, because there are two genuinely different roads:
Dithered photo engraving is what this guide covers. The software converts your photo's tones into patterns of tiny dots, and from arm's length those dots read as a continuous photograph. It is the classic look for portraits on wood and slate.
Line art engraving is the other road: the photo becomes clean pen-and-ink style linework first, and the laser burns those lines. It reads as artwork rather than photograph, hides material blotchiness better, and scales to any size. That conversion is exactly what Photo Converter does (1 credit per conversion), and it pairs happily with Beam Bench: convert the photo there, import the result here, and engrave it as crisp vector-style art.
If you're not sure, dithered is the default people usually mean by "photo engraving." Onward.
PRINT. CUT. CARVE.



- Multiple formats (SVG, DXF, PNG)
- Machine-tested designs
- Commercial licenses
Sponsored by PrintCutCarve.com
Step 1: Pick a photo that can survive being burned
No setting rescues a bad source photo. What works:
- One clear subject with good lighting. Faces and pets, front-lit, in focus.
- Contrast. Dithered modes reduce the image to burned and unburned dots (Grayscale mode instead varies laser power per pixel), so a photo where the subject already pops from the background translates well.
- Decent resolution. You'll be engraving at roughly 250 dots per inch, so a sharp phone photo is plenty; a tiny compressed thumbnail is not.
What fights you: busy backgrounds, dim indoor shots, and photos where the subject and background are similar tones. When in doubt, crop tight on the subject before importing.
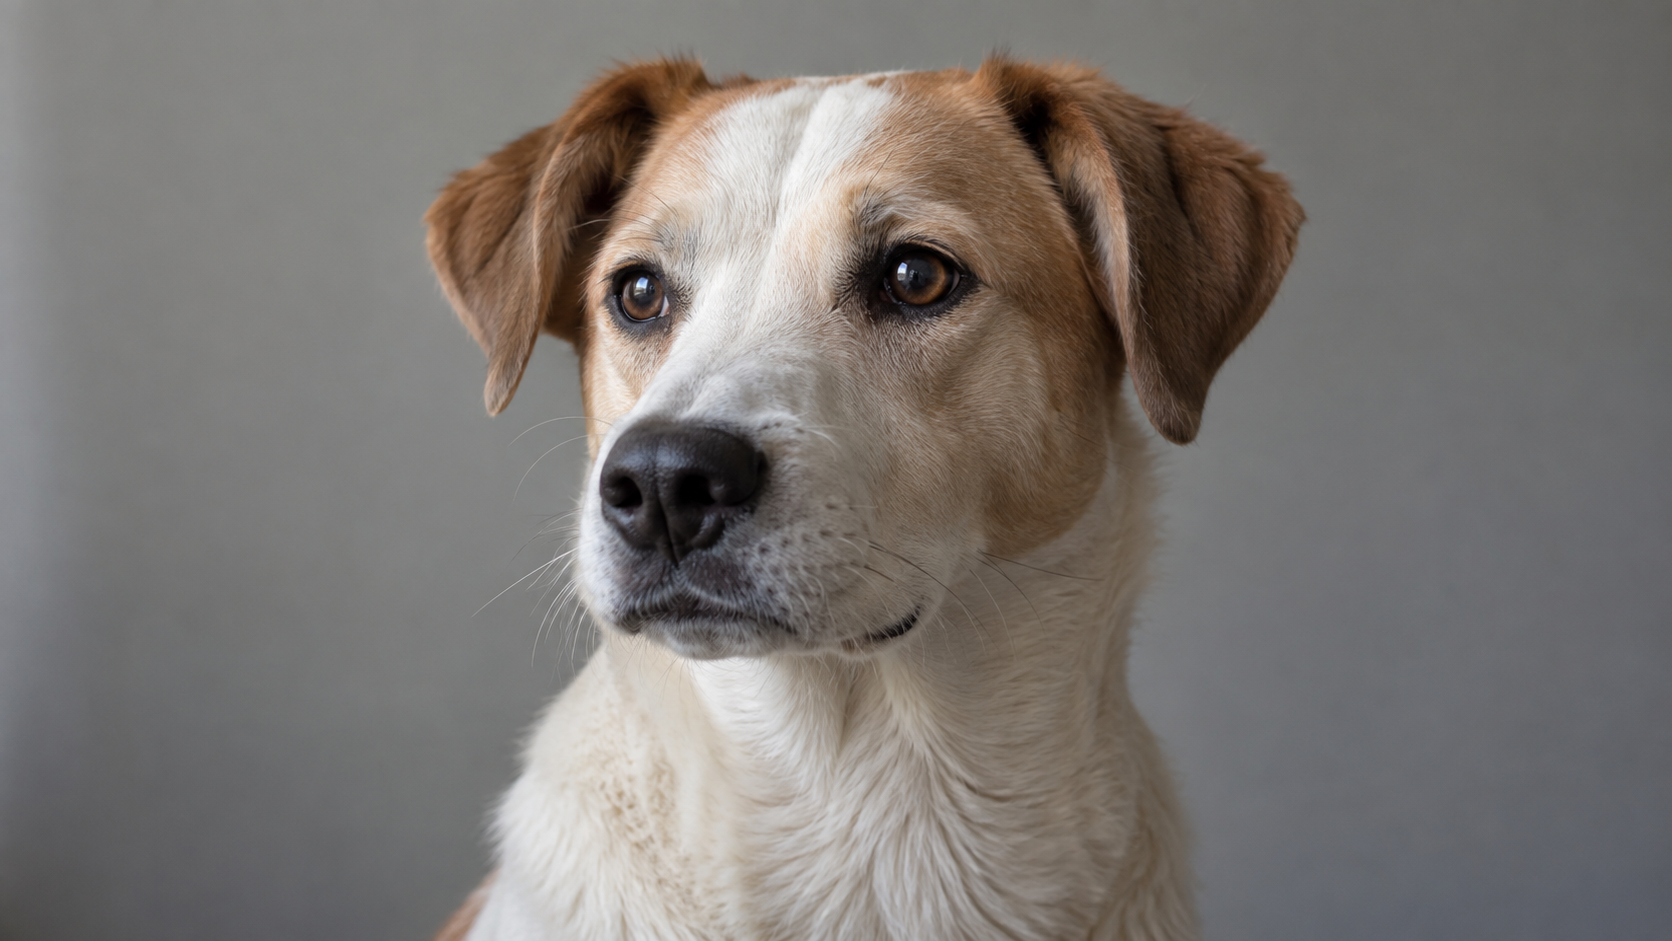
The source portrait used below has one clear subject, visible eyes and fur, and a quiet background. Follow the same face through the import and processed-preview views.
Step 2: Import it
Drag the photo onto the Beam Bench canvas (or click Import in the toolbar; PNG, JPG, BMP, GIF, TIFF, WebP, and TGA all work). Three things happen automatically that are worth knowing about:
- The photo is converted to grayscale on import. The laser only burns darkness, not color, so Beam Bench gets that conversion out of the way immediately.
- It is routed to an Image layer automatically, with one created if no compatible layer exists. Photos carry different settings than shapes and lines, so raster and vector content live on separate layers, and Beam Bench sorts that out for you.
- It arrives centered, at the physical size implied by the file's resolution metadata (or a standard default when the file has none), never stretched to fill your bed. A high-resolution photo may come in large; that's normal, you'll size it next.
Step 3: Size it, with one important checkbox
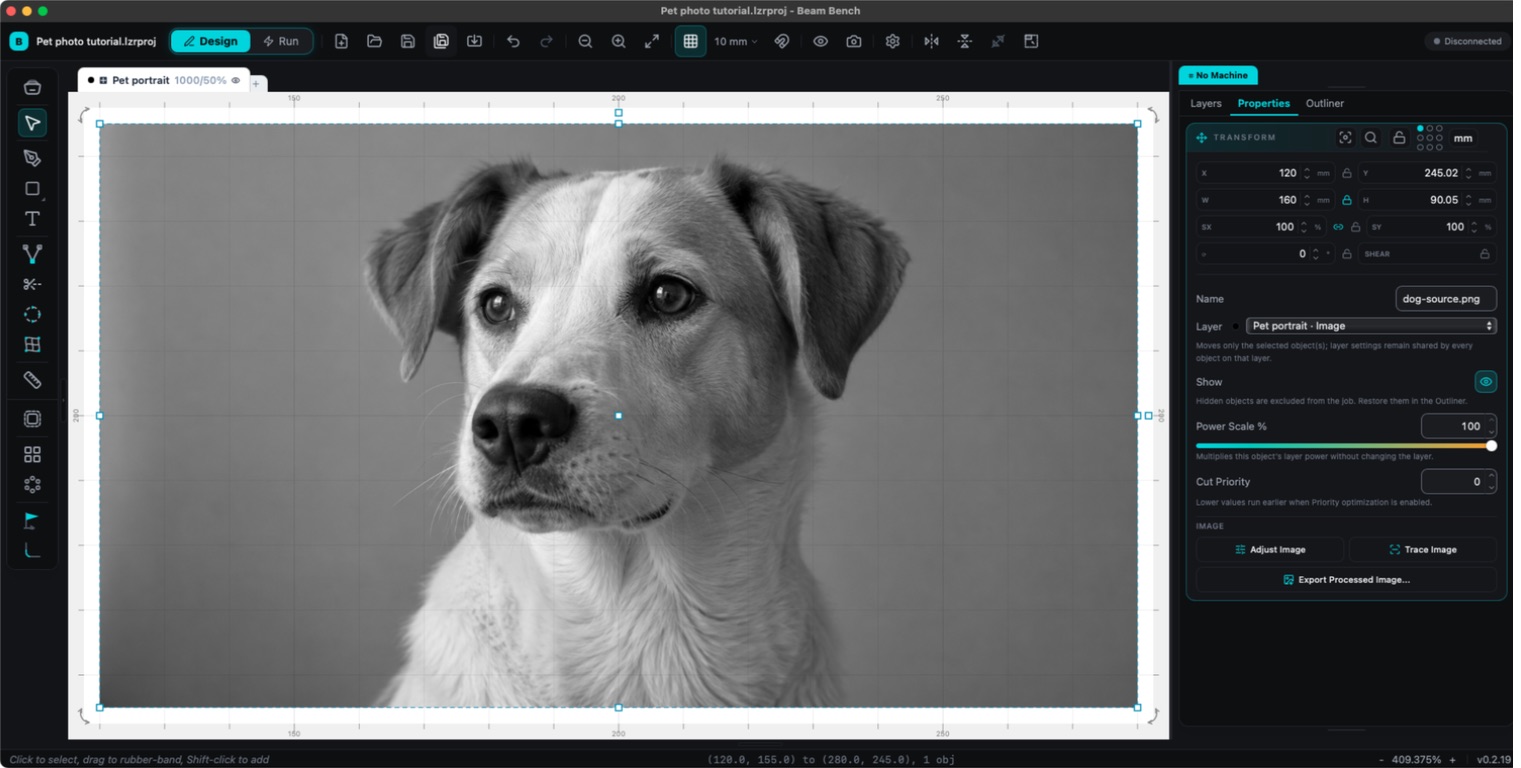
Select the photo and use the Transform fields in the Properties panel to set W and H to your material size.
Warning
Turn on Lock Aspect Ratio (the control between the W and H fields) before you resize. Check that the lock is on before changing a dimension; a stretched face is the kind of mistake you only spot after the burn. With the lock on, changing one dimension scales the other to match.
Step 4: Choose a raster mode
Select the photo's layer tab to see its settings. Choose a mode in the Raster section, or use Image Mode under Layer Settings in Adjust Image. The full menu runs from classic dithers to stylized effects:
| Mode | What you get |
|---|---|
| Floyd-Steinberg | The classic photo dither. Soft, natural gradients. The default, and the right first choice. |
| Stucki / Jarvis / Sierra | Variations on the same idea with smoother or more detailed output. Worth comparing on a test swatch. |
| Atkinson | Lighter, crisper, higher contrast. Nice for faces on dark-burning woods. |
| Ordered Dither | A repeating pattern rather than organic dots. Reads more "printed". |
| Grayscale | No dots at all: the laser varies its power per pixel. Capable of beautiful results and very dependent on your machine and material. |
| Threshold | Pure black and white, no midtones. For logos and high-contrast graphics, not photos. |
| Halftone / Newsprint | Deliberate dot-screen looks, like a comic or newspaper. Fun for stylized pieces. |
| Sketch | Experimental edge-detection effect that traces outlines. |
If that list feels like a lot: Floyd-Steinberg for your first photo, and let test swatches talk you into anything fancier.
Step 5: Tune the image itself
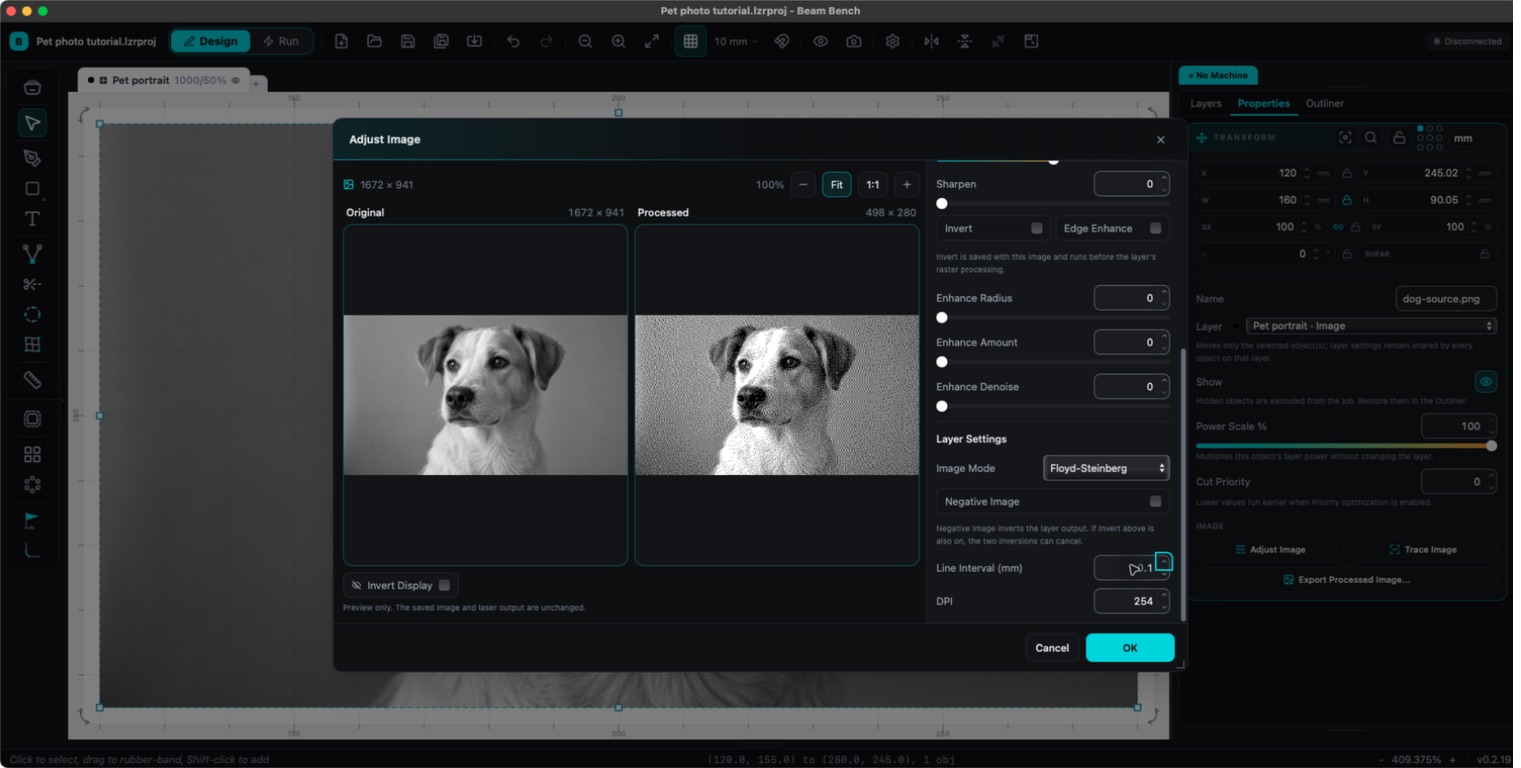
Select the photo and open Tools, then Adjust Image (Alt+I, Option+I on a Mac). This dialog shows a live processed preview built with the same image-processing pipeline the laser job uses, and it is where mediocre photos become good engravings.
The controls that earn their keep:
- Brightness and Contrast: most photos need a contrast push to keep midtones from turning to mud.
- Gamma: rescues detail in shadows without blowing out highlights.
- Sharpen and Edge Enhance: a little goes a long way at engraving resolution.
- Auto: a sensible one-click starting point that suggests Brightness, Contrast, Gamma, and Sharpen values; adjust from there.
- Invert: flips lights and darks. This is the key for dark materials like slate, where the laser burns a light mark, so the whole image logic reverses. Our slate photo engraving guide covers that look in depth.
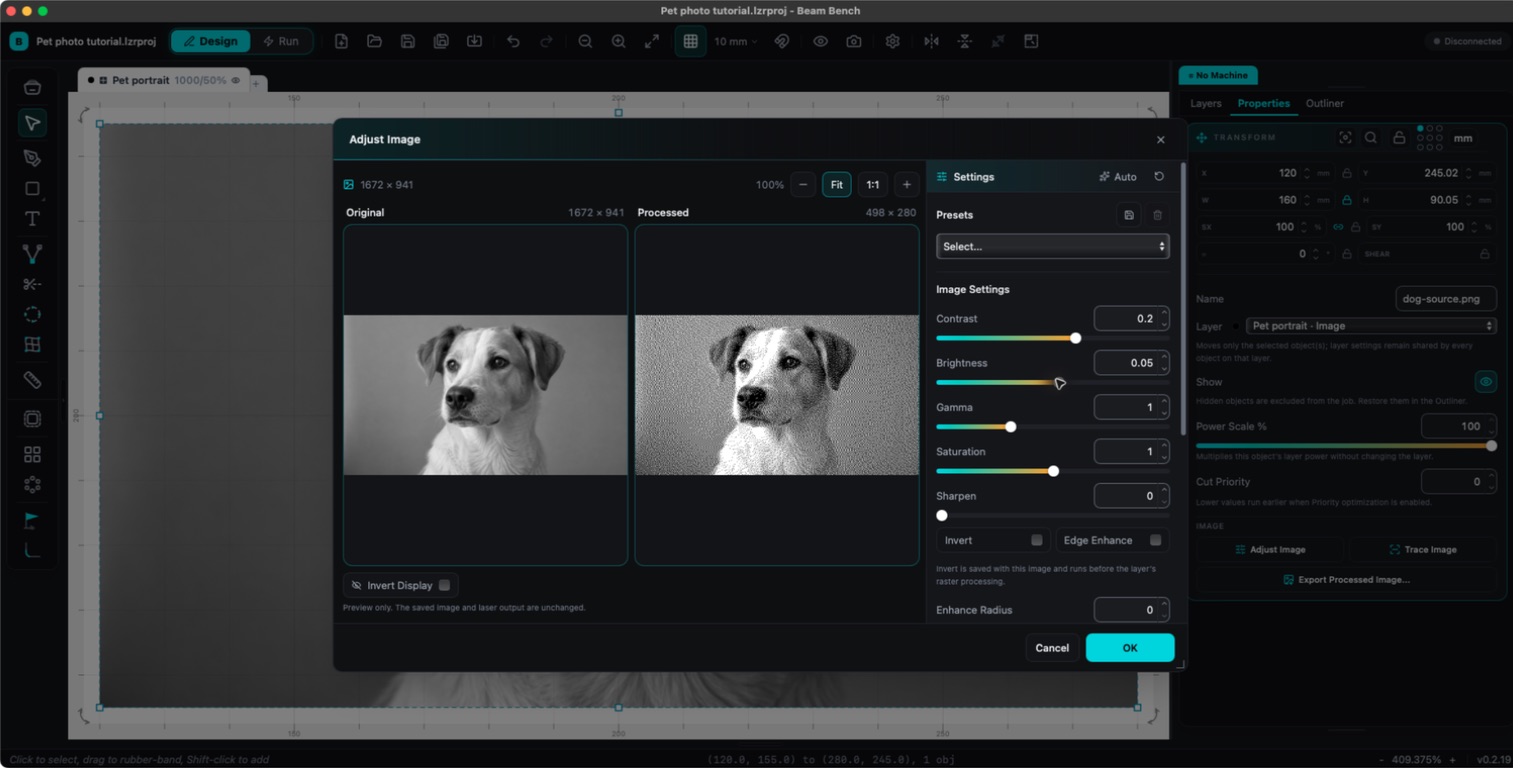
The same portrait in the actual Adjust Image window, with the original at left and the processed preview at right. These adjustments illustrate the controls; a test on your material determines the final settings.
Step 6: Line interval (resolution, in laser terms)
The Line Interval setting in the Raster section is the spacing between engraved rows. The default is 0.1 mm, equivalent to about 254 DPI; a test swatch tells you whether your machine and material want it tighter or wider. In the Adjust Image dialog the interval and a linked DPI field recalculate each other, whichever way you prefer to think.
The counterintuitive part: smaller intervals are not automatically better. Rows tighter than your laser's actual spot size just re-burn the same wood, darkening and muddying the image. If your engravings look overcooked at the default, a slightly wider interval is often the fix.
Step 7: Speed, power, and the overscan question
We deliberately publish no magic numbers here, because there aren't any: the right speed and power depend on your specific laser, lens, and material. The honest method is a test swatch: a small version of your photo (or a gradient strip) burned on the same material as the final piece, adjusting between runs. Ten minutes of testing beats an evening of ruined slate.
One raster-specific setting deserves a mention: Overscan (default 2.5 mm) is extra laser-off travel past each end of every engraved row, giving the head room to speed up and slow down outside the image. Without it, row edges burn darker where the head moves slower. Leave it on; just remember it needs clearance, so don't park the photo hard against the edge of your work area. Beam Bench's preflight check blocks the job outright if the image plus its overscan travel doesn't fit the bed.
Step 8: Preview, frame, burn
Preview (Alt+P) shows the processed result and simulates the scan, including the total raster line count, which doubles as a sanity check on your interval choice. Then it's the normal run routine from the getting started guide: switch to Run, Frame to confirm placement on the material, glasses on, ventilation running, and Start. Photo engravings can run much longer than simple vector jobs (Preview's duration estimate tells you what your job actually needs), and the never-leave-it-unattended rule applies for every minute of it.
When the result disappoints
- Muddy and dark overall: add contrast and brightness in Adjust Image, or slow down on the power. Overburning is the most common first-photo mistake.
- Washed out and faint: the opposite lever, and check the material; some light woods just don't develop much contrast.
- Visible horizontal banding: line interval tighter than the machine can resolve, or mechanical slop; try a wider interval first.
- Subject looks stretched: aspect lock was off when you resized. Re-import and resize with it on.
- Preflight refuses to start near the bed edge: the overscan travel doesn't fit; move the image inward or reduce the overscan distance.
Frequently asked questions
Which raster mode is best for photos?
Floyd-Steinberg is the sensible default, and the differences between the error-diffusion modes are subtle enough that a test swatch on your actual material settles it better than any article can.
Can I engrave a color photo?
Yes, in the sense that Beam Bench converts every photo to grayscale on import automatically. The laser burns tone, not color, so vivid colors that are similar in brightness (a red shirt on green grass) can flatten together; a quick look at the grayscale result in Adjust Image tells you what you're really working with.
What settings should I use for wood?
Whatever your test swatch says. Machine power, lens, wood species, and even the batch of plywood change the answer, which is why the guide teaches the swatch method instead of quoting numbers.
The photo on the shelf
There is a specific pleasure in watching someone recognize a face emerging from wood grain. Beam Bench gives you the whole pipeline for it, free: import, dither, adjust, preview, burn. And when a photo wants to be art instead of a photograph, Photo Converter turns it into clean engravable linework that drops straight into the same workflow. Grab a scrap of plywood, pick the photo you already know you want to make, and run the swatch.
Related Tools
Ready to try these tools?
Sign up free, no credit card required. Free tools available immediately.
Start Free