

Suportes para impressão 3D explicados (e como evitar precisar deles)
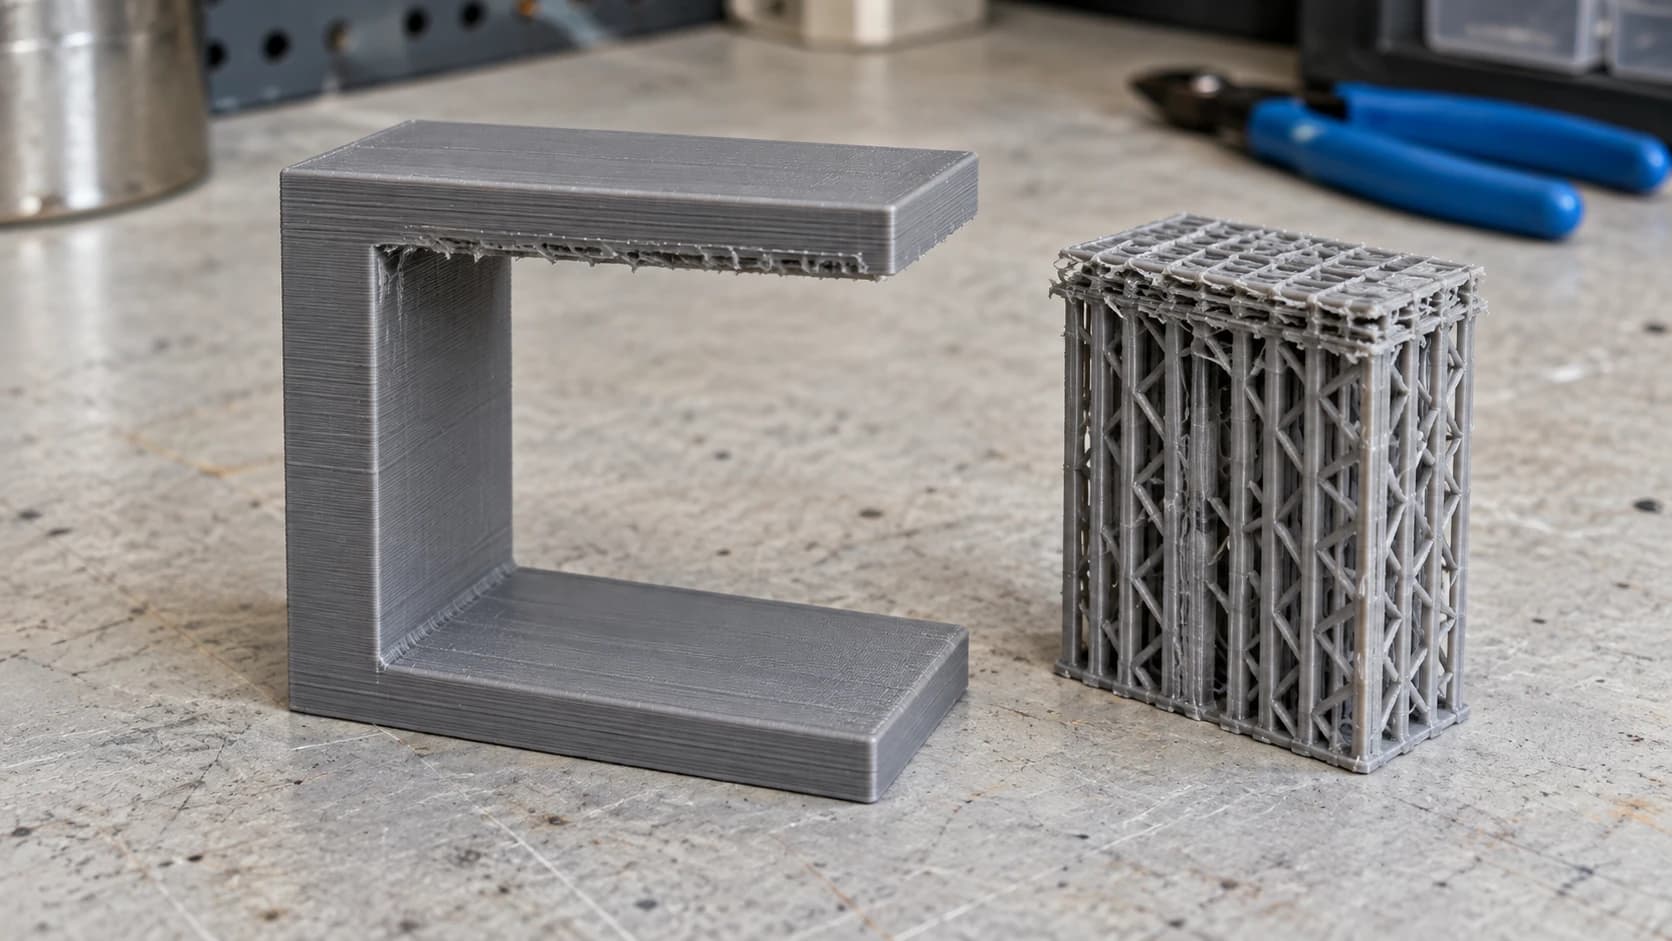
Há duas maneiras de os suportes arruinarem o seu dia.
A primeira é não usá-los e ver a impressora extrudar um belo arco no ar, onde o plástico cede até virar aquilo que a comunidade generosamente chama de espaguete.
A segunda é usá-los e passar quarenta minutos com um alicate removendo uma floresta de plástico de uma peça, para depois descobrir que a superfície por baixo parece ter sido atacada.
As duas situações acontecem quando você trata os suportes como um interruptor. Na verdade, eles são o último recurso e, na maior parte do tempo, a melhor decisão acontece antes mesmo de você abrir as configurações de suporte.
Dica
Resposta curta: uma impressora FDM só consegue construir sobre alguma coisa. Saliências com menos de aproximadamente 45 graus em relação à vertical geralmente são impressas sem suporte, vãos entre dois pontos ancorados normalmente fazem uma boa ponte e todo o resto precisa de suporte. Antes de adicionar qualquer suporte, tente girar o modelo, porque a orientação elimina mais suportes do que qualquer configuração.
Por que as saliências falham
Uma impressora FDM deposita plástico quente em camadas, e cada camada precisa se apoiar na camada abaixo. Onde não há nada por baixo, o plástico extrudado cede antes de esfriar.
A falha não acontece de uma vez, e é isso que torna a regra imprecisa. Cada camada é um pouco mais larga que a anterior, então uma inclinação suave tem a maior parte da sua largura apoiada pela camada anterior e permanece no lugar. Uma inclinação mais acentuada tem cada vez menos material por baixo, até que a borda saliente se curve, depois ceda e então arraste.
A regra dos 45 graus e por que ela é apenas uma regra prática
A convenção é que saliências de até cerca de 45 graus em relação à vertical são impressas bem sem suporte; acima disso, é preciso ajuda.
É um ponto de partida realmente útil, mas não é uma lei. A resposta real varia com:
- Resfriamento. Um resfriamento melhor da peça faz o plástico endurecer mais rápido, e uma impressora bem resfriada costuma lidar com ângulos mais acentuados.
- Altura da camada. Camadas mais finas fazem com que cada uma avance menos sobre a anterior, então camadas baixas conseguem lidar com paredes mais inclinadas.
- Velocidade. Imprimir mais devagar sobre uma saliência dá a cada camada mais tempo para solidificar.
- Material. O PLA é tolerante nesse aspecto. Outros materiais esfriam e se comportam de maneira diferente.
Por isso, o conselho honesto é imprimir um teste em vez de confiar em um número. Um modelo de teste de saliência imprime uma série de ângulos crescentes em uma única peça pequena e mostra o que sua impressora, com seu resfriamento e seu filamento, realmente consegue fazer.
IMPRIMA. CORTE. ENTALHE.



- Vários formatos (SVG, DXF, PNG)
- Designs testados em máquinas
- Licenças comerciais
Patrocinado por PrintCutCarve.com
Fazer pontes não é o mesmo que fazer saliências
Uma ponte é plástico atravessando um vão entre dois pontos que já estão apoiados, como o topo de uma porta ou um furo em uma parede vertical.
As pontes funcionam, muitas vezes surpreendentemente bem, porque a impressora consegue esticar um fio entre duas âncoras e deixá-lo esfriar tensionado. Não é necessário suporte por baixo, e adicionar suporte sob uma ponte é uma maneira comum de transformar um detalhe limpo em algo irregular.
Já uma saliência está ancorada em uma extremidade e suspensa no espaço na outra. Esse é o caso que precisa de ajuda.
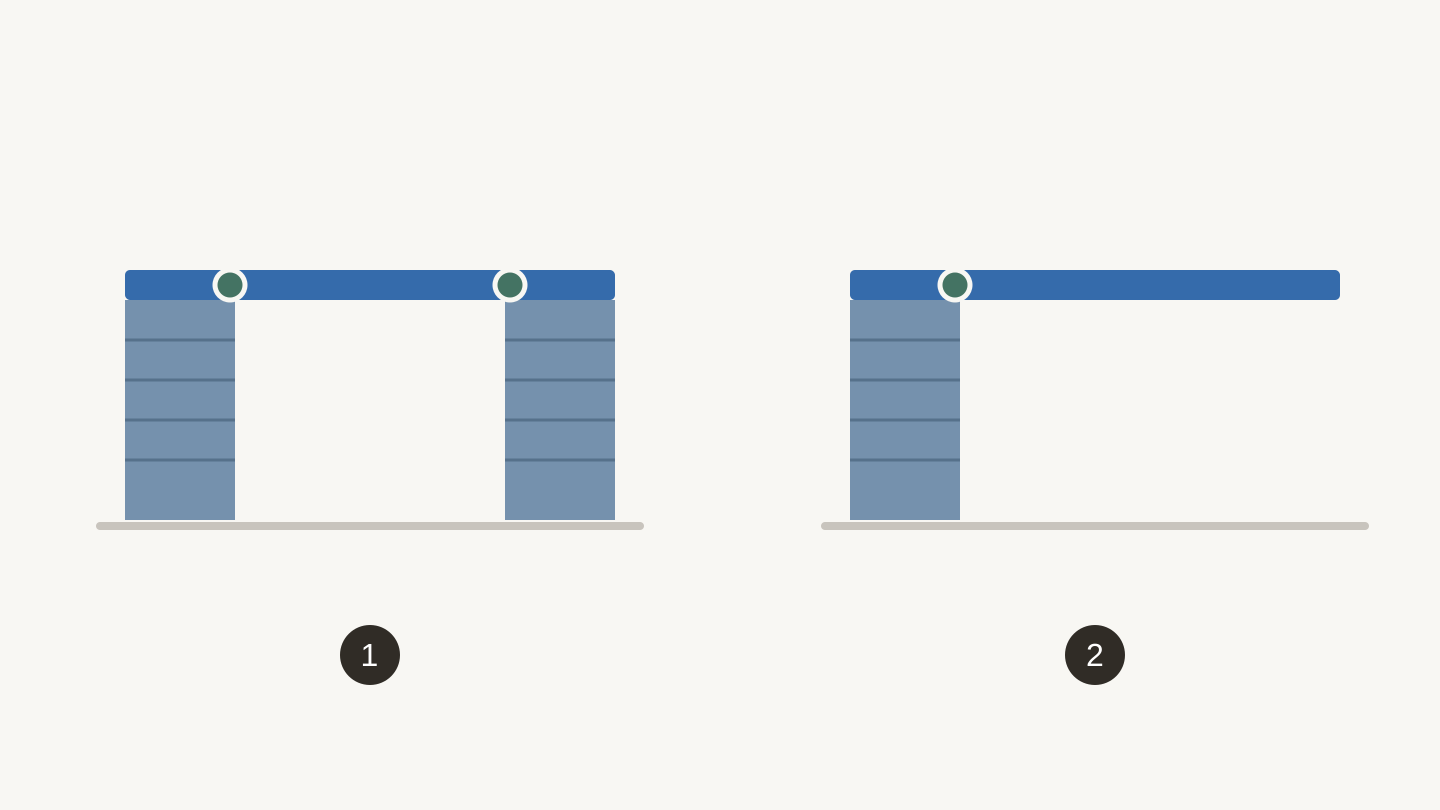
Dois vãos diferentes: 1, uma ponte entre duas âncoras; 2, um balanço que se estende a partir de uma âncora. Os pontos verdes marcam as extremidades apoiadas.
A orientação é melhor que os suportes
Esta é a parte que vale a pena internalizar, porque torna todo o resto mais fácil.
Antes de ativar qualquer coisa, gire o modelo. Coloque-o de pé, deite-o sobre a face, incline-o 45 graus. Muitos modelos que precisam de muito suporte na orientação óbvia precisam de quase nenhum em outra posição.
Três coisas devem ser avaliadas enquanto você o gira:
Onde ficarão as marcas dos suportes? Os suportes deixam marcas. Se a peça precisar ser apoiada em algum lugar, coloque as marcas em uma face que ninguém veja.
Qual direção suporta a carga? A adesão entre camadas é o eixo fraco. Uma peça que sofrerá esforço deve ter suas camadas atravessando a carga, não acompanhando-a.
A orientação cria um problema maior? Uma rotação que remove suportes, mas deixa uma área de contato minúscula com a mesa troca uma falha por outra.
Também é perfeitamente válido dividir um modelo em duas partes e colá-las depois; muitas vezes isso remove todos os suportes de uma só vez.
Elimine a saliência no projeto
Se você mesmo está criando o modelo, alguns hábitos eliminam os suportes antes que eles existam:
Use um chanfro em vez de uma saliência. Um chanfro de 45 graus sob um detalhe projetado para fora é impresso sem suporte onde uma prateleira quadrada não seria.
Dê formato de gota aos furos horizontais. Um furo redondo atravessando uma parede vertical tem um topo sem suporte. Remodelar o topo como uma ponta permite que ele se sustente sozinho.
Mantenha as pontes curtas e ancoradas nas duas extremidades.
Deixe a face plana voltada para baixo sempre que o projeto permitir.
As configurações que determinam se eles sairão
Se os suportes forem inevitáveis, algumas configurações separam “se solta inteiro de uma vez” de “projeto de arqueologia”.
| Configuração | O que ela faz | Efeito prático |
|---|---|---|
| Distância Z (distância superior) | Espaço entre o suporte e a peça acima dele | A principal. Pequena demais, solda as peças; grande demais, deixa a saliência ceder |
| Distância XY | Espaço horizontal entre o suporte e as paredes da peça | Evita que os suportes se fundam às superfícies verticais |
| Camadas de interface | Uma base densa diretamente sob a peça | Melhor acabamento superficial, remoção mais difícil |
| Densidade | Quantidade de material no corpo do suporte | Maior estabilidade e mais material para remover |
| Padrão | Geometria interna | Afeta tanto a estabilidade quanto a facilidade de desprendimento |
A distância Z é o ponto de partida para o ajuste e interage com a altura da camada; por isso, um valor copiado do perfil de outra pessoa costuma se comportar de maneira diferente na sua impressora. Defina-a como um múltiplo da altura da camada, em vez de um número absoluto, e ela funcionará melhor entre perfis.
Suportes normais ou suportes árvore
A maioria dos fatiadores oferece os dois.
Suportes normais sobem diretamente da mesa ou da peça, formando um bloco sólido sob tudo o que precisa ser sustentado. São previsíveis e estáveis, mas usam mais material e tocam uma área maior da superfície.
Suportes árvore crescem como galhos que avançam para tocar apenas os pontos específicos que precisam de apoio. Usam menos material, deixam muito menos marcas e são excelentes para formas orgânicas e figuras. São menos confiáveis sob saliências grandes e planas, nas quais um bloco sólido simplesmente faz um trabalho melhor.
Também existe a escolha entre apoiar em todos os lugares e apoiar somente a partir da mesa de impressão. A opção somente a partir da mesa se recusa a criar suportes sobre o próprio modelo, mantendo-os longe dos detalhes internos, mas deixa algumas saliências sem apoio.
Dica
Imprima o mesmo modelo duas vezes, com suportes árvore e normais, na primeira vez que testar uma nova classe de formas. Dez minutos de comparação ensinam mais sobre qual escolher do que qualquer guia, e o resultado é específico para cada forma, não universal.
Como removê-los sem destruir a peça
Trabalhe enquanto a peça estiver quente, se puder. Os suportes se soltam mais facilmente logo após o fim da impressão.
Use alicates de corte rente, não os dedos, em qualquer coisa com uma área de contato pequena. Arrancar os suportes puxa a superfície por baixo.
Vá de fora para dentro. Remova primeiro o volume maior e depois as partes delicadas próximas à superfície com pinças ou um estilete.
Espere marcas de contato. Mesmo as configurações perfeitas deixam uma textura um pouco mais áspera onde os suportes tocaram. Um lixamento leve remove a maior parte dela, e a orientação é o que mantém essas marcas longe das faces importantes.
Existem suportes solúveis para impressoras multimateriais, nas quais um segundo material se dissolve em água. É o resultado mais limpo disponível, mas custa um segundo extrusor e tempo de impressão.
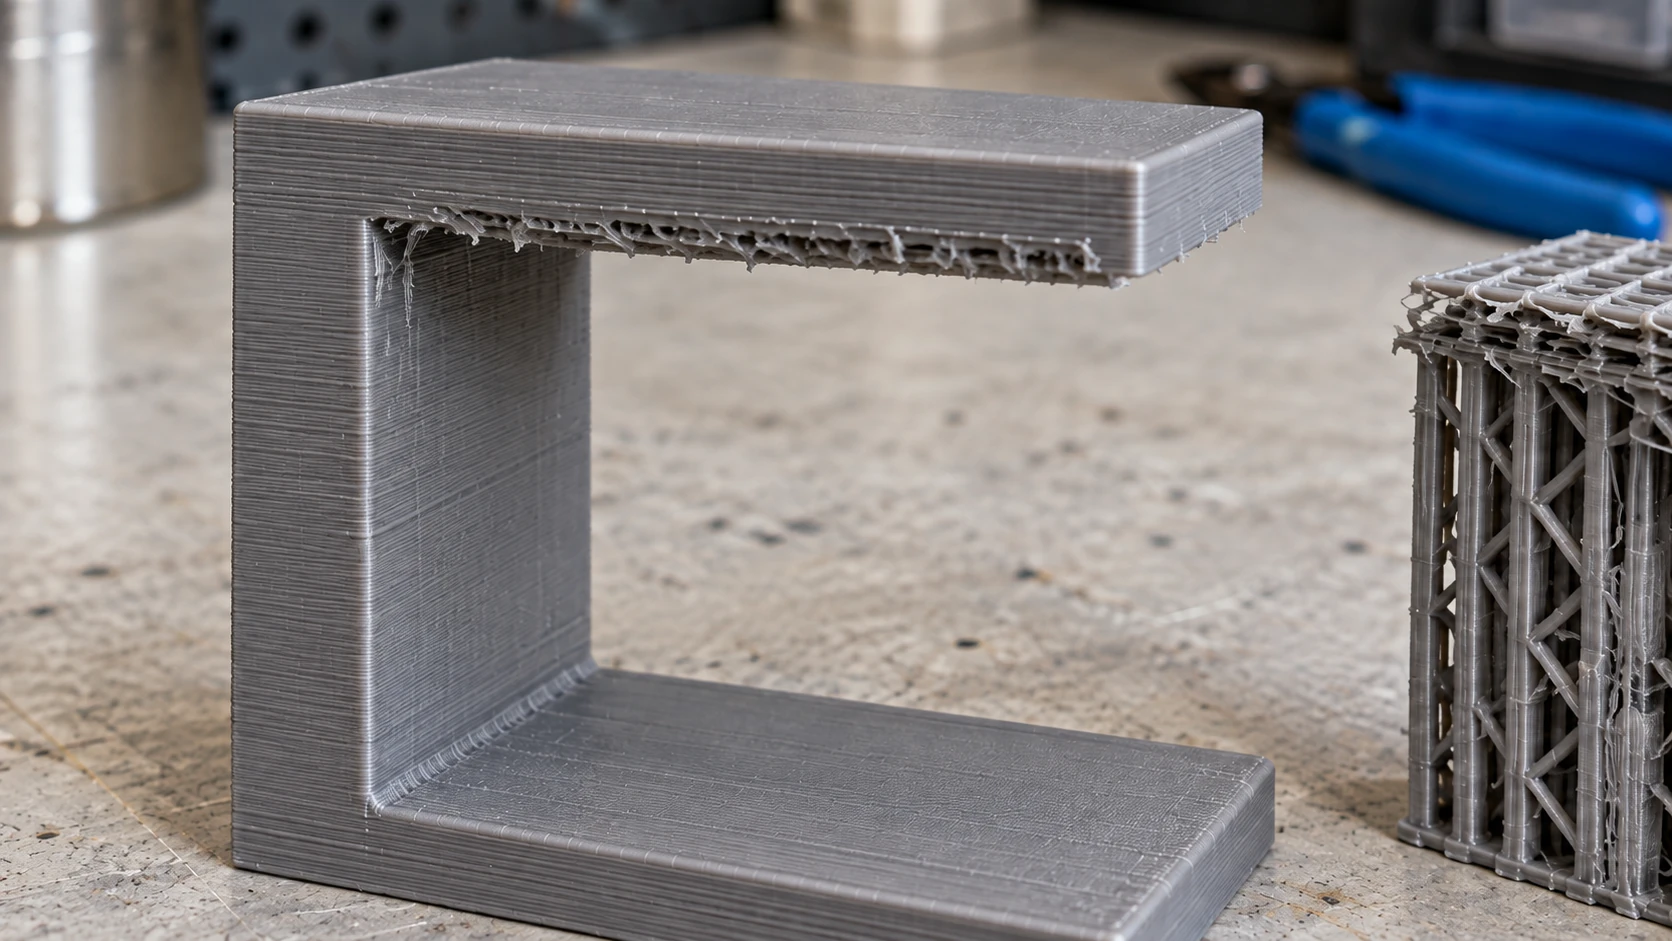
A face inferior apoiada tem uma textura diferente da parte superior e das paredes laterais. Deixe espaço para o acabamento quando essa face ficar visível.
Quando ainda dá errado
| Sintoma | Causa provável | Correção |
|---|---|---|
| Suportes soldados à peça | Distância Z pequena demais | Aumente a distância Z em múltiplos da altura da camada |
| A saliência ainda cede sobre os suportes | Distância Z grande demais | Reduza-a e verifique o resfriamento |
| Os suportes tombam no meio da impressão | Densidade baixa demais ou uma torre muito alta e fina | Aumente a densidade ou reoriente para encurtar o suporte |
| Superfície áspera e cheia de marcas sob a saliência | Suportes normais com interface densa | Tente suportes árvore ou aceite a condição e lixe |
| Suportes dentro de um furo que você não consegue alcançar | Suporte em todos os lugares | Mude para somente a partir da mesa ou redesenhe o furo |
Nosso guia de solução de problemas de impressão 3D aborda as falhas que não estão relacionadas aos suportes, e o guia para iniciantes explica os fundamentos por trás de tudo isso.
Perguntas frequentes
Quando você precisa de suportes na impressão 3D?
Quando um detalhe se projeta mais de aproximadamente 45 graus em relação à vertical sem nada por baixo. Pontes entre dois pontos ancorados normalmente não precisam de suporte, e saliências mais rasas geralmente são impressas sem problemas.
Os suportes árvore são melhores que os suportes normais?
Eles usam menos material e deixam menos marcas, o que é adequado para formas orgânicas e figuras. Suportes normais são mais confiáveis sob saliências grandes e planas. Nenhum dos dois é melhor em todos os casos.
Por que meus suportes estão fundidos à impressão?
A distância Z do suporte está pequena demais. Aumente-a, de preferência expressa como um múltiplo da altura da camada, em vez de um número fixo copiado de outro perfil.
Posso evitar completamente os suportes?
Muitas vezes, sim. Girar o modelo, dividi-lo em partes, chanfrar sob as saliências e transformar furos horizontais em gotas eliminam os suportes de muitas peças.
Os suportes deixam marcas?
Sim, sempre até certo ponto. O objetivo é colocar essas marcas em uma superfície que ninguém verá, o que é uma decisão de orientação, não de configuração.
O que é a regra dos 45 graus?
É a regra prática segundo a qual saliências de até cerca de 45 graus em relação à vertical são impressas sem suporte. Seu limite real depende do resfriamento, da altura da camada, da velocidade e do material; portanto, imprima um teste de saliência para descobrir o seu.
Imprima um teste de saliência
Antes do próximo modelo que causar preocupação, imprima um pequeno teste de saliência: uma peça com uma série de ângulos crescentes.
Você terminará com um objeto físico mostrando exatamente quando sua impressora deixa de dar conta. A partir daí, “isso precisa de suportes?” será uma pergunta respondida observando o modelo e fazendo uma comparação, em vez de adivinhar e descobrir depois de noventa minutos.
Se um modelo chegar em um formato que seu fatiador não abre, o File Converter lida com conversões de STL, OBJ e 3MF sem custo de créditos, com um plano pago necessário para baixar o resultado. E, se você estiver olhando para uma peça sem saber como orientá-la, o Craft Chat conversa sobre isso com você, gratuitamente, com sua conta.
Ferramentas relacionadas
Pronto para experimentar estas ferramentas?
Cadastre-se grátis, sem precisar de cartão de crédito. Ferramentas gratuitas disponíveis imediatamente.
Começar grátis