

Como transformar o projeto de uma prateleira ou armário em uma lista de cortes
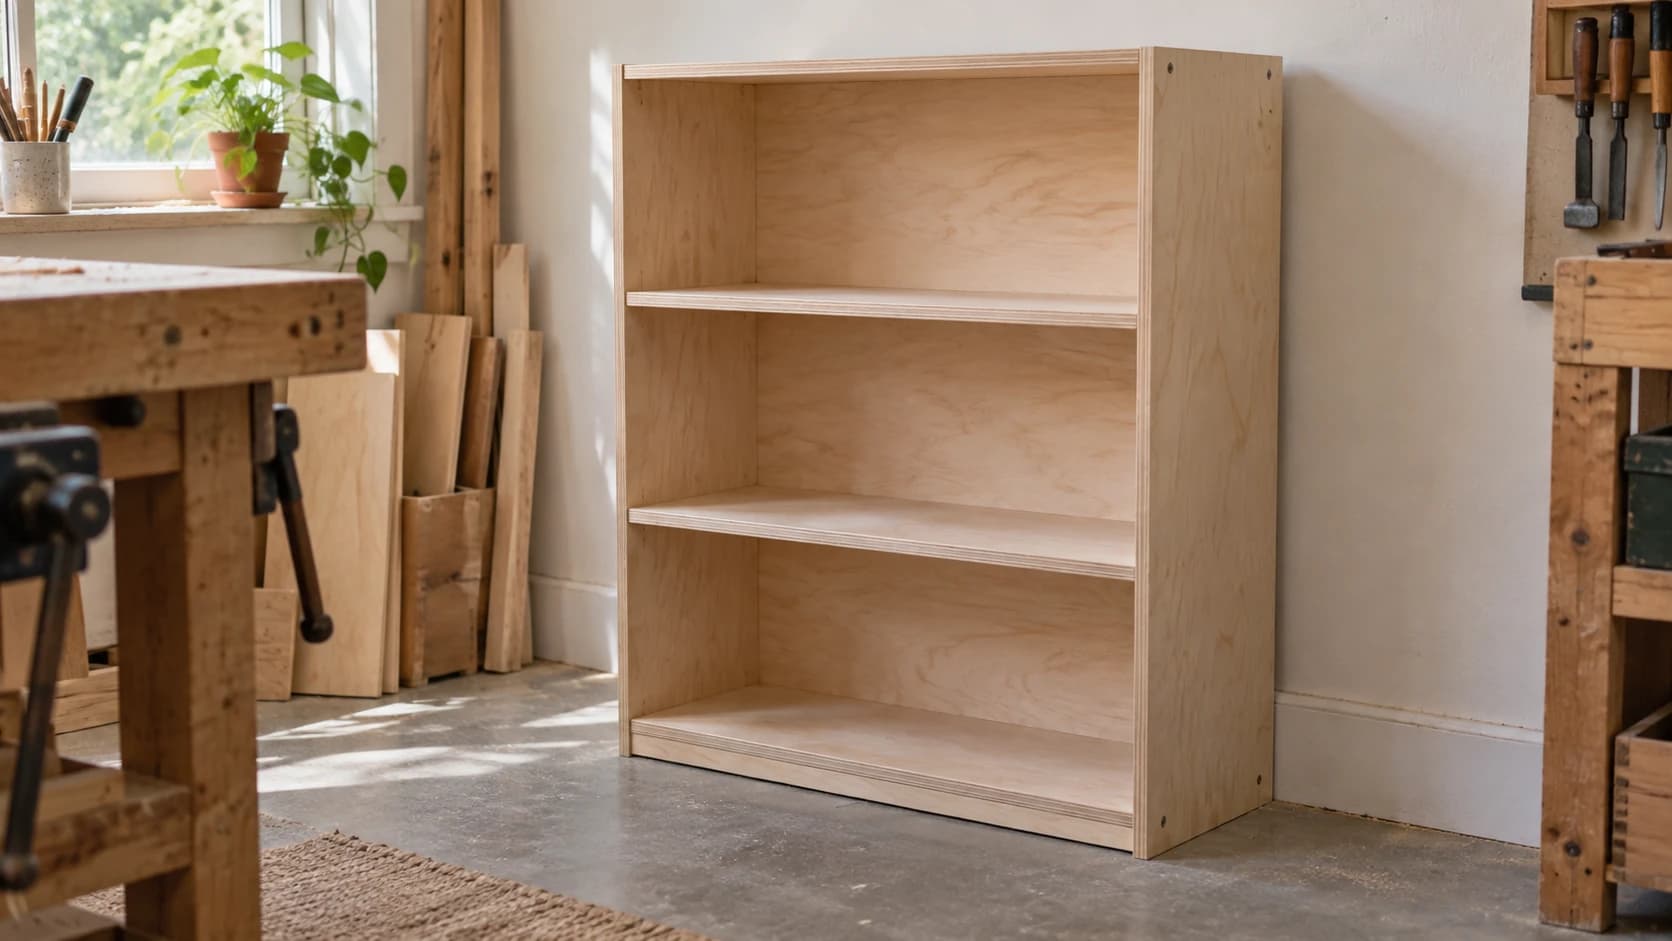
Você mediu o nicho. Ele tem 30 inches de largura. Então a prateleira tem 30 inches de largura, você anota isso e vai cortar o compensado.
Depois você monta tudo e a estante fica cerca de uma polegada e meia larga demais, porque as laterais nunca fizeram parte da sua aritmética. Ou as prateleiras têm 30 inches e simplesmente não cabem entre as laterais — é o mesmo erro usando outro chapéu.
É na lista de cortes que um projeto é realmente decidido. Todo o resto é apenas seguir instruções.
Três números definem cada peça
Antes de escrever uma única dimensão, você precisa resolver três coisas.
As dimensões externas. O espaço que o objeto pronto ocupa no ambiente. Este é o número que você mediu e o único com que o seu nicho se importa.
A espessura real do material. Não o número da etiqueta. Falaremos mais sobre isso abaixo, porque é o que mais estraga projetos.
Como as peças se encontram. Se uma prateleira fica entre as laterais ou sobre elas muda a largura dessa prateleira em uma polegada e meia. Nada mais na lista muda tanto.
Resolva essas três coisas e o restante é subtração.
IMPRIMA. CORTE. ENTALHE.



- Vários formatos (SVG, DXF, PNG)
- Designs testados em máquinas
- Licenças comerciais
Patrocinado por PrintCutCarve.com
O compensado raramente tem a espessura indicada na etiqueta
O compensado vendido como three-quarter inch geralmente tem pouco menos de 0.75 inches, e a espessura real varia entre fornecedores e linhas de produtos. A medida nominal é uma categoria, não uma medição.
Essa diferença é pequena, mas se acumula. Uma estrutura com duas laterais fica fora por duas vezes o erro. Um conjunto de armários com seis divisórias fica fora por seis vezes o erro e, na última, os seus encaixes ficam visivelmente frouxos e a moldura frontal deixa de se alinhar.
Aviso
Meça a sua chapa com paquímetros antes de escrever a lista de cortes e anote esse número. Não use 0.75 só porque a placa na loja dizia 3/4. Esse único hábito evita mais listas de cortes erradas do que qualquer outro.
Há um truque de projeto que contorna o problema: sempre que puder, organize as peças de modo que uma dimensão não dependa da espessura do material. Um painel traseiro aplicado na parte externa da estrutura tem o mesmo tamanho, independentemente da espessura que o seu compensado acabou tendo. Um painel traseiro encaixado em rebaixos não.
Um exemplo prático
Uma estante simples. Dimensões externas: 30 inches de largura, 36 inches de altura e 12 inches de profundidade. Suponha que o compensado de 3/4 meça 0.72 inches no paquímetro. As laterais percorrem toda a altura, e o topo, a base e as prateleiras cabem entre elas. Um painel traseiro de 1/4 inch é aplicado na parte de trás.
Esse painel traseiro é a primeira coisa a resolver, e ele engana as pessoas o tempo todo. Ele fica na parte externa, então acrescenta o próprio quarto de inch à profundidade final. Se as peças da estrutura tivessem 12 inches de profundidade, a estante acabaria com 12.25 inches de profundidade. Portanto, a estrutura precisa ser exatamente essa medida menor:
12 menos 0.25 = 11.75 inches de profundidade
As laterais são fáceis, porque definem o lado externo:
- Laterais: 2 peças de 36 x 11.75
Tudo que é horizontal cabe entre essas duas laterais, então cada peça perde duas espessuras de lateral:
30 menos (2 x 0.72) = 28.56 inches
- Topo e base: 2 peças de 28.56 x 11.75
- Prateleiras: 2 peças de 28.56 x 11.5
As prateleiras são intencionalmente um quarto de inch menos profundas que a estrutura, para recuarem em relação à borda frontal em vez de tentarem ficar perfeitamente niveladas. Nivelado é uma ótima ideia que nenhuma montagem consegue realizar completamente.
O painel traseiro cobre toda a face posterior, então usa as dimensões externas:
- Traseira: 1 peça de 30 x 36, em compensado de 1/4
O que resulta nisto:
| Peça | Qtd. | Comprimento | Largura | Material | Veio |
|---|---|---|---|---|---|
| Lateral | 2 | 36 | 11.75 | compensado de 3/4 | Travado, na vertical |
| Topo e base | 2 | 28.56 | 11.75 | compensado de 3/4 | Travado |
| Prateleira | 2 | 28.56 | 11.5 | compensado de 3/4 | Travado |
| Traseira | 1 | 36 | 30 | compensado de 1/4 | Livre |
Observe a última coluna. A traseira fica escondida, então pode ser girada livremente para se ajustar melhor à chapa. Todas as peças visíveis têm o veio travado. Essa distinção vale dinheiro de verdade quando as peças chegam à chapa.
Dica
Observe que a traseira é de um material diferente. As listas de cortes dão errado quando materiais de 1/4 e 3/4 são misturados em uma única lista, porque não é possível cortar uma traseira de quarto de inch de uma chapa de três quartos, por melhor que seja o encaixe. Mantenha cada espessura como um material separado, com suas próprias chapas.
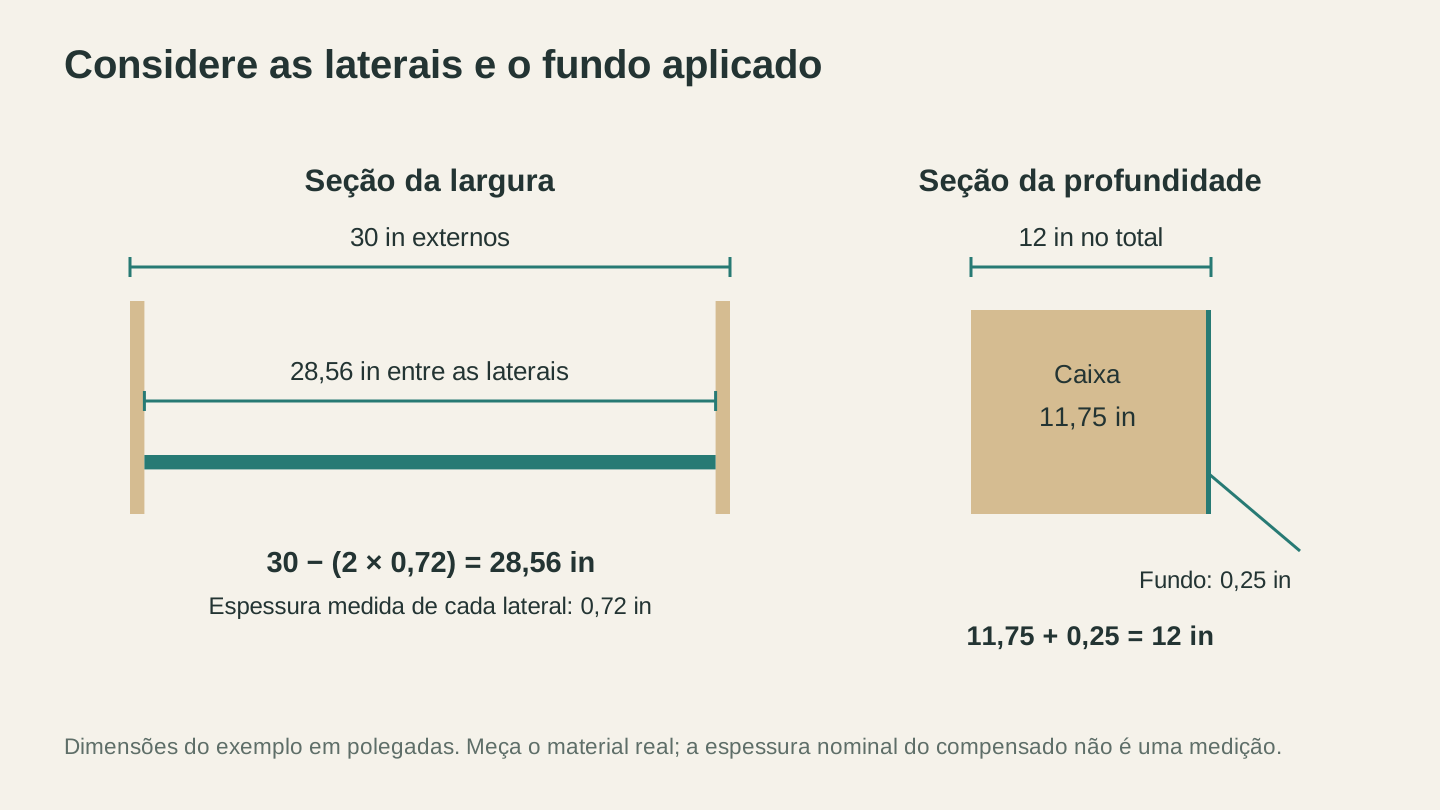
Nesta estante, 30 polegadas na parte externa menos duas laterais de 0,72 polegada deixam 28,56 polegadas entre elas. O fundo de um quarto de polegada também conta para a profundidade final.
Se você estiver usando encaixes
Os encaixes mudam um número: as peças que entram em um canal ficam mais compridas pela profundidade do canal em cada extremidade.
Se as suas prateleiras entram em encaixes de 1/4 inch de profundidade nas duas laterais, elas crescem meia inch:
28.56 + (2 x 0.25) = 29.06 inches
A prateleira ainda percorre 28.56 inches de espaço aberto. Ela apenas tem um quarto de inch enterrado em cada lateral. Esquecer isso deixa prateleiras chacoalhando nos canais, com uma folga visível nas duas extremidades — o segundo erro mais comum em listas de cortes, depois de usar a espessura nominal.
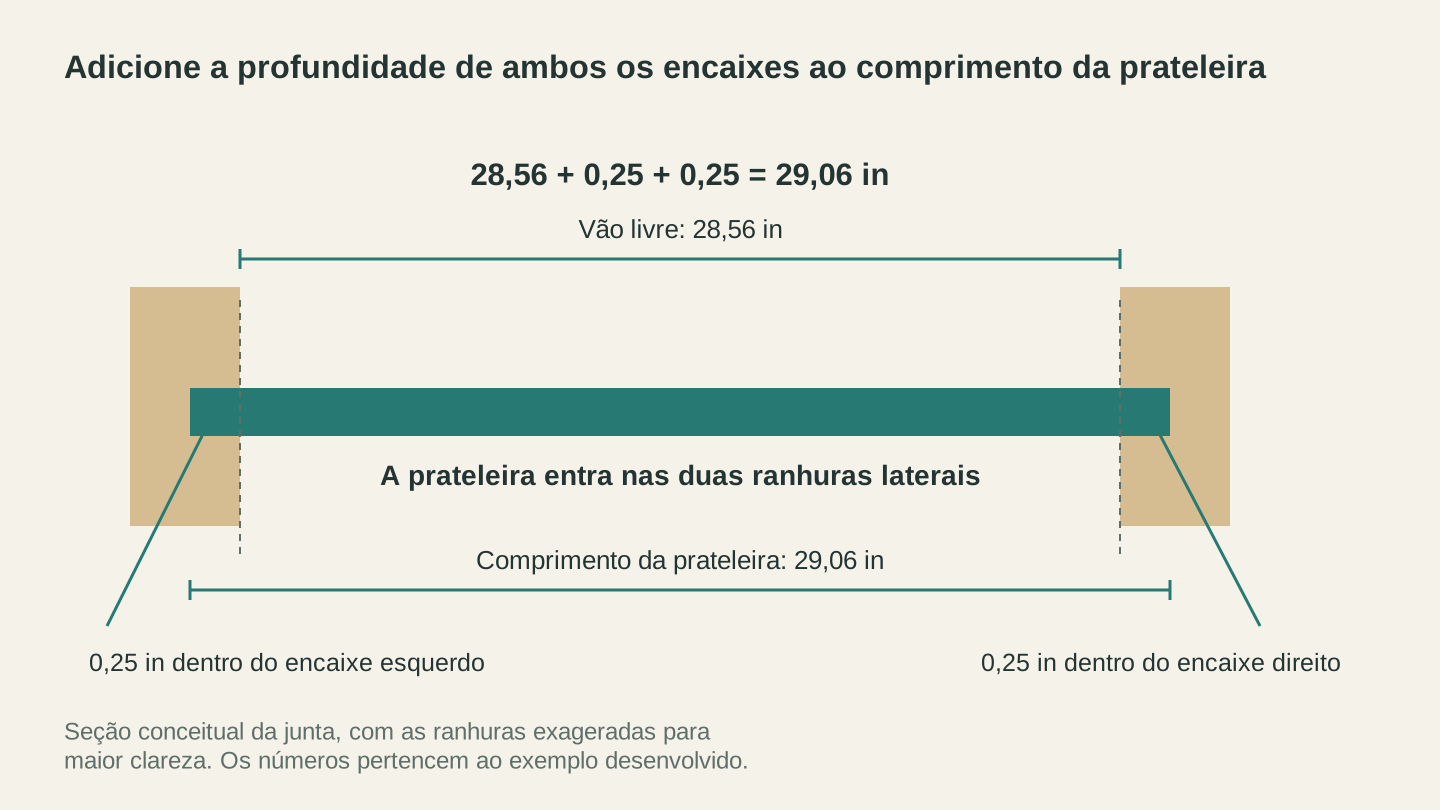
Some as duas profundidades dos encaixes ao vão livre: 28,56 + 0,25 + 0,25 = 29,06 polegadas. As juntas foram ampliadas para mostrar onde entra o comprimento adicional.
Depois, coloque tudo em uma chapa
Uma lista de cortes é uma lista de peças. Ela ainda não é um plano, e é no espaço entre os dois que o material em chapa é desperdiçado.
As chapas são vendidas em tamanhos fixos, suas peças não são, e a disposição determina quantas chapas você compra. Dois layouts que usam o mesmo número de chapas ainda podem deixar você em situações completamente diferentes: um deixa uma sobra de 40 por 12 que vira uma prateleira no mês seguinte; o outro deixa cinco tiras estreitas.
Digite a lista no CutPlan, informe o tamanho da chapa e a espessura do corte da serra, e ele distribui as peças nas chapas e escreve a sequência de cortes na ordem. Ele recalcula enquanto você digita, então você pode descobrir em segundos se prateleiras de 11 1/4 inch em vez de 12 economizam uma chapa inteira. Planejar é grátis. Nosso guia completo da ferramenta explica os modos de serra e CNC e o que o pacote de exportação contém.
Duas coisas para definir antes de confiar no layout:
Espessura do corte. Todo corte transforma uma tira em pó. Quarenta cortes de um oitavo de inch representam cinco inches de compensado que você nunca contabilizou. Nosso guia sobre espessura de corte explica como medir a sua própria lâmina.
Travamentos do veio. Trave as peças que ficam visíveis e libere as que não ficam. Na estante acima, isso significa travar as laterais, o topo, a base e as prateleiras, e liberar a traseira. Liberar um painel grande e oculto costuma ser a diferença entre duas chapas e três.
Os erros que custam chapas
Usar a espessura da etiqueta. Já mencionamos isso, e vale repetir porque é o erro que todo mundo comete duas vezes.
Esquecer a espessura do corte. Especialmente em uma sequência de peças iguais. Cinco prateleiras significam quatro espessuras de corte de material desaparecendo entre elas.
Esquecer a traseira. É a maior peça individual na maioria dos armários, é a que as pessoas deixam fora do esboço e, se for aplicada na parte externa, muda a profundidade de todas as outras peças da lista.
Misturar materiais em uma única lista. Separe cada espessura.
Escrever a lista a partir do desenho, em vez de partir da marcenaria. O desenho mostra o lado externo. A lista de cortes precisa descrever peças, e as peças são as dimensões externas menos a forma como se encontram.
Não planejar para a fita de borda. Se você aplicar fita nas bordas expostas do compensado, essa fita acrescentará espessura em cada borda que cobrir. Normalmente pode ser ignorada, mas não em uma peça que precisa caber em uma abertura existente.
Perguntas frequentes
Como faço uma lista de cortes para um armário?
Comece pelas dimensões externas, depois subtraia a espessura do material para cada peça que se encaixa entre duas outras e acrescente a profundidade do encaixe para as peças que entram em canais. Use a espessura medida do seu compensado, nunca a espessura nominal da etiqueta.
O compensado de 3/4 tem mesmo 3/4 inch de espessura?
Geralmente não. Ele costuma medir um pouco menos, e o valor real varia conforme o fornecedor e a linha de produtos. Meça a chapa que você tem e use esse número.
Preciso considerar a espessura do corte em uma lista de cortes?
A lista de cortes contém os tamanhos finais das peças, então a espessura do corte não altera esses tamanhos. Ela importa quando você distribui as peças na chapa, porque cada corte consome material entre elas.
Em que ordem devo cortar as peças?
Uma abordagem comum é fazer primeiro os cortes longitudinais e depois os transversais, trabalhando das peças maiores para as menores, embora a ordem certa dependa do seu layout e alguns planos comecem com um corte transversal para tornar uma chapa inteira mais fácil de manusear. Seja qual for a sua escolha, mantenha uma borda de referência reta conhecida pelo maior tempo possível e verifique a borda de fábrica antes de confiar nela, pois ela nem sempre é tão reta quanto parece.
O veio da prateleira deve correr no sentido do comprimento ou da largura?
Duas coisas estão em jogo. Nas peças visíveis, combinar a direção do veio do folheado da face importa para a aparência, e uma diferença entre peças vizinhas fica imediatamente evidente depois que a peça é finalizada. Em uma prateleira que suportará peso, a orientação também é estrutural: o compensado tem um eixo de resistência, e um vão fica mais rígido quando o veio da face corre ao longo dele. Para uma prateleira carregada, siga primeiro o eixo de resistência do painel e as orientações do fabricante; depois, preocupe-se com a aparência.
Escreva uma antes de comprar o compensado
Pegue o que estiver em seguida na sua lista de construção e anote as peças: nome, quantidade, comprimento, largura e material. Meça primeiro a espessura real da sua chapa e use esse número na subtração.
Depois, coloque tudo no CutPlan antes de ir à loja. Descobrir que o seu projeto de três chapas é, na verdade, um projeto de duas chapas é o intervalo de vinte minutos mais barato da marcenaria — e você descobre isso antes de o compensado estar no caminhão, não depois.
Ferramentas relacionadas
Pronto para experimentar estas ferramentas?
Cadastre-se grátis, sem precisar de cartão de crédito. Ferramentas gratuitas disponíveis imediatamente.
Começar grátis