

Heat Transfer Vinyl for Beginners: Your First Shirt Without the Tears
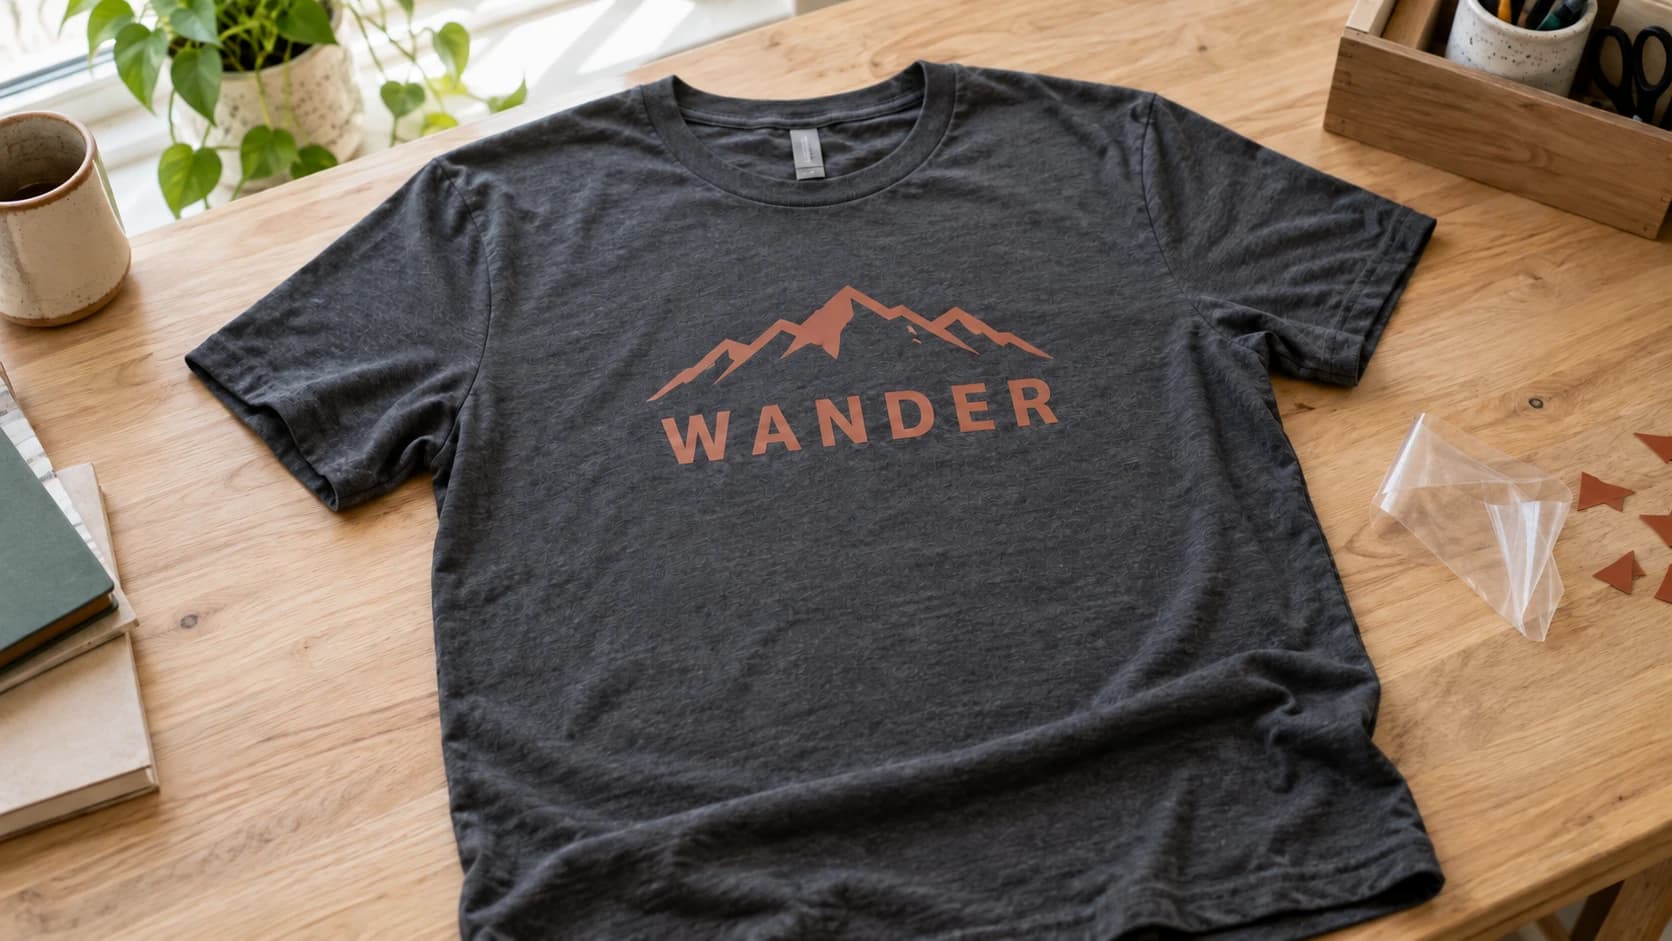
Somewhere out there is a drawer full of first attempts: shirts with backwards text, designs that peeled off in the wash, vinyl that melted into a sad shiny wrinkle under a too-hot iron. Heat transfer vinyl has a handful of rules, and every single one of them is learnable the easy way or the expensive way.
This is the easy way, tuition already paid by everyone else's ruined blanks.
What Heat Transfer Vinyl Actually Is
Heat transfer vinyl (HTV, sometimes called iron-on) is a thin film, usually polyurethane or PVC, with a heat-activated adhesive on one side and a clear plastic carrier sheet on the other. It does nothing until you press it with heat. Then the adhesive melts into the fibers of the fabric and grabs hold.
That heat-activated part is the whole difference from the adhesive vinyl you'd use for decals and stickers. Adhesive vinyl is sticky out of the box, sticks to hard smooth surfaces, and would fall off a t-shirt by lunchtime. HTV is inert until heated and bonds to fabric. They look similar on the roll and they are not interchangeable.
| Heat Transfer Vinyl (HTV) | Adhesive Vinyl | |
|---|---|---|
| Sticks via | Heat-activated adhesive | Pressure-sensitive adhesive (sticky now) |
| Goes on | Fabric: shirts, totes, hats, hoodies | Hard surfaces: tumblers, laptops, glass, walls |
| Carrier | Clear carrier sheet, already attached | Separate transfer tape you apply yourself |
| Cut orientation | Mirrored, shiny side down | Not mirrored, vinyl side up |
| Applied with | Heat press or household iron | Your thumb and a squeegee |
If your project is a mug, a car window, or a laptop lid, you want adhesive vinyl instead, and our vinyl decals and stickers guide walks that whole workflow. If your project involves fabric, keep reading.
PRINT. CUT. CARVE.



- Multiple formats (SVG, DXF, PNG)
- Machine-tested designs
- Commercial licenses
Sponsored by PrintCutCarve.com
The Two Rules You Cannot Skip
Everything else in HTV is adjustable. These two are not.
Rule 1: Always mirror your design
HTV is cut from the back. The carrier sheet sits on the front of the vinyl, so the sheet goes face down on the cutting mat and the blade cuts the adhesive side. That means the machine sees your design in reverse, and if you don't flip it first, your finished shirt reads backwards.
Your cutting program has a mirror or flip-horizontal toggle for exactly this reason. Turn it on for every cut of standard carrier-backed HTV, even designs with no text. A backwards snowflake might survive. A backwards name will not, and you find out only after the vinyl is cut, weeded, and pressed. (One common exception is printable heat-transfer material, which works face up; specialty products set their own rules, so follow their instructions.)
Warning
Mirror first, then cut. Say it out loud if you have to. The most common HTV mistake in existence is a design that was weeded and pressed beautifully and still reads backwards. We've all donated at least one shirt to that cause.
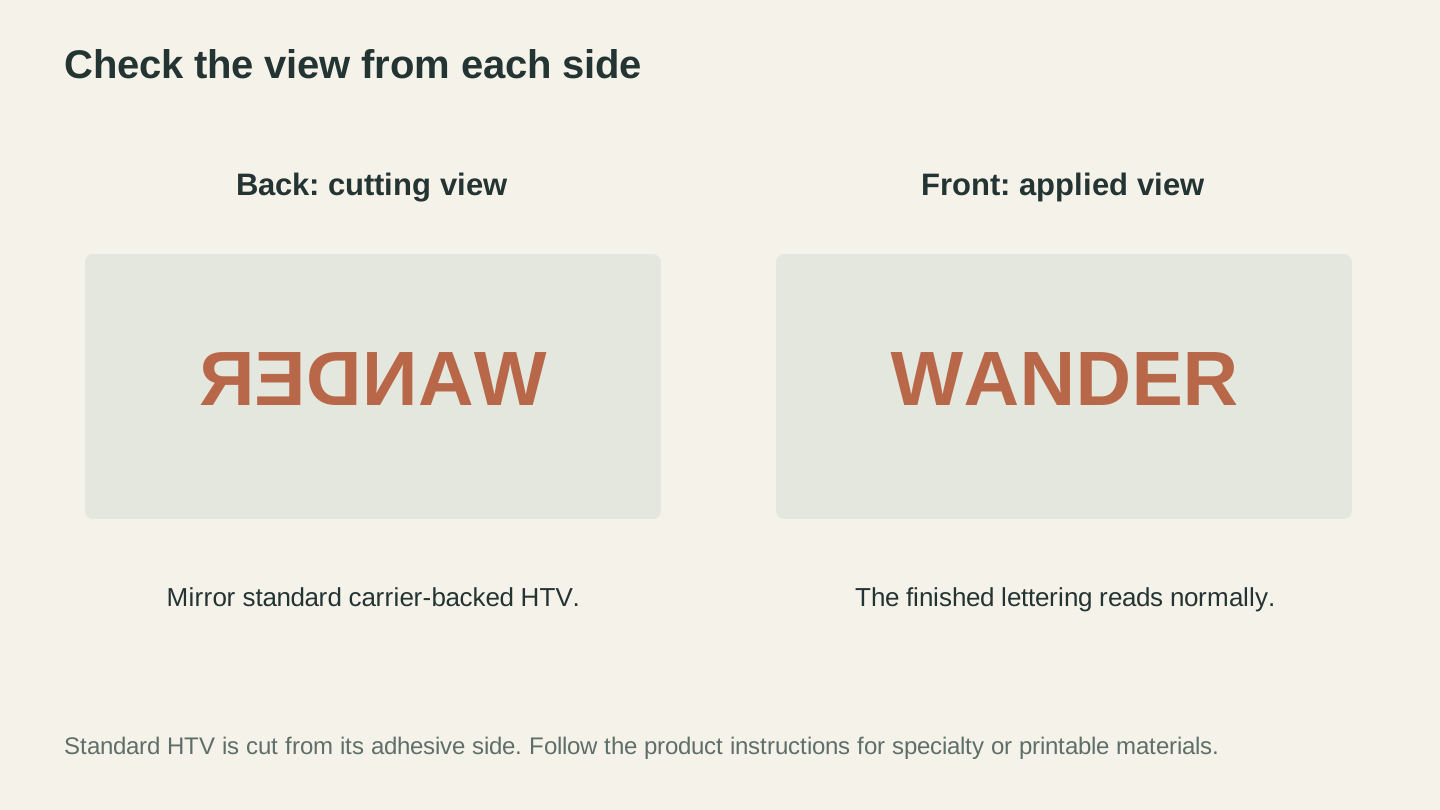
For standard carrier-backed HTV, mirror the design before cutting from the adhesive side. The front reads normally after application.
Rule 2: Shiny side down
The glossy side of an HTV sheet is the carrier. It faces down on the mat, so the duller adhesive side faces up toward the blade. Load it shiny side up and you'll cut through the carrier instead of the vinyl, which ruins the sheet.
Some specialty HTV (glitter especially) makes the shiny/dull call confusing. When in doubt, the carrier side is the smoother, plasticky one that flexes like a transparency sheet. The vinyl manufacturer's product page will say which side is which.
Cutting: You Want a Kiss Cut
An HTV cut should slice through the vinyl layer and stop at the carrier sheet. That's called a kiss cut. The carrier stays intact so it can hold your whole design in position, letters, dots on the i's and all, until the heat press does its job.
Start with your machine's built-in preset for iron-on or HTV, then test cut a small square in a corner of the sheet before committing to the full design. Peel the test square: the vinyl should lift cleanly while the carrier underneath shows only a faint score line. If the carrier tore, your blade is too deep. If the vinyl wouldn't release, too shallow.
Where does the design itself come from? Any clean SVG cuts well. If you're starting from a PNG, a sketch, or a piece of artwork, MonoTrace converts images to cut-ready SVG outlines for free, no credits required. And if you want to build or edit the artwork first, Canvas Pro is a free full browser image editor with layers, brushes, and text. A nice pipeline for original designs: draw it in Canvas Pro, export the PNG, run it through MonoTrace, and cut the resulting SVG.
Tip
Simple designs weed faster and last longer. Thin strokes, tiny counters (the holes in letters like e and a), and delicate flourishes are all places where HTV lifts first. For your first few projects, bold and chunky beats fine and fancy.
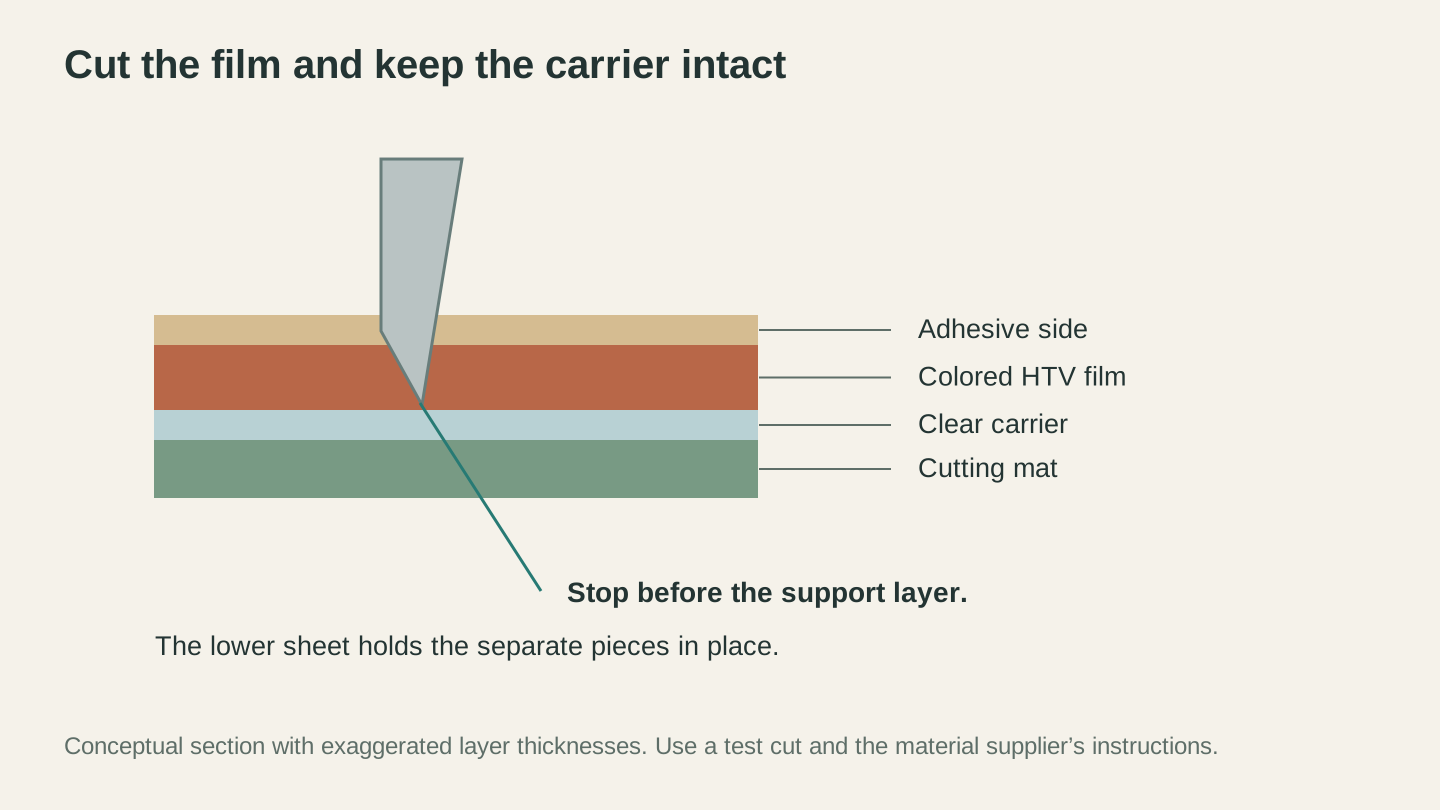
Cut through the adhesive and colored film while keeping the carrier intact. This section exaggerates the layer thicknesses to show their order.
Weeding: Remove Everything That Isn't the Design
Weeding means picking away all the vinyl that isn't part of your design, leaving only the artwork on the carrier sheet. Use a weeding hook or a sharp pin, work from a corner, and pull the excess back over itself at a low angle rather than straight up.
Two things make weeding dramatically easier:
- Good light at an angle. Kiss-cut lines are nearly invisible straight on. Raking light across the sheet makes every cut line pop.
- Weeding while warm. A few seconds of gentle warmth (some people briefly lay the sheet on the still-warm press) softens the vinyl and helps edges release. Optional, but pleasant.
Don't forget the insides of letters. Nothing says first project like a pressed shirt where every o is a solid blob.
Pressing: Iron vs Heat Press, Honestly
Here's the truth nobody selling heat presses wants to lead with, and nobody selling "just use your iron!" wants to admit either.
A household iron works with many standard HTV products. Plenty of people press their first dozen projects with one. Check the spec sheet first though: it will say whether your vinyl allows iron application, and a few specialty vinyls don't. But an iron has hot spots, steam holes that press nothing, and no way to measure actual pressure. Results are inconsistent: the center bonds beautifully and a corner lifts after the second wash. For occasional small projects, it's fine. Use a firm surface (not a squishy ironing board), turn steam off, and lean in with real body weight.
A heat press exists because HTV bonding is a three-variable equation: temperature, time, and pressure. A press holds all three steady across the whole design. If you find yourself making shirts regularly, an entry-level press pays for itself in un-ruined blanks surprisingly fast.
As for the actual numbers: use the settings printed on your vinyl's spec sheet. Every brand and every finish (smooth, glitter, flock, metallic) has its own temperature, press time, and peel instructions, and they genuinely differ. The spec sheet also gives your vinyl's peel timing: hot peel (remove the carrier immediately), warm peel, or cold peel (let it cool completely first). Peeling a cold-peel vinyl hot will lift your design right off the shirt, so this one line of the spec sheet matters as much as the temperature.
A few habits that help regardless of brand:
- Pre-press the blank for a few seconds to drive out moisture and wrinkles.
- Use a pressing pillow or folded towel inside shirts with seams, zippers, or buttons nearby, so the design area sits proud and gets even pressure.
- Cover the design with a Teflon sheet or parchment before pressing.
- Press, don't slide. An iron gets picked up and set down on the next zone, never dragged across the carrier.
What Fabrics Work
HTV is happiest on the fabrics most blanks are made from:
| Fabric | HTV friendly? | Notes |
|---|---|---|
| Cotton | Yes | The classic. Easy mode. |
| Polyester | Yes | Use vinyl rated for it and watch the temperature; polyester can scorch at heat cotton shrugs off, so follow the vinyl's polyester guidance. |
| Cotton/poly blends | Yes | Most commercial blanks. Very forgiving. |
| Canvas, denim, tote bags | Yes | Sturdy and flat. Great first projects. |
| Nylon | Only with HTV rated for it | Standard HTV struggles here; several brands make a nylon-rated vinyl that works well. |
| Waterproof or coated fabrics | Mostly no | The coating blocks the adhesive, and some melt under press heat. |
| Delicates (silk, thin acrylic knits) | Risky | Many can't take standard press heat. Check the fabric's tolerance against the vinyl's instructions and test somewhere hidden first. |
A plain cotton tote is arguably the perfect first HTV project: flat, cheap, no seams in the way, and no sizing to get wrong. For a wider tour of what your machine can handle beyond fabric, see our Cricut and Silhouette materials guide.
Layering HTV
Multi-color designs are done by pressing layers in sequence, and there are real rules:
- Press the bottom layer first, but only briefly. A short tack press holds it in place; your vinyl's layering instructions give the exact tack time. Full press time comes with the final layer, so early layers don't get overcooked.
- Each layer needs its own mirrored cut. Design the colors as separate pieces that align, not one image.
- Avoid stacking large areas. Overlap edges slightly where colors meet instead of burying a full sheet of vinyl under another. Thick stacks feel like cardboard and crack sooner.
- Specialty vinyls usually go on top. Most glitter and metallic finishes are designed to be the last layer and won't accept another layer over them. A few products allow specific combinations, so check your vinyl's own layering guidance before planning the stack.
Start with two colors before attempting five. Alignment is a skill, and the carrier sheet's transparency is your friend: you can see the layer below through it while positioning.
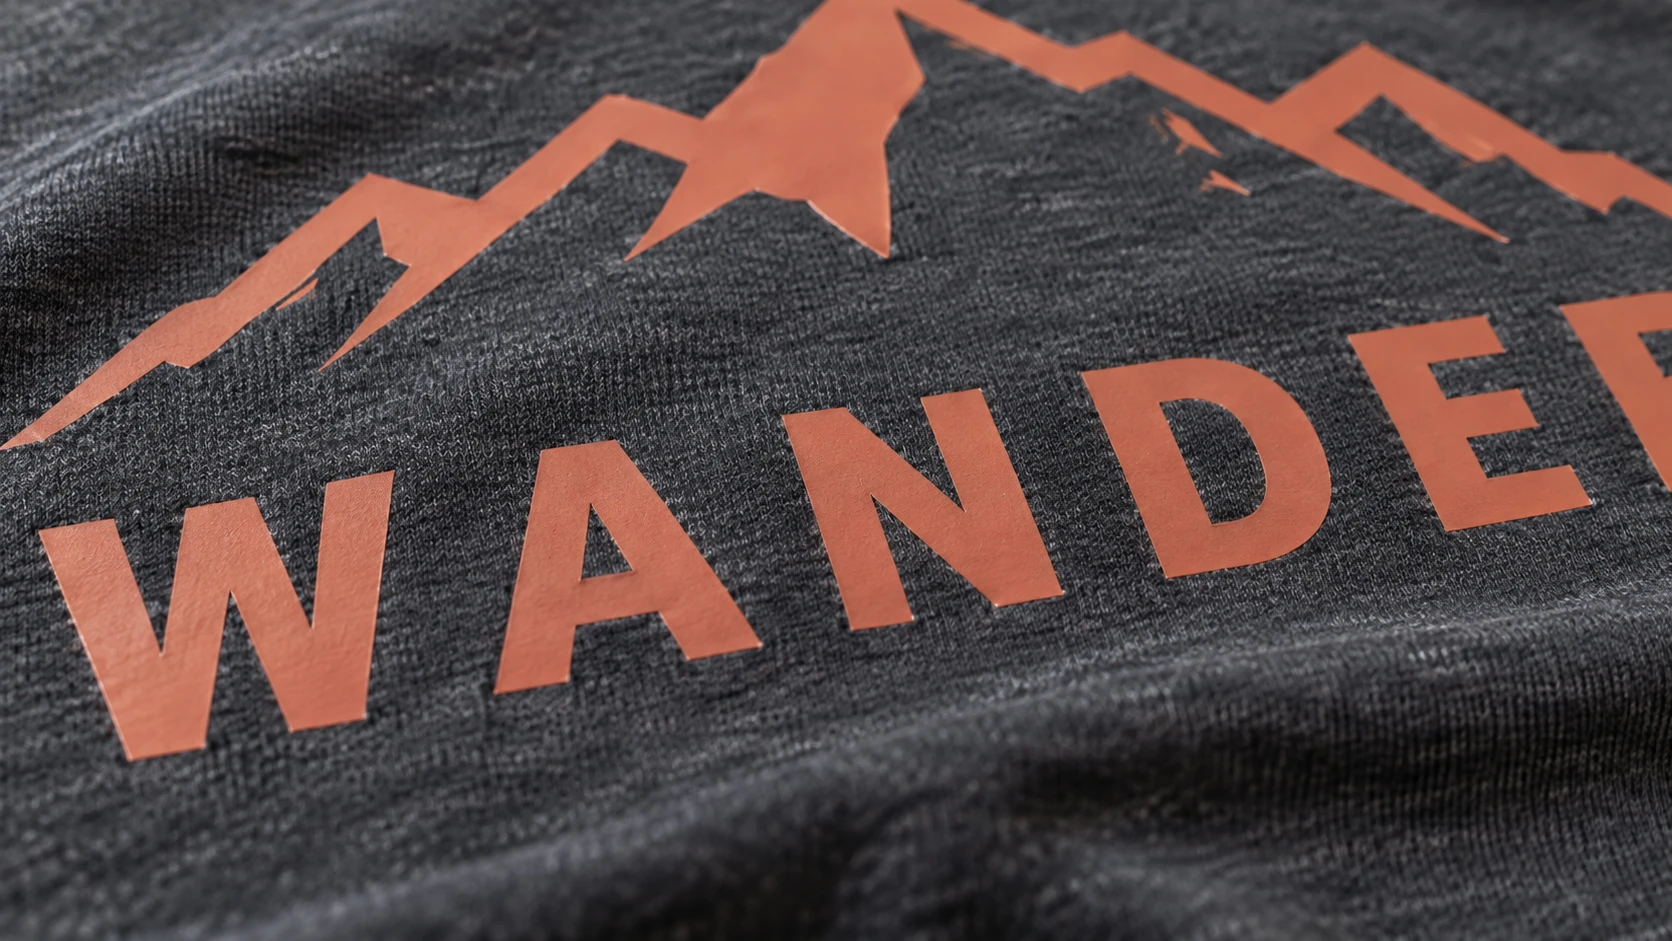
The same shirt at close range. The design is a thin film on the fabric, with no carrier rectangle left around the lettering.
The First Wash, and Why Designs Fail
Your press job meets its judge in the laundry. Give the adhesive time to fully cure before the first wash. Major manufacturers specify a 24 hour wait, and your vinyl's spec sheet will say. Then, for the life of the garment: wash inside out in cold or warm water, skip bleach, follow the care sheet on fabric softener (many brands tell you to leave it out), and air dry or tumble low. Never iron directly on the vinyl; if you must touch it up, cover it first.
When something does go wrong, the failure tells you the cause:
| Symptom | Likely cause | Fix next time |
|---|---|---|
| Edges lifting or peeling | Not enough pressure or time | More body weight or a firmer press, full spec-sheet time, re-press with a cover sheet |
| Design wrinkled or shrunken, shiny surface | Too hot or pressed too long | Drop to the spec-sheet temperature; the vinyl overheated |
| Whole design lifted with the carrier | Wrong peel timing | Check the peel timing (hot, warm, or cold) on the spec sheet |
| Cracking after several washes | Layers too thick, or dried on high heat | Overlap instead of stacking; dry low |
| Fine details missing after pressing | Details too small for HTV | Bolder design; thicken thin strokes before cutting |
Info
Short answer for the impatient: mirror the design, shiny side down, kiss cut, weed the excess, press with the exact temperature, time, and peel method on the vinyl manufacturer's spec sheet, and wait out the cure time it specifies before washing inside out. That's the whole craft; the rest is practice.
Your First Project This Weekend
Here's a first run with almost nothing to go wrong:
- Pick a cotton tote or a cheap cotton tee.
- Choose a bold, single-color design. Trace or clean one up with MonoTrace, or build something of your own in Canvas Pro and trace the exported PNG. Both are free tools.
- Mirror it. Cut it shiny side down with a test cut first.
- Weed it under a good lamp.
- Press it exactly as the vinyl's spec sheet says, cover sheet on top.
- Wait for the cure, wash inside out, and admire your survivor.
Once the basics feel boring (they will, faster than you think), the whole world of blanks opens up: hoodies, hats, onesies, aprons, team shirts. Our roundup of what you can make with a Cricut is full of places to take it.
Ready to cut something? Start your design with Canvas Pro and turn it into a clean cut file with MonoTrace. Both are free, and neither will judge you for that one backwards shirt in the drawer.
Related Tools
Ready to try these tools?
Sign up free, no credit card required. Free tools available immediately.
Start Free